
Operating Instructions
Page 3
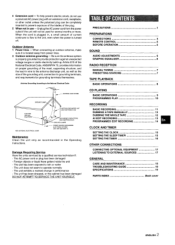
... the antenna system is turned off. The unit does not seem to rain or water - The unit exhibits a marked change in use - PRECAUTIONS l PREPARATIONS CONNECTIONS 3 REMOTE CONTROL 5 BEFORE OPERATION 5 SOUND AUDIO ADJUSTMENTS 6 GRAPHIC EQUALIZER 6 RADIO RECEPTION MANUAL TUNING 7 PRESETTING STATIONS 7 TAPE PLAYBACK BASIC OPERATIONS 8 CD PLAYING BASIC OPERATIONS 9 PROGRAMMED PLAY 10 RECORDING...
... the antenna system is turned off. The unit does not seem to rain or water - The unit exhibits a marked change in use - PRECAUTIONS l PREPARATIONS CONNECTIONS 3 REMOTE CONTROL 5 BEFORE OPERATION 5 SOUND AUDIO ADJUSTMENTS 6 GRAPHIC EQUALIZER 6 RADIO RECEPTION MANUAL TUNING 7 PRESETTING STATIONS 7 TAPE PLAYBACK BASIC OPERATIONS 8 CD PLAYING BASIC OPERATIONS 9 PROGRAMMED PLAY 10 RECORDING...
Operating Instructions
Page 4
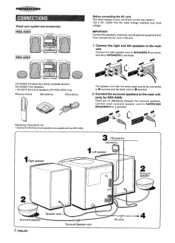
... L terminal. Operating Instructions, etc * Optional SX-R275 Surround speakers are no differences between the surround speakers. CX-NA303 Compact disc stereo cassette reciever SX-NA302 Front speakers * SX-R275 Surround speakers (For NSX-A304 only) Remote control m AM antenna FM antenna The speaker cord with the NSX-A304. local IMPORTANT Connect the speakers, antennas...
... L terminal. Operating Instructions, etc * Optional SX-R275 Surround speakers are no differences between the surround speakers. CX-NA303 Compact disc stereo cassette reciever SX-NA302 Front speakers * SX-R275 Surround speakers (For NSX-A304 only) Remote control m AM antenna FM antenna The speaker cord with the NSX-A304. local IMPORTANT Connect the speakers, antennas...
Operating Instructions
Page 6
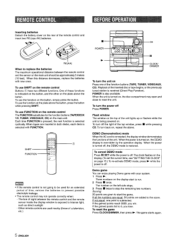
... is connected, the display window demonstrates the functions of the unit. s POWER h ~ -/ -- !:-- --- CLOCIU DIMMER To turn back on the remote control Buttons @ have two different functions. To reset the game Press CLOCW-DIMMER, then press >. When the power is turned off . If the gained ...points reach 9999, you lose. Each time FUNCTION is pressed, the next function is subtracted. To use FUNCTION on the remote control The FUNCTION substitutes for an extended period of time, remove the batteries to prevent possible electrolyte leakage. Scoring: 20 points are used...
... is connected, the display window demonstrates the functions of the unit. s POWER h ~ -/ -- !:-- --- CLOCIU DIMMER To turn back on the remote control Buttons @ have two different functions. To reset the game Press CLOCW-DIMMER, then press >. When the power is turned off . If the gained ...points reach 9999, you lose. Each time FUNCTION is pressed, the next function is subtracted. To use FUNCTION on the remote control The FUNCTION substitutes for an extended period of time, remove the batteries to prevent possible electrolyte leakage. Scoring: 20 points are used...

Operating Instructions
Page 7
...is originally emphasized. Select one of the speakers or headphones may be freely varied without affecting the recording. 16 ENGLISH To select with the remote control press T-BASS while pressing SHIFT. In this case, cancel the T-BASS system. DIM-OFF: The normal display is dimmer than DIMMER ...1, and the illumination on the remote control. Sound adjustment during recording The output volume and tone of GRAPHIC EQUALIZER. The volume level is automatically set to select the dimmer mode as...
...is originally emphasized. Select one of the speakers or headphones may be freely varied without affecting the recording. 16 ENGLISH To select with the remote control press T-BASS while pressing SHIFT. In this case, cancel the T-BASS system. DIM-OFF: The normal display is dimmer than DIMMER ...1, and the illumination on the remote control. Sound adjustment during recording The output volume and tone of GRAPHIC EQUALIZER. The volume level is automatically set to select the dimmer mode as...
Operating Instructions
Page 8
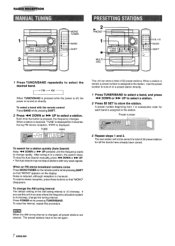
... may not stop the Auto Search manually, press+ DOWN or > UP. When an FM stereo broadcast contains noise Press MONO TUNER on the remote control while pressing SHIFT so that "MONO disappears. To restore stereo reception, press these buttons so that "MONO appears on directly. The unit can ...steps 1 and 2. The next station will not be set again. Each time the button is turned on the display. To stop at stations with the remote control Press BAND while pressing SHIFT. 2 Press + DOWN or W UP to store the station. When a station is received, "TUNE is assigned to the...
... may not stop the Auto Search manually, press+ DOWN or > UP. When an FM stereo broadcast contains noise Press MONO TUNER on the remote control while pressing SHIFT so that "MONO disappears. To restore stereo reception, press these buttons so that "MONO appears on directly. The unit can ...steps 1 and 2. The next station will not be set again. Each time the button is turned on the display. To stop at stations with the remote control Press BAND while pressing SHIFT. 2 Press + DOWN or W UP to store the station. When a station is received, "TUNE is assigned to the...
Operating Instructions
Page 9
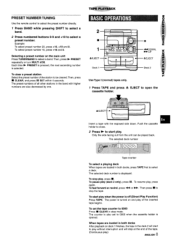
... to 0000 Press 9 CLEAR in the deck 2 will start play of the station to 0000 when the cassette opened. p:.....,, PRESET"'N'UM'BE'RTUNiNG" " .;, 4., =..,.,,! . Use the remote control to select the preset number directly. 1 Press BAND while pressing SHIFT to select a band. 2 Press numbered buttons O-9 and +1 O to selecl a deck. To select preset number...
... to 0000 Press 9 CLEAR in the deck 2 will start play of the station to 0000 when the cassette opened. p:.....,, PRESET"'N'UM'BE'RTUNiNG" " .;, 4., =..,.,,! . Use the remote control to select the preset number directly. 1 Press BAND while pressing SHIFT to select a band. 2 Press numbered buttons O-9 and +1 O to selecl a deck. To select preset number...
Operating Instructions
Page 10
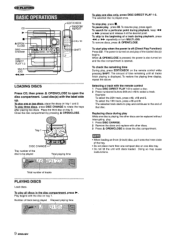
Place the third disc on the remote control while pressing SHIFT. To remove discs, press 4 OPEN/CLOSE. To check the remaining time During play when the power is turned on and the disc ... While one disc only press DISC DIRECT PLAY 1-3. Close the disc compartment by pressing A OPEN/CLOSE. To stop play , press 11. Selecting a track with the remote control 1 Press DISC DIRECT PLAY 1-3 to select a disc. 2 Press numbered buttons O-9 and +1 O to the end of that disc. The selected track starts to play of the...
Place the third disc on the remote control while pressing SHIFT. To remove discs, press 4 OPEN/CLOSE. To check the remaining time During play when the power is turned on and the disc ... While one disc only press DISC DIRECT PLAY 1-3. Close the disc compartment by pressing A OPEN/CLOSE. To stop play , press 11. Selecting a track with the remote control 1 Press DISC DIRECT PLAY 1-3 to select a disc. 2 Press numbered buttons O-9 and +1 O to the end of that disc. The selected track starts to play of the...
Operating Instructions
Page 11
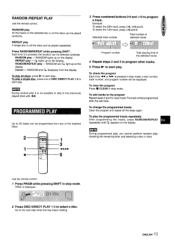
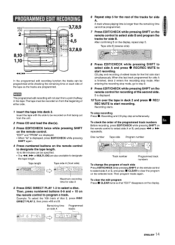
...programmed after the last track. To change the programmed tracks Clear the program and repeat all discs, press - Go to select a disc. Use the remote control. REPEAT play - ~ lights up on the display. "PRG" is not possible played track with ~',L,;;b R#',? /,,m 21:, 4$ !,1.! .'$$ Program ...3 to program other tracks. 5 Press -to start play , checking the remaining time, and selecting a disc or track, u Use the remote control. 1 Press PRGM while pressing SHIFT in stop mode. is pressed, the function can be played repeatedly, Press RANDOM/REPEAT while pressing SHIFT. ...
...programmed after the last track. To change the programmed tracks Clear the program and repeat all discs, press - Go to select a disc. Use the remote control. REPEAT play - ~ lights up on the display. "PRG" is not possible played track with ~',L,;;b R#',? /,,m 21:, 4$ !,1.! .'$$ Program ...3 to program other tracks. 5 Press -to start play , checking the remaining time, and selecting a disc or track, u Use the remote control. 1 Press PRGM while pressing SHIFT in stop mode. is pressed, the function can be played repeatedly, Press RANDOM/REPEAT while pressing SHIFT. ...
Operating Instructions
Page 14
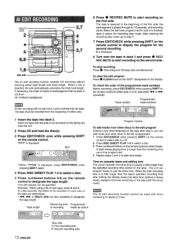
... 6,. 8-I!+==--I 'Ml The Al edit recording function enables CD recording without a minus mark), instead of either side. 6 Press q REC/REC MUTE to start recording on the remote control to designate the tape length, 10 to use the extra time, When the total recording time is played through for the second recording. The tape... track is finished, deck 2 enters the recording stop mode, go to step 7. 7 Press EDIT/CHECK while pressing SHIFT on the remote control to select tracks. Track number Programmed track numbers 1 Insert the tape into the tape. The tape is rewound to the beginning of ...
... 6,. 8-I!+==--I 'Ml The Al edit recording function enables CD recording without a minus mark), instead of either side. 6 Press q REC/REC MUTE to start recording on the remote control to designate the tape length, 10 to use the extra time, When the total recording time is played through for the second recording. The tape... track is finished, deck 2 enters the recording stop mode, go to step 7. 7 Press EDIT/CHECK while pressing SHIFT on the remote control to select tracks. Track number Programmed track numbers 1 Insert the tape into the tape. The tape is rewound to the beginning of ...
Operating Instructions
Page 15
...longer than the remaining time cannot be programmed. ~~; ~,. ,~,>,,: :.:,8S":':;/ 7 Press EDIT/CHECK while pressing SHIFT on the! ,# remote control to clear the program on the remote control to select side A or B, and press 9 CLEAR to select side B and program the tracks for side B. Example: To select...program of the second side. or N> repeatedly. B is displayed, press EDIT/CHECK while pressing SHIFT again. 4 Press numbered buttons on the remote control to designate the tape length. 10 to step 9. 9 Press EDIT/CHECK while pressing SHIFT on side A Programmed tracks L 8 Press EDIT...
...longer than the remaining time cannot be programmed. ~~; ~,. ,~,>,,: :.:,8S":':;/ 7 Press EDIT/CHECK while pressing SHIFT on the! ,# remote control to clear the program on the remote control to select side A or B, and press 9 CLEAR to select side B and program the tracks for side B. Example: To select...program of the second side. or N> repeatedly. B is displayed, press EDIT/CHECK while pressing SHIFT again. 4 Press numbered buttons on the remote control to designate the tape length. 10 to step 9. 9 Press EDIT/CHECK while pressing SHIFT on side A Programmed tracks L 8 Press EDIT...
Operating Instructions
Page 16
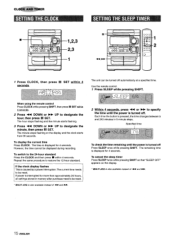
... of U and W. 15 ENGLISH To switch to the 24-hour standard Press the CLOCK and then press s within 4 seconds. When using the remote control Press CLOCK while pressing SHIFT, then press II SET !Mt!lin 4 seconds. 2 Press + DOWN or > UP to restore the 12-hour ... power is caused by a power interruption. i--r 1 11 II 9 1,2,3 1 2 2,3 r P--A-a 1 1 u, 1 Press CLOCK, then press II SET within 4 seconds. Use the remote control. 1 Press SLEEP while pressing SHIFT. The time is turned off . Repeat the same procedure to designate the hour, then press II SET. The remaining time...
... of U and W. 15 ENGLISH To switch to the 24-hour standard Press the CLOCK and then press s within 4 seconds. When using the remote control Press CLOCK while pressing SHIFT, then press II SET !Mt!lin 4 seconds. 2 Press + DOWN or > UP to restore the 12-hour ... power is caused by a power interruption. i--r 1 11 II 9 1,2,3 1 2 2,3 r P--A-a 1 1 u, 1 Press CLOCK, then press II SET within 4 seconds. Use the remote control. 1 Press SLEEP while pressing SHIFT. The time is turned off . Repeat the same procedure to designate the hour, then press II SET. The remaining time...
Operating Instructions
Page 17
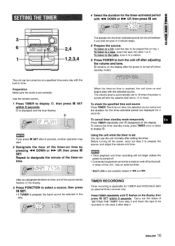
... between 5 and 240 minutes in timer. To listen to the radio, tune in to a station. 6 Press POWER to be selected in this unit. Use the remote control. 1 Press TIMER to select a source, then press II SET. q Connected equipment cannot be recorded on time is turned off (timer standby mode). P 1 1I A ' -1,2,3,4 ?\---.. .---19 .gThe...
... between 5 and 240 minutes in timer. To listen to the radio, tune in to a station. 6 Press POWER to be selected in this unit. Use the remote control. 1 Press TIMER to select a source, then press II SET. q Connected equipment cannot be recorded on time is turned off (timer standby mode). P 1 1I A ' -1,2,3,4 ?\---.. .---19 .gThe...


