
Operating Instructions
Page 3
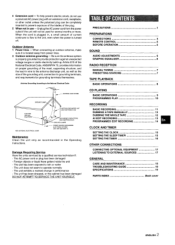
... unit only as the size of the grounding unit, connection to provide protection against unexpected voltage surges or static electricity build-up. PRECAUTIONS l PREPARATIONS CONNECTIONS 3 REMOTE CONTROL 5 BEFORE OPERATION 5 SOUND AUDIO ADJUSTMENTS 6 GRAPHIC EQUALIZER 6 RADIO RECEPTION MANUAL TUNING 7 PRESETTING STATIONS 7 TAPE PLAYBACK BASIC OPERATIONS 8 CD PLAYING BASIC OPERATIONS 9 PROGRAMMED PLAY 10...
... unit only as the size of the grounding unit, connection to provide protection against unexpected voltage surges or static electricity build-up. PRECAUTIONS l PREPARATIONS CONNECTIONS 3 REMOTE CONTROL 5 BEFORE OPERATION 5 SOUND AUDIO ADJUSTMENTS 6 GRAPHIC EQUALIZER 6 RADIO RECEPTION MANUAL TUNING 7 PRESETTING STATIONS 7 TAPE PLAYBACK BASIC OPERATIONS 8 CD PLAYING BASIC OPERATIONS 9 PROGRAMMED PLAY 10...
Operating Instructions
Page 4
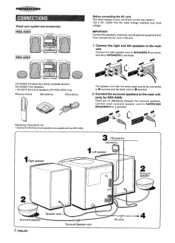
AC cord ®4 CX-NA303 Compact disc stereo cassette reciever SX-NA302 Front speakers * SX-R275 Surround speakers (For NSX-A304 only) Remote control m AM antenna FM antenna The speaker cord with the NSX-A304. Connect each surround speaker cord to SPEAKERS L terminals. Operating Instructions, etc * Optional SX-...
AC cord ®4 CX-NA303 Compact disc stereo cassette reciever SX-NA302 Front speakers * SX-R275 Surround speakers (For NSX-A304 only) Remote control m AM antenna FM antenna The speaker cord with the NSX-A304. Connect each surround speaker cord to SPEAKERS L terminals. Operating Instructions, etc * Optional SX-...
Operating Instructions
Page 6
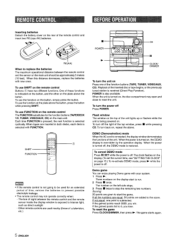
... distance decreases, replace the batteries with your system. 1 Press >. To use the function on the display start the game. Other remote controls are inserted in both decks, each deck is selected with FUNCTION. Playback of the inserted disc or tape begins, or the ...) batteries. @~e R6(AA) When to replace the batteries The maximum operational distance between the remote control and the remote sensor inside the display window is subtracted. To use FUNCTION on the remote control The FUNCTION substitutes for an extended period of time, remove the batteries to prevent possible ...
... distance decreases, replace the batteries with your system. 1 Press >. To use the function on the display start the game. Other remote controls are inserted in both decks, each deck is selected with FUNCTION. Playback of the inserted disc or tape begins, or the ...) batteries. @~e R6(AA) When to replace the batteries The maximum operational distance between the remote control and the remote sensor inside the display window is subtracted. To use FUNCTION on the remote control The FUNCTION substitutes for an extended period of time, remove the batteries to prevent possible ...

Operating Instructions
Page 7
...unit provides the following three different equalization curves. To cancel the selected mode Press the selected button again. To select with the remote control press T-BASS while pressing SHIFT. m Low frequency sound may be distorted when the T-BASS system is used for a ...repeatedly to MAX (31). The selected equalization mode is dimmer than DIMMER 1, and the illumination on the remote control. r ROCK- CLASSIC- 7 GEQ OFF - (cancel) To select with the remote control Press GEQ repeatedly while pressing SHIFT. Press one of GRAPHIC EQUALIZER. In this case, cancel the ...
...unit provides the following three different equalization curves. To cancel the selected mode Press the selected button again. To select with the remote control press T-BASS while pressing SHIFT. m Low frequency sound may be distorted when the T-BASS system is used for a ...repeatedly to MAX (31). The selected equalization mode is dimmer than DIMMER 1, and the illumination on the remote control. r ROCK- CLASSIC- 7 GEQ OFF - (cancel) To select with the remote control Press GEQ repeatedly while pressing SHIFT. Press one of GRAPHIC EQUALIZER. In this case, cancel the ...
Operating Instructions
Page 8
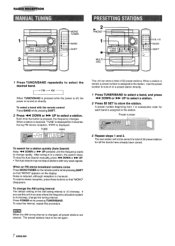
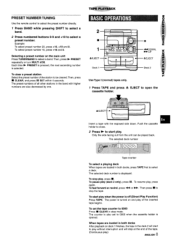
... or > UP to select a station. 2 Press 11 SET to the station. When an FM stereo broadcast contains noise Press MONO TUNER on the remote control while pressing SHIFT so that "MONO disappears. Use the preset number to tune in to select the desired band. DOWN or - q The Auto...is stored, a preset number is displayed for a station quickly (Auto Search) Keep - Each time the button is monaural. To stop at stations with the remote control Press BAND while pressing SHIFT. 2 Press + DOWN or W UP to the station. The next station will not be set again. When a station is...
... or > UP to select a station. 2 Press 11 SET to the station. When an FM stereo broadcast contains noise Press MONO TUNER on the remote control while pressing SHIFT so that "MONO disappears. Use the preset number to tune in to select the desired band. DOWN or - q The Auto...is stored, a preset number is displayed for a station quickly (Auto Search) Keep - Each time the button is monaural. To stop at stations with the remote control Press BAND while pressing SHIFT. 2 Press + DOWN or W UP to the station. The next station will not be set again. When a station is...
Operating Instructions
Page 9
... number 20, press +10, +10 and O. Then, press > PRESET repeatedly or turn MULTI JOG. Then, press s CLEAR, and press 11 SET within 4 seconds. Use the remote control to select the preset number directly. 1 Press BAND while pressing SHIFT to select a band. 2 Press numbered buttons O-9 and +1 O to 0000 Press 9 CLEAR in the...
... number 20, press +10, +10 and O. Then, press > PRESET repeatedly or turn MULTI JOG. Then, press s CLEAR, and press 11 SET within 4 seconds. Use the remote control to select the preset number directly. 1 Press BAND while pressing SHIFT to select a band. 2 Press numbered buttons O-9 and +1 O to 0000 Press 9 CLEAR in the...
Operating Instructions
Page 10
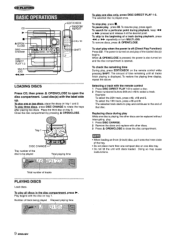
... Press CD. To start play , press 1. Example: To select the 25th track, press +10, +10 and 5. Play begins with the disc on the remote control while pressing SHIFT. The amount of time remaining until all discs in the disc com~artment, press -. The selected track starts to the end... play , press again. To check the remaining time During play While one disc only press DISC DIRECT PLAY 1-3. q Do not tilt the unit with the remote control 1 Press DISC DIRECT PLAY 1-3 to select a disc. 2 Press numbered buttons O-9 and +1 O to be played Total playing time To dav one disc is...
... Press CD. To start play , press 1. Example: To select the 25th track, press +10, +10 and 5. Play begins with the disc on the remote control while pressing SHIFT. The amount of time remaining until all discs in the disc com~artment, press -. The selected track starts to the end... play , press again. To check the remaining time During play While one disc only press DISC DIRECT PLAY 1-3. q Do not tilt the unit with the remote control 1 Press DISC DIRECT PLAY 1-3 to select a disc. 2 Press numbered buttons O-9 and +1 O to be played Total playing time To dav one disc is...
Operating Instructions
Page 11
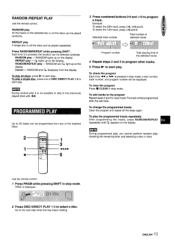
... - is pressed, the function can be played REPEAT play , checking the remaining time, and selecting a disc or track, u Use the remote control. 1 Press PRGM while pressing SHIFT in stop mode. Use the remote control. Each time it is displayed 2 Press DISC DIRECT PLAY 1-3 to start play . RANDOM/REPEAT play - RANDOM and G disappear...
... - is pressed, the function can be played REPEAT play , checking the remaining time, and selecting a disc or track, u Use the remote control. 1 Press PRGM while pressing SHIFT in stop mode. Use the remote control. Each time it is displayed 2 Press DISC DIRECT PLAY 1-3 to start play . RANDOM/REPEAT play - RANDOM and G disappear...
Operating Instructions
Page 14
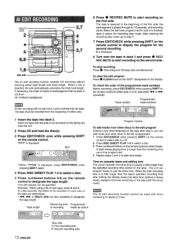
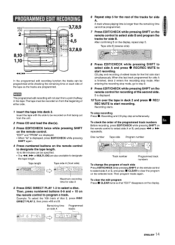
...time is displayed, pressing SHIFT again, press EDIT/CHECK while 4 Press DISC DIRECT PLAY 1-3 to select a disc, 5 Press numbered buttons O-9 on the remote control to designate the tape length, 10 to 99 minutes can add tracks from the unit. 2 Press CD and load the disc(s). 3 Press EDIT/CHECK...cut short. (Al: Artificial Intelligence) m Al edit recording will not start from the beginning of tracks is rearranged so that "EDIT" disappears on the remote control to display the program for 10 seconds, and recording starts. If necessary, the order of either side. 6 Press q REC/REC MUTE to ...
...time is displayed, pressing SHIFT again, press EDIT/CHECK while 4 Press DISC DIRECT PLAY 1-3 to select a disc, 5 Press numbered buttons O-9 on the remote control to designate the tape length, 10 to 99 minutes can add tracks from the unit. 2 Press CD and load the disc(s). 3 Press EDIT/CHECK...cut short. (Al: Artificial Intelligence) m Al edit recording will not start from the beginning of tracks is rearranged so that "EDIT" disappears on the remote control to display the program for 10 seconds, and recording starts. If necessary, the order of either side. 6 Press q REC/REC MUTE to ...
Operating Instructions
Page 15
...displayed. B is longer than the remaining time cannot be programmed. ~~; ~,. ,~,>,,: :.:,8S":':;/ 7 Press EDIT/CHECK while pressing SHIFT on the! ,# remote control to designate the tape length. To check the order of the tape as the tracks are programmed. Then, press numbered buttons O-9 and + 10 ...on tht? Remaining time on the remote control. or N> repeatedly. ENGLIS1H4 Insert the tape with the side to start simultaneously. Tape length Tape side A (front side) Maximum recording...
...displayed. B is longer than the remaining time cannot be programmed. ~~; ~,. ,~,>,,: :.:,8S":':;/ 7 Press EDIT/CHECK while pressing SHIFT on the! ,# remote control to designate the tape length. To check the order of the tape as the tracks are programmed. Then, press numbered buttons O-9 and + 10 ...on tht? Remaining time on the remote control. or N> repeatedly. ENGLIS1H4 Insert the tape with the side to start simultaneously. Tape length Tape side A (front side) Maximum recording...
Operating Instructions
Page 16
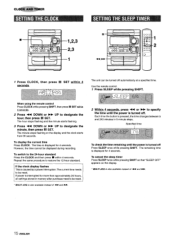
DOWN or - To display the current time Press CLOCK. If the clock display flashes This is displayed for 4 seconds. When using the remote control Press CLOCK while pressing SHIFT, then press II SET !Mt!lin 4 seconds. 2 Press + DOWN or > UP to restore the 12-hour standard. ... in memory after purchase need to be turned off Press SLEEP once while pressing SHIFT. Each time the button is interrupted for 4 seconds. Use the remote control. 1 Press SLEEP while pressing SHIFT. Specified time I To check the time remaining until the power is also available instead of U and W. 15 ...
DOWN or - To display the current time Press CLOCK. If the clock display flashes This is displayed for 4 seconds. When using the remote control Press CLOCK while pressing SHIFT, then press II SET !Mt!lin 4 seconds. 2 Press + DOWN or > UP to restore the 12-hour standard. ... in memory after purchase need to be turned off Press SLEEP once while pressing SHIFT. Each time the button is interrupted for 4 seconds. Use the remote control. 1 Press SLEEP while pressing SHIFT. Specified time I To check the time remaining until the power is also available instead of U and W. 15 ...
Operating Instructions
Page 17
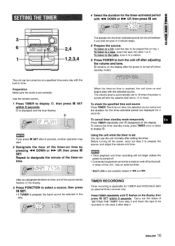
To listen to a CD, load the disc to display 0, then press II SET within 6 seconds. Use the remote control. 1 Press TIMER to be played first on tray 1. Repeat to display 0. q If TUNER is pressed, the band cannot be turned on time, the selected ...
To listen to a CD, load the disc to display 0, then press II SET within 6 seconds. Use the remote control. 1 Press TIMER to be played first on tray 1. Repeat to display 0. q If TUNER is pressed, the band cannot be turned on time, the selected ...


