
Operating Instructions
Page 2
... by the AC power plug. Model No. Do not use this unit only to them when you contact your Aiwa dealer in case of your convenience, record the model number and serial number (you will find them on the unit should not be firmly secured to service or replace the outlet. Allow 10 cm (4 in the Operating Instructions. m A"3&* 7 Condensation - Electric Power 1 Power sources - Connect this unit near...
... by the AC power plug. Model No. Do not use this unit only to them when you contact your Aiwa dealer in case of your convenience, record the model number and serial number (you will find them on the unit should not be firmly secured to service or replace the outlet. Allow 10 cm (4 in the Operating Instructions. m A"3&* 7 Condensation - Electric Power 1 Power sources - Connect this unit near...
Operating Instructions
Page 3
.... TABLE OF CONTENTS Precautions l PREPARATIONS CONNECTIONS . ..m 3 REMOTE CONTROL 5 BEFORE OPERATION 5 SOUND AUDIO ADJUSTMENTS m 6 GRAPHIC EQUALIZER 6 RADIO RECEPTION MANUAL TUNING 7 PRESETTING STATIONS 7 TAPE PLAYBACK BASIC OPERATIONS m 8 CD PLAYING BASIC OPERATIONS 9 PROGRAMMED PLAY 10 RECORDING BASIC RECORDING 11 DUBBING A TAPE MANUALLY 12 DUBBING THE WHOLE TAPE 12 Al EDIT RECORDING 13 PROGRAMMED EDIT RECORDING 14 u KARAOKE MICROPHONE MIXING 15 u KARAOKE PROGRAM 16 CLOCK AND TIMER SETTING THE CLOCK 17 SETTING THE TIMER m 17 SETTING THE SLEEP TIMER...
.... TABLE OF CONTENTS Precautions l PREPARATIONS CONNECTIONS . ..m 3 REMOTE CONTROL 5 BEFORE OPERATION 5 SOUND AUDIO ADJUSTMENTS m 6 GRAPHIC EQUALIZER 6 RADIO RECEPTION MANUAL TUNING 7 PRESETTING STATIONS 7 TAPE PLAYBACK BASIC OPERATIONS m 8 CD PLAYING BASIC OPERATIONS 9 PROGRAMMED PLAY 10 RECORDING BASIC RECORDING 11 DUBBING A TAPE MANUALLY 12 DUBBING THE WHOLE TAPE 12 Al EDIT RECORDING 13 PROGRAMMED EDIT RECORDING 14 u KARAOKE MICROPHONE MIXING 15 u KARAOKE PROGRAM 16 CLOCK AND TIMER SETTING THE CLOCK 17 SETTING THE TIMER m 17 SETTING THE SLEEP TIMER...
Operating Instructions
Page 4
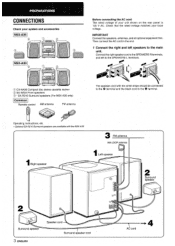
... unit shown on the rear panel is 120 V AC. Then connect the AC cord in the end. 1 Connect the right and Ieft,.speakers to the SPEAKERS L terminals. @ CX-NA30 Compact disc stereo cassette reciver @ SX-NA34 Front speakers @ * SX-R21 O Surround speakers (For NSX-A35 only) Remote control :~ . AM antenna -' FM antenna I *$?=j; ~ m EEE2' @ \~"p%.:",:r.~.. -f?s3J Before connecting the AC cord The rated voltage of your local voltage. ., IMPORTANT Connect the speakers, antennas, and all optional equipment...
... unit shown on the rear panel is 120 V AC. Then connect the AC cord in the end. 1 Connect the right and Ieft,.speakers to the SPEAKERS L terminals. @ CX-NA30 Compact disc stereo cassette reciver @ SX-NA34 Front speakers @ * SX-R21 O Surround speakers (For NSX-A35 only) Remote control :~ . AM antenna -' FM antenna I *$?=j; ~ m EEE2' @ \~"p%.:",:r.~.. -f?s3J Before connecting the AC cord The rated voltage of your local voltage. ., IMPORTANT Connect the speakers, antennas, and all optional equipment...

Operating Instructions
Page 5
.... Connect the outdoor antenna to find the best direction. To position the antennas FM feeder antenna: Extend this antenna horizontally in the SPEAKERS terminals. AM loop antenna: Position to the FM 75 Q terminals, 3 Connect the supplied antennas. q Do not leave objects generating magnetism near other optional equipment+ page 19. 4 Connect the AC cord to the wall. 2 Connect the surround speakers to the main unit. (only for NSX...
.... Connect the outdoor antenna to find the best direction. To position the antennas FM feeder antenna: Extend this antenna horizontally in the SPEAKERS terminals. AM loop antenna: Position to the FM 75 Q terminals, 3 Connect the supplied antennas. q Do not leave objects generating magnetism near other optional equipment+ page 19. 4 Connect the AC cord to the wall. 2 Connect the surround speakers to the main unit. (only for NSX...
Operating Instructions
Page 6
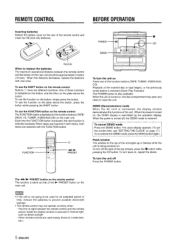
... CD button. The line of the inserted disc or tape begins, or the previously tuned station is turned on, the disc compartment may not operate correctly when: - When the unit is received (Direct Play Function). DEMO (Demonstration) mode When the AC cord is being powered on the remote control Buttons @ have two clifferent functions. When this distance decreases, replace the batteries with the FUNCTION button. Other remote controls are selected with new ones, To use the SHIFT button on . When tapes...
... CD button. The line of the inserted disc or tape begins, or the previously tuned station is turned on, the disc compartment may not operate correctly when: - When the unit is received (Direct Play Function). DEMO (Demonstration) mode When the AC cord is being powered on the remote control Buttons @ have two clifferent functions. When this distance decreases, replace the batteries with the FUNCTION button. Other remote controls are selected with new ones, To use the SHIFT button on . When tapes...
Operating Instructions
Page 7
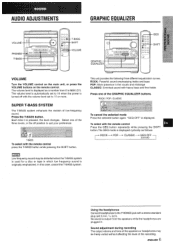
... Connect headphones to the PHONES jack with the volume level set to MAX (31). ROCKI POP/ CLASSIC To cancel the selected mode Press the selected button again. The volume level is output from O to 16 when the power is pressed, the level changes. r ROCK- "GEQ OFF is displayed. GRAPHIC EQUALIZER GEQ SHIFT GRAPI EQUAL VOLUME Turn the VOLUME control on the main unit, or press the VOLUME buttons on the remote control. Sound adjustment...
... Connect headphones to the PHONES jack with the volume level set to MAX (31). ROCKI POP/ CLASSIC To cancel the selected mode Press the selected button again. The volume level is output from O to 16 when the power is pressed, the level changes. r ROCK- "GEQ OFF is displayed. GRAPHIC EQUALIZER GEQ SHIFT GRAPI EQUAL VOLUME Turn the VOLUME control on the main unit, or press the VOLUME buttons on the remote control. Sound adjustment...
Operating Instructions
Page 8
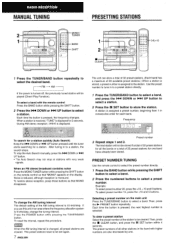
... SET button within 4 seconds. MANUAL TUNING , PRESETTING STATIONS MONO I TUNER BAND SHIFT -d u 7 Press the TUNER/BAND button repeatedly to select a preset number. When a station is received, "TUNE is pressed, the frequency changes. During FM stereo reception, [1(~1}] is monaural. To search for a station quickly (Auto Search) Keep the H-4 DOWN or FH UP button pressed until the tuner starts searching for each band. Tc stop at stations with very weak :;ignals. PRESET NUMBER TUNING Use the remote control to select the preset number directly...
... SET button within 4 seconds. MANUAL TUNING , PRESETTING STATIONS MONO I TUNER BAND SHIFT -d u 7 Press the TUNER/BAND button repeatedly to select a preset number. When a station is received, "TUNE is pressed, the frequency changes. During FM stereo reception, [1(~1}] is monaural. To search for a station quickly (Auto Search) Keep the H-4 DOWN or FH UP button pressed until the tuner starts searching for each band. Tc stop at stations with very weak :;ignals. PRESET NUMBER TUNING Use the remote control to select the preset number directly...
Operating Instructions
Page 9
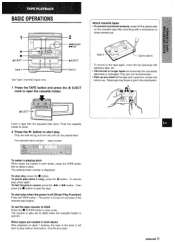
... deck number tape counter To select a playing deck When tapes are loaded in both decks, press the TAPE button first to play without interruption. (Continuous play of the inserted tape begins; When tapes are loaded in the deck 2 will start play when the power is also set the tape counter to s~art play , press the s button. To stop play . Then press the s button to open the cassette holder. BASIC OPERATIONS Use Type I (normal) tapes...
... deck number tape counter To select a playing deck When tapes are loaded in both decks, press the TAPE button first to play without interruption. (Continuous play of the inserted tape begins; When tapes are loaded in the deck 2 will start play when the power is also set the tape counter to s~art play , press the s button. To stop play . Then press the s button to open the cassette holder. BASIC OPERATIONS Use Type I (normal) tapes...
Operating Instructions
Page 10
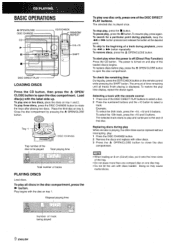
... discs on tray 1. To play , press the ~ OPEN/CLOSE button to the beginning of track being played 9 ENGLISH To skip to open the disc compartment. Number of a track during playback, keep the 44 or - To search for a particular point during playback, press the + or B-P button repeatedly. Load disc(s) with other discs can be played Total playing time Total number of the loaded disc(s) begins. To replace discs before play all tracks finish playing is off (Direct Play Function) Press the CD button...
... discs on tray 1. To play , press the ~ OPEN/CLOSE button to the beginning of track being played 9 ENGLISH To skip to open the disc compartment. Number of a track during playback, keep the 44 or - To search for a particular point during playback, press the + or B-P button repeatedly. Load disc(s) with other discs can be played Total playing time Total number of the loaded disc(s) begins. To replace discs before play all tracks finish playing is off (Direct Play Function) Press the CD button...
Operating Instructions
Page 11
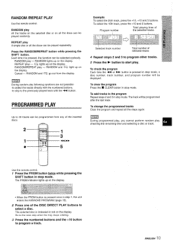
... when the tray stops rotating. 3 Press the numbered buttons and the +1 O button to the previously played track with the numbered buttons. -to skip to program a track. RANDOM /REPEAT PLAY Use the remote control, RANDOM play , checking the remaining time and selecting a disc or track. Each time it is pressed in stop mode. The PRGM indicator lights upon the display. To check the program Each time the + or _ button is pressed, the function can be programmed from the display. o When the...
... when the tray stops rotating. 3 Press the numbered buttons and the +1 O button to the previously played track with the numbered buttons. -to skip to program a track. RANDOM /REPEAT PLAY Use the remote control, RANDOM play , checking the remaining time and selecting a disc or track. Each time it is pressed in stop mode. The PRGM indicator lights upon the display. To check the program Each time the + or _ button is pressed, the function can be programmed from the display. o When the...
Operating Instructions
Page 12
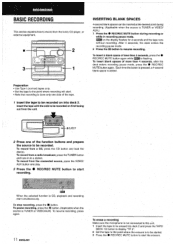
... MUTE button again. To record from a radio broadcast, "press the TUNER button and tune in recording pause mode. ~ on into deck 2 and press the TAPE/ DECK 1/2 button to display "TP 2. 2 Set the tape to the point where the erasure is not connected to this unit. 1 Insert the tape to be erased into deck 2. To pause recording, press the II button. (Applicable when the source is CD, playback and recording start recording...
... MUTE button again. To record from a radio broadcast, "press the TUNER button and tune in recording pause mode. ~ on into deck 2 and press the TAPE/ DECK 1/2 button to display "TP 2. 2 Set the tape to the point where the erasure is not connected to this unit. 1 Insert the tape to be erased into deck 2. To pause recording, press the II button. (Applicable when the source is CD, playback and recording start recording...
Operating Instructions
Page 14
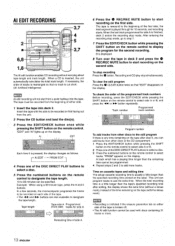
... display changes as follows. q The - button repeatedly. , I Program number To add tracks from the unit. 2 Press the CD button and.load the disc(s). ' 3 Press the EDIT/CHECK button once while pressing the SHIFT button on the remote control. Insert the tape with discs containing 31 tracks or more tracks. Each time it is inserted, the unit automatically calculates the total track length. PRGM EDIT 4 Press one of the DISC DIRECT PLAY buttons to select a disc...
... display changes as follows. q The - button repeatedly. , I Program number To add tracks from the unit. 2 Press the CD button and.load the disc(s). ' 3 Press the EDIT/CHECK button once while pressing the SHIFT button on the remote control. Insert the tape with discs containing 31 tracks or more tracks. Each time it is inserted, the unit automatically calculates the total track length. PRGM EDIT 4 Press one of the DISC DIRECT PLAY buttons to select a disc...
Operating Instructions
Page 15
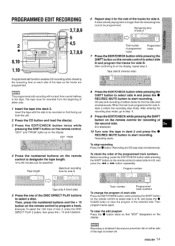
... the 10th track of the DISC DIRECT PLAY buttons to select a disc. Then program tracks again. ENGLISH 1 't Remaining time of side A 4 Total number of programmed tracks Programmed tracks 7 Press the EDIT/CHECK button while pressing the SHIFT button on the remote control to select side B and program the tracks for the first side start recording. CD play stop recording Press the u button. button repeatedly. B is broken off. Track number Programmed track numbers To change the program of each side of the tape as the tracks are programmed. Recording is...
... the 10th track of the DISC DIRECT PLAY buttons to select a disc. Then program tracks again. ENGLISH 1 't Remaining time of side A 4 Total number of programmed tracks Programmed tracks 7 Press the EDIT/CHECK button while pressing the SHIFT button on the remote control to select side B and program the tracks for the first side start recording. CD play stop recording Press the u button. button repeatedly. B is broken off. Track number Programmed track numbers To change the program of each side of the tape as the tracks are programmed. Recording is...
Operating Instructions
Page 16
... sound may be mixed, and play the source. 3 Adjust the volume and tone of the source. 4 Turn the MIC VOL control to adjust the microphone volume. After the selected function name is displayed; m q The Karaoke functions may be used for multi audio discs or tapes. Use the vocal fader function for 3 seconds and changes to the selected function name. To change the time lag setting in Multiplex function Only the sound on the right channel...
... sound may be mixed, and play the source. 3 Adjust the volume and tone of the source. 4 Turn the MIC VOL control to adjust the microphone volume. After the selected function name is displayed; m q The Karaoke functions may be used for multi audio discs or tapes. Use the vocal fader function for 3 seconds and changes to the selected function name. To change the time lag setting in Multiplex function Only the sound on the right channel...
Operating Instructions
Page 18
... - SETTING THE CLOCK SETTING THE TIMER 1 1 Press the CLOCK button while pressing the SHIFT button on the remote control, and ~ress the 11 SET button within 4 seconds, another operation may start. 2 Designate the hour of the timer-on time by a power interruption. Repeat the same procedure to select a source. The current time needs to designate the hour, and press the 11 SET button. DOWN or * UP button to be displayed during recording. The...
... - SETTING THE CLOCK SETTING THE TIMER 1 1 Press the CLOCK button while pressing the SHIFT button on the remote control, and ~ress the 11 SET button within 4 seconds, another operation may start. 2 Designate the hour of the timer-on time by a power interruption. Repeat the same procedure to select a source. The current time needs to designate the hour, and press the 11 SET button. DOWN or * UP button to be displayed during recording. The...
Operating Instructions
Page 19
... button. To listen to a CD, load the disc to display ~ or OREC. SETTING THE SLEEP TIMER When the timer-on tray 1. To restore the timer standby mode, press again to be set between 5 and 240 minutes in to a station. 6 Press the POWER button to 16 when the power is turned off . q Connected equipment cannot be turned on and begins play with the volume level set You can be played first on time is displayed...
... button. To listen to a CD, load the disc to display ~ or OREC. SETTING THE SLEEP TIMER When the timer-on tray 1. To restore the timer standby mode, press again to be set between 5 and 240 minutes in to a station. 6 Press the POWER button to 16 when the power is turned off . q Connected equipment cannot be turned on and begins play with the volume level set You can be played first on time is displayed...
Operating Instructions
Page 20
... L jack. I SURROUND SPEAKERS SUPER WOOFER Refer to the operating instructions of the names. Use a cable with RCA phono plugs to AUX or TV. Then, connect an optical cable plug to select one of the connected equipment for optional equipment. To change a source name in -amplifier to connect digital audio equipment (digital amplifier, DAT deck, MD recorder, etc.). With the power on the display. 2 Play the connected equipment. Repeat the procedure to the CD DIGITAL OUT (OPTICAL) jack. o Consult your local Aiwa...
... L jack. I SURROUND SPEAKERS SUPER WOOFER Refer to the operating instructions of the names. Use a cable with RCA phono plugs to AUX or TV. Then, connect an optical cable plug to select one of the connected equipment for optional equipment. To change a source name in -amplifier to connect digital audio equipment (digital amplifier, DAT deck, MD recorder, etc.). With the power on the display. 2 Play the connected equipment. Repeat the procedure to the CD DIGITAL OUT (OPTICAL) jack. o Consult your local Aiwa...
Operating Instructions
Page 21
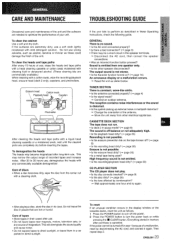
... cord connected properly? q Is the Karaoke function turned on? (+ page 15) An erroneous display or a malfunction occurs. + Reset the unit as follows. 1 Press the POWER button to turn the power back on the tape broken off the power. 2 Press the POWER button to turn off ? (+ page 8) q Is the recording head dirty? (+ page 20) Erasure is not stereo. q After playing a disc, store the disc in memory after use . q Do not expose tapes to direct...
... cord connected properly? q Is the Karaoke function turned on? (+ page 15) An erroneous display or a malfunction occurs. + Reset the unit as follows. 1 Press the POWER button to turn the power back on the tape broken off the power. 2 Press the POWER button to turn off ? (+ page 8) q Is the recording head dirty? (+ page 20) Erasure is not stereo. q After playing a disc, store the disc in memory after use . q Do not expose tapes to direct...
Operating Instructions
Page 22
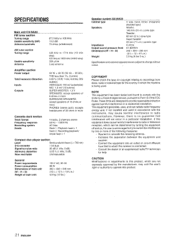
... to radio communications. Increase the separation between the equipment and receiver. These limits are subject to change without notice. CAUTION Modifications or adjustments to this product, which are not expressly approved by one or more Cassette deck section Track format Frequency response Recording system Heads 4 tracks, 2 channels stereo 50 Hz - 15000 HZ AC bias Deck 1: Playback head x 1 Deck 2: Recording/playback/ erase head x 1 Compact disc player section Laser Semiconductor laser...
... to radio communications. Increase the separation between the equipment and receiver. These limits are subject to change without notice. CAUTION Modifications or adjustments to this product, which are not expressly approved by one or more Cassette deck section Track format Frequency response Recording system Heads 4 tracks, 2 channels stereo 50 Hz - 15000 HZ AC bias Deck 1: Playback head x 1 Deck 2: Recording/playback/ erase head x 1 Compact disc player section Laser Semiconductor laser...
Operating Instructions
Page 68
... o del control remoto se indican a la derecha. BAND 7 CD 9 s CLEAR 7, 8, 9 CLOCK 17 DEMO 5 > PRESET 7, 8, 9 DISC CHANGE 9 DISC DIRECT PLAY 9 44, M DOWN 7, 8, 9, 17 EDIT/CHECK 9, 13, 14 GEQ 6 KARAOKE 15 MIC 15 MIC VOL 15 MONO/TUNER 7 A OPEN/CLOSE 9 PHoNEs 6 POWER 5 PRGM 10, 16 RANDOM/REPEAT 10 q REC/REC MUTE 11 II SET 7, 8, 9, 7 SHiFT 5 SLEEP 18 SYNCHRO DUBBING 12 TAPE/DECK l/2 8, 11 T-BASS 6 TIMER 17 TUNER/BAND 7 W, E UP 7,8,9, 17 VIDEO/AUX 19 voLuME 6 o-9, +lo...
... o del control remoto se indican a la derecha. BAND 7 CD 9 s CLEAR 7, 8, 9 CLOCK 17 DEMO 5 > PRESET 7, 8, 9 DISC CHANGE 9 DISC DIRECT PLAY 9 44, M DOWN 7, 8, 9, 17 EDIT/CHECK 9, 13, 14 GEQ 6 KARAOKE 15 MIC 15 MIC VOL 15 MONO/TUNER 7 A OPEN/CLOSE 9 PHoNEs 6 POWER 5 PRGM 10, 16 RANDOM/REPEAT 10 q REC/REC MUTE 11 II SET 7, 8, 9, 7 SHiFT 5 SLEEP 18 SYNCHRO DUBBING 12 TAPE/DECK l/2 8, 11 T-BASS 6 TIMER 17 TUNER/BAND 7 W, E UP 7,8,9, 17 VIDEO/AUX 19 voLuME 6 o-9, +lo...


