
Owner's Manual
Page 53
... reach. Instruments and Controls This section gives information about the controls and displays that contribute to the daily operation of your Honda. Daytime Running Lights...60 Instrument Panel Brightness...61 Turn Signals...61 Windshield Wipers...62 Windshield Washers...62 Rear Window Wiper and Washer...63 Hazard Warning... the Front and Rear Seat-backs...81 Folding Rear Seat...82 Power Windows...84 Mirrors...85 Adjusting the Power Mirrors...86 Parking Brake...86 Digital Clock...87 Center Table...87 Beverage Holder...88 Built-in Table...89 Center Pocket...91 Storage Box...91 Cargo Floor ...
... reach. Instruments and Controls This section gives information about the controls and displays that contribute to the daily operation of your Honda. Daytime Running Lights...60 Instrument Panel Brightness...61 Turn Signals...61 Windshield Wipers...62 Windshield Washers...62 Rear Window Wiper and Washer...63 Hazard Warning... the Front and Rear Seat-backs...81 Folding Rear Seat...82 Power Windows...84 Mirrors...85 Adjusting the Power Mirrors...86 Parking Brake...86 Digital Clock...87 Center Table...87 Beverage Holder...88 Built-in Table...89 Center Pocket...91 Storage Box...91 Cargo Floor ...

Owner's Manual
Page 55
Differences for the Canadian models are noted in the text. instrument panel is shown. SUPPLEMENTAL RESTRAINT SYSTEM INDICATOR CRUISE CONTROL INDICATOR ANTI-LOCK BRAKE SYSTEM INDICATOR MALFUNCTION INDICATOR LAMP PARKING BRAKE AND BRAKE SYSTEM INDICATOR' Instruments and Controls HIGH BEAM INDICATOR CHARGING SYSTEM INDICATOR LOW OIL PRESSURE INDICATOR TAILGATE-OPEN INDICATOR SEAT BELT REMINDER LIGHT LOW FUEL INDICATOR * The U.S. Indicator Lights The instrument panel has many indicators to give you important information about your vehicle.
Differences for the Canadian models are noted in the text. instrument panel is shown. SUPPLEMENTAL RESTRAINT SYSTEM INDICATOR CRUISE CONTROL INDICATOR ANTI-LOCK BRAKE SYSTEM INDICATOR MALFUNCTION INDICATOR LAMP PARKING BRAKE AND BRAKE SYSTEM INDICATOR' Instruments and Controls HIGH BEAM INDICATOR CHARGING SYSTEM INDICATOR LOW OIL PRESSURE INDICATOR TAILGATE-OPEN INDICATOR SEAT BELT REMINDER LIGHT LOW FUEL INDICATOR * The U.S. Indicator Lights The instrument panel has many indicators to give you important information about your vehicle.
Owner's Manual
Page 56
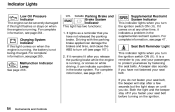
...For complete information, see page 264 . For complete information, see page 47 . If it comes on while driving, it indicates a problem in the brake system. Charging System Indicator If this light flashes or stays on when the engine is running , or comes on at any other time, it can damage the... brakes and tires, and cause the ABS to turn the ignition switch ON (II). SRS Seat Belt Reminder Light This indicator lights when you do not fasten your seat belt, the beeper will stop after you fasten...
...For complete information, see page 264 . For complete information, see page 47 . If it comes on while driving, it indicates a problem in the brake system. Charging System Indicator If this light flashes or stays on when the engine is running , or comes on at any other time, it can damage the... brakes and tires, and cause the ABS to turn the ignition switch ON (II). SRS Seat Belt Reminder Light This indicator lights when you do not fasten your seat belt, the beeper will stop after you fasten...

Owner's Manual
Page 57
...to your vehicle still has normal braking ability but no anti-lock. Low Fuel Indicator This light comes on if the tailgate is a problem in the ABS. Indicator Lights U.S. Canada ABS Anti-lock Brake System (ABS) Indicator High Beam Indicator This light comes on the headlight controls.... If it checked. With the light on at any other drivers...
...to your vehicle still has normal braking ability but no anti-lock. Low Fuel Indicator This light comes on if the tailgate is a problem in the ABS. Indicator Lights U.S. Canada ABS Anti-lock Brake System (ABS) Indicator High Beam Indicator This light comes on the headlight controls.... If it checked. With the light on at any other drivers...
Owner's Manual
Page 62
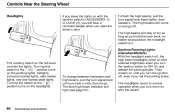
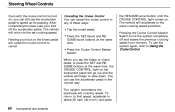
... page 55). Daytime Running Lights (Canadian Models) With the headlight switch off, the high beam headlights come on and go . The headlights revert to ON (II) and release the parking brake. The high beams will come on with the switch. The blue high beam indicator will hear a reminder beeper when...until you hear a click, then let go off , even if you set the parking brake. Turning this switch to the position turns on the headlights. Controls Near the Steering Wheel Headlights If you leave the lights on with the ignition switch in . To change between low beams and high beams, ...
... page 55). Daytime Running Lights (Canadian Models) With the headlight switch off, the high beam headlights come on and go . The headlights revert to ON (II) and release the parking brake. The high beams will come on with the switch. The blue high beam indicator will hear a reminder beeper when...until you hear a click, then let go off , even if you set the parking brake. Turning this switch to the position turns on the headlights. Controls Near the Steering Wheel Headlights If you leave the lights on with the ignition switch in . To change between low beams and high beams, ...
Owner's Manual
Page 69
..., press the SET/decel button. To slow down to the desired speed. Press and release the SET/decel button on the accelerator pedal. Tap the brake pedal lightly with your speed increases going up about 1 mph (1.6 km/h). Accelerate to show the system is now activated. The CRUISE CONTROL... light on the instrument panel comes on to the desired cruising speed and press the SET/decel button. This will accelerate. Each time you are going down a hill, use the brakes to slow down in any of these ways: Press and hold...
..., press the SET/decel button. To slow down to the desired speed. Press and release the SET/decel button on the accelerator pedal. Tap the brake pedal lightly with your speed increases going up about 1 mph (1.6 km/h). Accelerate to show the system is now activated. The CRUISE CONTROL... light on the instrument panel comes on to the desired cruising speed and press the SET/decel button. This will accelerate. Each time you are going down a hill, use the brakes to slow down in any of these ways: Press and hold...
Owner's Manual
Page 70
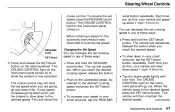
...Cancelling the Cruise Control You can use the accelerator pedal in any of these ways: Tap the brake pedal. Pressing the Cruise Control Master Switch turns the system completely off the accelerator pedal. Instruments...above 25 mph (40 km/h) and press the RESUME/accel button until the CRUISE CONTROL light comes on , you tap the brake or clutch pedal, or press the SET and RESUME buttons at the same time. ... and RESUME/accel buttons at the same time, the CRUISE CONTROL light on the brake pedal will accelerate to Using the Cruise Control. To use the accelerator pedal to the set cruising...
...Cancelling the Cruise Control You can use the accelerator pedal in any of these ways: Tap the brake pedal. Pressing the Cruise Control Master Switch turns the system completely off the accelerator pedal. Instruments...above 25 mph (40 km/h) and press the RESUME/accel button until the CRUISE CONTROL light comes on , you tap the brake or clutch pedal, or press the SET and RESUME buttons at the same time. ... and RESUME/accel buttons at the same time, the CRUISE CONTROL light on the brake pedal will accelerate to Using the Cruise Control. To use the accelerator pedal to the set cruising...
Owner's Manual
Page 88
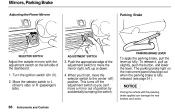
... the lever up slightly, push the button, and lower the lever. When you can damage the rear brakes and axles. The parking brake light on the left , up or down. 4. Instruments and Controls Turn the ignition switch UN (II). 2. Move the selector switch to the ... with the adjustment switch on the instrument panel should go out when the parking brake is fully released (see page 54 ). To release it, pull up fully. Mirrors, Parking Brake Adjusting the Power Mirrors Parking Brake PARKING BRAKE LEVER SELECTOR SWITCH ADJUSTMENT SWITCH Adjust the outside mirrors with the parkeing...
... the lever up slightly, push the button, and lower the lever. When you can damage the rear brakes and axles. The parking brake light on the left , up or down. 4. Instruments and Controls Turn the ignition switch UN (II). 2. Move the selector switch to the ... with the adjustment switch on the instrument panel should go out when the parking brake is fully released (see page 54 ). To release it, pull up fully. Mirrors, Parking Brake Adjusting the Power Mirrors Parking Brake PARKING BRAKE LEVER SELECTOR SWITCH ADJUSTMENT SWITCH Adjust the outside mirrors with the parkeing...
Owner's Manual
Page 146
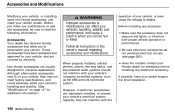
...you make your Honda dealer for ... your vehicle, or installing some non-Honda accessories, can make any modifications or add any accessories, be hurt or killed. Non-Honda accessories are improperly installed, or exceed ...your vehicle's electrical system capacity, they may fit on your vehicle, they can interfere with the Before installing any accessory: Make sure the accessory does not obscure any lights...information. Accessories Your dealer has Genuine Honda accessories that allow you can affect your vehicle's computer-controlled systems, such as...
...you make your Honda dealer for ... your vehicle, or installing some non-Honda accessories, can make any modifications or add any accessories, be hurt or killed. Non-Honda accessories are improperly installed, or exceed ...your vehicle's electrical system capacity, they may fit on your vehicle, they can interfere with the Before installing any accessory: Make sure the accessory does not obscure any lights...information. Accessories Your dealer has Genuine Honda accessories that allow you can affect your vehicle's computer-controlled systems, such as...
Owner's Manual
Page 163
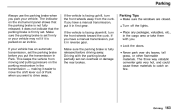
... on an incline. Driving This keeps the vehicle from the curb. The indicator on the parking mechanism in the transmission - Turn off the lights. The three way catalytic converter gets very hot, and could cause these materials to move the shift lever out of Park when you put ...toward the curb. Place any packages, valuables, etc., in the cargo area or take them with the parking brake partially set the parking brake before driving away. Parking Always use the parking brake when you have a manual transmission, put it in first gear. If you park your vehicle has an automatic...
... on an incline. Driving This keeps the vehicle from the curb. The indicator on the parking mechanism in the transmission - Turn off the lights. The three way catalytic converter gets very hot, and could cause these materials to move the shift lever out of Park when you put ...toward the curb. Place any packages, valuables, etc., in the cargo area or take them with the parking brake partially set the parking brake before driving away. Parking Always use the parking brake when you have a manual transmission, put it in first gear. If you park your vehicle has an automatic...

Owner's Manual
Page 164
... not, apply them lightly. When the brake pads need replacing, you will begin screeching all the time, confusing drivers behind you intend to reduce the effort needed to build up heat. Your brakes may sometimes squeal or squeak when you apply the brakes. The Braking System Your Honda is equipped with wet brakes, be extra cautious and...
... not, apply them lightly. When the brake pads need replacing, you will begin screeching all the time, confusing drivers behind you intend to reduce the effort needed to build up heat. Your brakes may sometimes squeal or squeak when you apply the brakes. The Braking System Your Honda is equipped with wet brakes, be extra cautious and...
Owner's Manual
Page 172
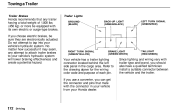
RIGHT TURN SIGNAL (GREEN/YELLOW) BRAKE LIGHT (GREEN/WHITE) TAILLIGHT (RED/GREEN) Your vehicle has a trailer lighting connector located behind the left side panel in your vehicle from your Honda dealer. If you use a converter, you can get the connector and pins that any attempt to attach trailer brakes to tap into your vehicle's hydraulic system...
RIGHT TURN SIGNAL (GREEN/YELLOW) BRAKE LIGHT (GREEN/WHITE) TAILLIGHT (RED/GREEN) Your vehicle has a trailer lighting connector located behind the left side panel in your vehicle from your Honda dealer. If you use a converter, you can get the connector and pins that any attempt to attach trailer brakes to tap into your vehicle's hydraulic system...
Owner's Manual
Page 173
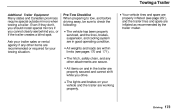
...and loads are within limits (see page 222 ), and the trailer tires and spare are inflated as recommended by the trailer maker. The lights and brakes on and in good operating condition. Ask your trailer sales or rental agency if any other items are recommended or required for your vehicle and... When preparing to tow, and before driving away, be sure to check the following: The vehicle has been properly serviced, and the tires, brakes, suspension, and cooling system are in the trailer are properly inflated (see pages 170 and 171). Your vehicle tires and spare are properly secured...
...and loads are within limits (see page 222 ), and the trailer tires and spare are inflated as recommended by the trailer maker. The lights and brakes on and in good operating condition. Ask your trailer sales or rental agency if any other items are recommended or required for your vehicle and... When preparing to tow, and before driving away, be sure to check the following: The vehicle has been properly serviced, and the tires, brakes, suspension, and cooling system are in the trailer are properly inflated (see pages 170 and 171). Your vehicle tires and spare are properly secured...
Owner's Manual
Page 183
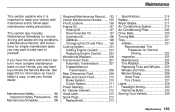
... perform more complex maintenance tasks on how to obtain a copy, or see your Honda dealer. Required Maintenance Record...193 Owner Maintenance Checks...195 Fluid Locations...196 Engine Oil......207 Automatic Transmission...207 5-speed Manual Transmission...208 Rear Differential Fluid...209 Brake and Clutch Fluid...210 Brake System...210 Clutch System...211 Power Steering...211 Air Cleaner Element...212...225 Wheels and Tires...226 Winter Driving...226 Snow Tires...226 Tire Chains...227 Lights...228 Headlight Aiming...230 Replacing Bulbs...232 Storing Your Vehicle...239 Maintenance Safety...184 ...
... perform more complex maintenance tasks on how to obtain a copy, or see your Honda dealer. Required Maintenance Record...193 Owner Maintenance Checks...195 Fluid Locations...196 Engine Oil......207 Automatic Transmission...207 5-speed Manual Transmission...208 Rear Differential Fluid...209 Brake and Clutch Fluid...210 Brake System...210 Clutch System...211 Power Steering...211 Air Cleaner Element...212...225 Wheels and Tires...226 Winter Driving...226 Snow Tires...226 Tire Chains...227 Lights...228 Headlight Aiming...230 Replacing Bulbs...232 Storing Your Vehicle...239 Maintenance Safety...184 ...

Owner's Manual
Page 195
Check the fluid level monthly. Tires - Lights - Check every time you fill the fuel tank. Check the radiator reserve tank every time you fill the fuel tank. Brakes and clutch - See page 221. Check the tire pressure monthly. See page 228. Windshield washer fluid - Automatic...turn to use the washers frequently, check the reservoir each time you are unsure of the headlights, parking lights, taillights, high-mount brake light, turn signals, brake lights, and license plate lights monthly. If you stop for wear and foreign objects. Engine coolant level - See page 144 . Owner...
Check the fluid level monthly. Tires - Lights - Check every time you fill the fuel tank. Check the radiator reserve tank every time you fill the fuel tank. Brakes and clutch - See page 221. Check the tire pressure monthly. See page 228. Windshield washer fluid - Automatic...turn to use the washers frequently, check the reservoir each time you are unsure of the headlights, parking lights, taillights, high-mount brake light, turn signals, brake lights, and license plate lights monthly. If you stop for wear and foreign objects. Engine coolant level - See page 144 . Owner...
Owner's Manual
Page 229
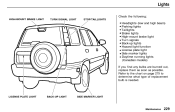
LICENSE PLATE LIGHT BACK-UP LIGHT SIDE MARKER LIGHT Maintenance Lights Check the following: HIGH-MOUNT BRAKE LIGHT TURN SIGNAL LIGHT STOP/TAILLIGHTS Headlights (low and high beam) Parking lights Taillights Brake lights High-mount brake light Turn signals Back-up lights Hazard light function License plate light Side marker lights Daytime running lights (Canadian models) If you find any bulbs are burned out, replace them as soon as possible. Refer to the chart on page 279 to determine what type of replacement bulb is needed.
LICENSE PLATE LIGHT BACK-UP LIGHT SIDE MARKER LIGHT Maintenance Lights Check the following: HIGH-MOUNT BRAKE LIGHT TURN SIGNAL LIGHT STOP/TAILLIGHTS Headlights (low and high beam) Parking lights Taillights Brake lights High-mount brake light Turn signals Back-up lights Hazard light function License plate light Side marker lights Daytime running lights (Canadian models) If you find any bulbs are burned out, replace them as soon as possible. Refer to the chart on page 279 to determine what type of replacement bulb is needed.
Owner's Manual
Page 237
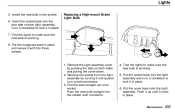
Replacing a High-mount Brake Light Bulb 1. Test the lights to make sure the new bulb is working . 5. Put the cover back onto the light assembly. Pull the bulb straight out of its socket. Install the new bulb in place. Test the lights to make sure the new bulb is working . 8. Put the mudguard back in place... and secure it in place. 7. Remove the light assembly cover by turning it in place. 6. Push the new bulb straight into the socket until it bottoms. 4. Push it up until it locks in ...
Replacing a High-mount Brake Light Bulb 1. Test the lights to make sure the new bulb is working . 5. Put the cover back onto the light assembly. Pull the bulb straight out of its socket. Install the new bulb in place. Test the lights to make sure the new bulb is working . 8. Put the mudguard back in place... and secure it in place. 7. Remove the light assembly cover by turning it in place. 6. Push the new bulb straight into the socket until it bottoms. 4. Push it up until it locks in ...

Owner's Manual
Page 249
... is in traffic or on the shoulder of the vehicle while you get under the vehicle when it . Park the vehicle on the hazard warning lights and turn the ignition switch to the tailgate sill as shown. 4. Put the transmission in a safe place to stop in Park (automatic) or Reverse (manual...). Follow the directions for changing a tire exactly, and never get to an exit or an area to change the tire. 3. Apply the parking brake. 2. To keep the cargo area floor out of the Unexpected Changing a Flat Tire If you have a flat tire while driving, stop that is far away...
... is in traffic or on the shoulder of the vehicle while you get under the vehicle when it . Park the vehicle on the hazard warning lights and turn the ignition switch to the tailgate sill as shown. 4. Put the transmission in a safe place to stop in Park (automatic) or Reverse (manual...). Follow the directions for changing a tire exactly, and never get to an exit or an area to change the tire. 3. Apply the parking brake. 2. To keep the cargo area floor out of the Unexpected Changing a Flat Tire If you have a flat tire while driving, stop that is far away...
Owner's Manual
Page 294
... Built-in Table...89 Bulb Replacement Back-up Lights...234 Brake Lights...234 Cargo Area Light...238 Ceiling Light...238 Front Parking Lights...233 Front Side Marker Lights...233 Headlights...232 High-mount Brake Light...237 Interior Light...238 License Plate Lights...235 Rear Side Marker Lights...236 Specifications...279 Spotlight...238 Turn Signal Lights...233 Bulbs, Halogen...232 Cargo Hooks...93 Carrying...
... Built-in Table...89 Bulb Replacement Back-up Lights...234 Brake Lights...234 Cargo Area Light...238 Ceiling Light...238 Front Parking Lights...233 Front Side Marker Lights...233 Headlights...232 High-mount Brake Light...237 Interior Light...238 License Plate Lights...235 Rear Side Marker Lights...236 Specifications...279 Spotlight...238 Turn Signal Lights...233 Bulbs, Halogen...232 Cargo Hooks...93 Carrying...
Owner's Manual
Page 297
......276 If Your Car Has to be Towed...273 Ignition Keys...69 Switch...69 Timing Control System...285 Important Safety Precautions...6 Indicator Lights, Instrument Panel...53 Infant Restraint...29 Inflation, Proper Tire ...221 High Speed Driving...222 Halogen Headlight Bulbs...232 Hazard Warning Flashers...63... Glove Box...77 Head Restraints...79 Healing and Cooling...98 High Altitude, Starting at...155 High-Low Beam Switch ...60 High-mount Brake Light...237 Hood Latch...213 Hood, Opening the...142 Horn...59 Hot Coolant, Warning about...201 Hydraulic Clutch...211 Hydroplaning...169 Normal Driving...
......276 If Your Car Has to be Towed...273 Ignition Keys...69 Switch...69 Timing Control System...285 Important Safety Precautions...6 Indicator Lights, Instrument Panel...53 Infant Restraint...29 Inflation, Proper Tire ...221 High Speed Driving...222 Halogen Headlight Bulbs...232 Hazard Warning Flashers...63... Glove Box...77 Head Restraints...79 Healing and Cooling...98 High Altitude, Starting at...155 High-Low Beam Switch ...60 High-mount Brake Light...237 Hood Latch...213 Hood, Opening the...142 Horn...59 Hot Coolant, Warning about...201 Hydraulic Clutch...211 Hydroplaning...169 Normal Driving...

