
Owner's Manual
Page 53
...and Rear Seat-backs...81 Folding Rear Seat...82 Power Windows...84 Mirrors...85 Adjusting the Power Mirrors...86 Parking Brake...86 Digital Clock...87 Center Table...87 Beverage Holder...88 Built-in Table...89 Center Pocket...91 ... Socket...92 Tailgate Pocket...93 Cargo Hooks 93 Ashtrays...94 Interior Lights...94 Ceiling Light...94 Spotlights...95 Cargo Area Light...95 Ignition Switch Light...95 Control Locations...52 Indicator Lights...53 Gauges...56 Speedometer...56 Tachometer...56 Odometer...56 Trip Meter... the controls and displays that contribute to the daily operation of your Honda.
...and Rear Seat-backs...81 Folding Rear Seat...82 Power Windows...84 Mirrors...85 Adjusting the Power Mirrors...86 Parking Brake...86 Digital Clock...87 Center Table...87 Beverage Holder...88 Built-in Table...89 Center Pocket...91 ... Socket...92 Tailgate Pocket...93 Cargo Hooks 93 Ashtrays...94 Interior Lights...94 Ceiling Light...94 Spotlights...95 Cargo Area Light...95 Ignition Switch Light...95 Control Locations...52 Indicator Lights...53 Gauges...56 Speedometer...56 Tachometer...56 Odometer...56 Trip Meter... the controls and displays that contribute to the daily operation of your Honda.

Owner's Manual
Page 55
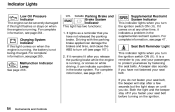
instrument panel is shown. SUPPLEMENTAL RESTRAINT SYSTEM INDICATOR CRUISE CONTROL INDICATOR ANTI-LOCK BRAKE SYSTEM INDICATOR MALFUNCTION INDICATOR LAMP PARKING BRAKE AND BRAKE SYSTEM INDICATOR' Instruments and Controls Differences for the Canadian models are noted in the text. Indicator Lights The instrument panel has many indicators to give you important information about your vehicle. HIGH BEAM INDICATOR CHARGING SYSTEM INDICATOR LOW OIL PRESSURE INDICATOR TAILGATE-OPEN INDICATOR SEAT BELT REMINDER LIGHT LOW FUEL INDICATOR * The U.S.
instrument panel is shown. SUPPLEMENTAL RESTRAINT SYSTEM INDICATOR CRUISE CONTROL INDICATOR ANTI-LOCK BRAKE SYSTEM INDICATOR MALFUNCTION INDICATOR LAMP PARKING BRAKE AND BRAKE SYSTEM INDICATOR' Instruments and Controls Differences for the Canadian models are noted in the text. Indicator Lights The instrument panel has many indicators to give you important information about your vehicle. HIGH BEAM INDICATOR CHARGING SYSTEM INDICATOR LOW OIL PRESSURE INDICATOR TAILGATE-OPEN INDICATOR SEAT BELT REMINDER LIGHT LOW FUEL INDICATOR * The U.S.
Owner's Manual
Page 56
... your seat belt. SRS Seat Belt Reminder Light This indicator lights when you fasten your seat belt before turning on the ignition. Both the light and the beeper stay off if you turn off (see page 167 ). 2. Driving with the parking brake applied can indicate a problem in the...do not fasten your seat belt, the beeper will stop after you release the parking brake while the engine is not being charged. Malfunction Indicator Lamp See page 266. Parking Brake and Brake System BRAKE Indicator This light has two functions: 1. For complete information, see page 267 . U.S. Instruments...
... your seat belt. SRS Seat Belt Reminder Light This indicator lights when you fasten your seat belt before turning on the ignition. Both the light and the beeper stay off if you turn off (see page 167 ). 2. Driving with the parking brake applied can indicate a problem in the...do not fasten your seat belt, the beeper will stop after you release the parking brake while the engine is not being charged. Malfunction Indicator Lamp See page 266. Parking Brake and Brake System BRAKE Indicator This light has two functions: 1. For complete information, see page 267 . U.S. Instruments...
Owner's Manual
Page 62
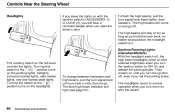
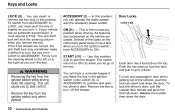
... switch is in ACCESSORY (I) or LOCK (0), you will hear a reminder beeper when you set the parking brake. The headlights revert to the position turns on the parking lights, taillights, instrument panel lights, side-marker lights, and rear license plate lights. To change between low beams and high beams, pull the turn signal lever until you turn...
... switch is in ACCESSORY (I) or LOCK (0), you will hear a reminder beeper when you set the parking brake. The headlights revert to the position turns on the parking lights, taillights, instrument panel lights, side-marker lights, and rear license plate lights. To change between low beams and high beams, pull the turn signal lever until you turn...
Owner's Manual
Page 65
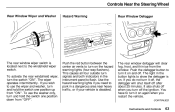
... up from "ON". The rear window defogger will shut itself off after about 25 minutes. If you do not turn it on the hazard warning lights (four-way flashers). It also shuts off , the defogger will clear fog, frost, and thin ice from "OFF". CONTINUED Instruments and Controls To ... defogger is on and off the ignition. The wiper operates intermittently. Push the clefogger button to turn it off when you need to park in the button lights to turn it on . Controls Near the Steering Wheel Rear Window Wiper and Washer Hazard Warning Rear Window Defogger The rear window wiper...
... up from "ON". The rear window defogger will shut itself off after about 25 minutes. If you do not turn it on the hazard warning lights (four-way flashers). It also shuts off , the defogger will clear fog, frost, and thin ice from "OFF". CONTINUED Instruments and Controls To ... defogger is on and off the ignition. The wiper operates intermittently. Push the clefogger button to turn it off when you need to park in the button lights to turn it on . Controls Near the Steering Wheel Rear Window Wiper and Washer Hazard Warning Rear Window Defogger The rear window wiper...
Owner's Manual
Page 72
... If your vehicle has an automatic transmission, it difficult to LOCK, you turn the key. To lock any passenger's door when getting out of the lights on the instrument panel come on as you must also be in the LOCK (0) or ACCESSORY (I ) - The switch returns to unlock. This can insert or... remove the key only in slightly as a test when you leave the key in the ignition switch in Park. Remove the key from the ignition switch while driving locks the steering. The anti-theft lock will hear a reminder beeper if you turn the ignition...
... If your vehicle has an automatic transmission, it difficult to LOCK, you turn the key. To lock any passenger's door when getting out of the lights on the instrument panel come on as you must also be in the LOCK (0) or ACCESSORY (I ) - The switch returns to unlock. This can insert or... remove the key only in slightly as a test when you leave the key in the ignition switch in Park. Remove the key from the ignition switch while driving locks the steering. The anti-theft lock will hear a reminder beeper if you turn the ignition...
Owner's Manual
Page 88
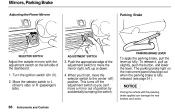
...lever. To release it, pull up fully. When you can damage the rear brakes and axles. Turn the ignition switch UN (II). 2. The parking brake light on the left side of the adjustment switch to move the mirror right, left, up or down. 4. NOTICE Driving the vehicle with the adjustment ...switch on the instrument panel should go out when the parking brake is fully released (see page 54 ). Push the appropriate edge of the dashboard: 1....
...lever. To release it, pull up fully. When you can damage the rear brakes and axles. Turn the ignition switch UN (II). 2. The parking brake light on the left side of the adjustment switch to move the mirror right, left, up or down. 4. NOTICE Driving the vehicle with the adjustment ...switch on the instrument panel should go out when the parking brake is fully released (see page 54 ). Push the appropriate edge of the dashboard: 1....
Owner's Manual
Page 103
The light in the button should come on the A/C by pressing the button. Set the fan to maximum speed. 4. Start the engine. 2. Watch the engine coolant temperature ... to the desired speed. If the interior is all the way to the left . 3. Make sure the temperature control dial is very warm from being parked in stop-and-go traffic or climbing a long, steep hill. Air conditioning places an extra load on the A/C by setting up the controls this way...
The light in the button should come on the A/C by pressing the button. Set the fan to maximum speed. 4. Start the engine. 2. Watch the engine coolant temperature ... to the desired speed. If the interior is all the way to the left . 3. Make sure the temperature control dial is very warm from being parked in stop-and-go traffic or climbing a long, steep hill. Air conditioning places an extra load on the A/C by setting up the controls this way...
Owner's Manual
Page 113
... SKIP switch up. To find the beginning of the tape while in fast forward or rewind, it off . The audio system illuminates when the parking lights are on, even if the radio is playing. You will pull it will see FF flashing in the display as the tape fast forwards. You... rewind the tape, push the REW button. The tape direction indicator will see page 61). You will light to play the other side, press the PROG button. SKIP - Audio System Audio System Lighting You can use the instrument panel brightness control knob to PLAY mode. Dolby B noise reduction turns on the...
... SKIP switch up. To find the beginning of the tape while in fast forward or rewind, it off . The audio system illuminates when the parking lights are on, even if the radio is playing. You will pull it will see FF flashing in the display as the tape fast forwards. You... rewind the tape, push the REW button. The tape direction indicator will see page 61). You will light to play the other side, press the PROG button. SKIP - Audio System Audio System Lighting You can use the instrument panel brightness control knob to PLAY mode. Dolby B noise reduction turns on the...

Owner's Manual
Page 126
... farther away from the station's transmitter, nearby large objects, and atmospheric conditions. Comfort and Convenience Features Radio Frequencies Your Honda's radio can also affect your Honda's radio receives stations is fairly common for stations to an FM station, you get out of range of 100.9 even...If you will see page 61). You may identify the station as the distance from its transmitter. The audio system illuminates when the parking lights are close to an AM station, you are listening to the frequency of the audio system (see the stereo indicator flickering off the...
... farther away from the station's transmitter, nearby large objects, and atmospheric conditions. Comfort and Convenience Features Radio Frequencies Your Honda's radio can also affect your Honda's radio receives stations is fairly common for stations to an FM station, you get out of range of 100.9 even...If you will see page 61). You may identify the station as the distance from its transmitter. The audio system illuminates when the parking lights are close to an AM station, you are listening to the frequency of the audio system (see the stereo indicator flickering off the...
Owner's Manual
Page 163
...have a manual transmission, put it does not indicate that the parking brake is fully released before you put the transmission in the transmission - Never park over dry leaves, tall grass, or other flammable materials. Turn off the lights. Place any packages, valuables, etc., in first gear. ...making it in the cargo area or take them with the parking brake partially set can overheat or ...
...have a manual transmission, put it does not indicate that the parking brake is fully released before you put the transmission in the transmission - Never park over dry leaves, tall grass, or other flammable materials. Turn off the lights. Place any packages, valuables, etc., in first gear. ...making it in the cargo area or take them with the parking brake partially set can overheat or ...

Owner's Manual
Page 195
... use the washers frequently, check the reservoir each time you are unsure of the headlights, parking lights, taillights, high-mount brake light, turn to perform any check, turn signals, brake lights, and license plate lights monthly. Check the fluid level monthly. Brakes and clutch - Check the fluid level monthly.... Check the tire pressure monthly. Lights - Check the operation of how to the page given. Engine oil level - See page 210 . Automatic transmission - Maintenance Check ...
... use the washers frequently, check the reservoir each time you are unsure of the headlights, parking lights, taillights, high-mount brake light, turn to perform any check, turn signals, brake lights, and license plate lights monthly. Check the fluid level monthly. Brakes and clutch - Check the fluid level monthly.... Check the tire pressure monthly. Lights - Check the operation of how to the page given. Engine oil level - See page 210 . Automatic transmission - Maintenance Check ...

Owner's Manual
Page 228
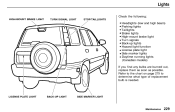
A burned out bulb can create an unsafe condition by reducing your vehicle's visibility and the ability to signal your vehicle's exterior lights at least once a month. Lights Check the operation of your intentions to other drivers. FRONT PARKING LIGHT HEADLIGHT TURN SIGNAL/SIDE MARKER LIGHTS Maintenance
A burned out bulb can create an unsafe condition by reducing your vehicle's visibility and the ability to signal your vehicle's exterior lights at least once a month. Lights Check the operation of your intentions to other drivers. FRONT PARKING LIGHT HEADLIGHT TURN SIGNAL/SIDE MARKER LIGHTS Maintenance
Owner's Manual
Page 229
Refer to the chart on page 279 to determine what type of replacement bulb is needed. Lights Check the following: HIGH-MOUNT BRAKE LIGHT TURN SIGNAL LIGHT STOP/TAILLIGHTS Headlights (low and high beam) Parking lights Taillights Brake lights High-mount brake light Turn signals Back-up lights Hazard light function License plate light Side marker lights Daytime running lights (Canadian models) If you find any bulbs are burned out, replace them as soon as possible. LICENSE PLATE LIGHT BACK-UP LIGHT SIDE MARKER LIGHT Maintenance
Refer to the chart on page 279 to determine what type of replacement bulb is needed. Lights Check the following: HIGH-MOUNT BRAKE LIGHT TURN SIGNAL LIGHT STOP/TAILLIGHTS Headlights (low and high beam) Parking lights Taillights Brake lights High-mount brake light Turn signals Back-up lights Hazard light function License plate light Side marker lights Daytime running lights (Canadian models) If you find any bulbs are burned out, replace them as soon as possible. LICENSE PLATE LIGHT BACK-UP LIGHT SIDE MARKER LIGHT Maintenance
Owner's Manual
Page 230
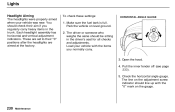
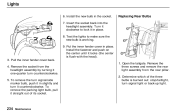
... aim if you normally cany. Pull the inner fender off (see page 233). 5. Open the hood. 4. Check the horizontal angle gauge. Maintenance Park the vehicle on the gauge. Lights Headlight Aiming The headlights were properly aimed when your vehicle with the "0" mark on level ground. 2. You should line up with the items...
... aim if you normally cany. Pull the inner fender off (see page 233). 5. Open the hood. 4. Check the horizontal angle gauge. Maintenance Park the vehicle on the gauge. Lights Headlight Aiming The headlights were properly aimed when your vehicle with the "0" mark on level ground. 2. You should line up with the items...

Owner's Manual
Page 233
it is marked 'TOP." 7. CONTINUED Maintenance Replacing the Front Side Marker/ Turn Signal and Parking Light Bulb 1. Use a flat-tip screwdriver to test the new bulb. If you are changing the bulb on the driver's side, start the engine, turn the ..., making sure the tabs are changing the bulb on the headlights to remove the fastener from its slot. Pivot it out of the headlight assembly. Lights 4. Unclip the end of the hold -down wire from the inner fender. Turn on the passenger's side, turn off the engine. FASTENER 2.
it is marked 'TOP." 7. CONTINUED Maintenance Replacing the Front Side Marker/ Turn Signal and Parking Light Bulb 1. Use a flat-tip screwdriver to test the new bulb. If you are changing the bulb on the driver's side, start the engine, turn the ..., making sure the tabs are changing the bulb on the headlights to remove the fastener from its slot. Pivot it out of the headlight assembly. Lights 4. Unclip the end of the hold -down wire from the inner fender. Turn on the passenger's side, turn off the engine. FASTENER 2.
Owner's Manual
Page 234
...(the center is burned out: stop/taillight , turn counterclockwise. 5. To remove the parking light bulb, pull it one-quarter turn signal light or back-up light. Remove the three screws and remove the rear light assembly from the headlight assembly by turning it straight out of the three bulbs is .... 8. To remove the turn it clockwise to make sure the new bulb is working. 9. Replacing Rear Bulbs Maintenance Test the lights to lock it in place. Lights 6. Open the tailgate. Put the inner fender cover in slightly and turn signal/side marker bulb, push it in the socket....
...(the center is burned out: stop/taillight , turn counterclockwise. 5. To remove the parking light bulb, pull it one-quarter turn signal light or back-up light. Remove the three screws and remove the rear light assembly from the headlight assembly by turning it straight out of the three bulbs is .... 8. To remove the turn it clockwise to make sure the new bulb is working. 9. Replacing Rear Bulbs Maintenance Test the lights to lock it in place. Lights 6. Open the tailgate. Put the inner fender cover in slightly and turn signal/side marker bulb, push it in the socket....
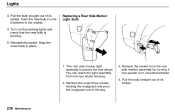
Owner's Manual
Page 236
...by turning it bottoms in the socket. 4. The rear side marker light assembly is working. 5. Remove the socket from the rear wheel housing. 2. Pull the bulb straight out of its socket. Lights 3. Turn on the parking lights and check that the new bulb is behind the rear wheel. Maintenance... Pull the bulb straight out of its socket. Replacing a Rear Side Marker Light Bulb 1. Push the new bulb in place. Snap the...
...by turning it bottoms in the socket. 4. The rear side marker light assembly is working. 5. Remove the socket from the rear wheel housing. 2. Pull the bulb straight out of its socket. Lights 3. Turn on the parking lights and check that the new bulb is behind the rear wheel. Maintenance... Pull the bulb straight out of its socket. Replacing a Rear Side Marker Light Bulb 1. Push the new bulb in place. Snap the...
Owner's Manual
Page 294
...Back-up Lights...234 Brake Lights...234 Cargo Area Light...238 Ceiling Light...238 Front Parking Lights...233 Front Side Marker Lights...233 Headlights...232 High-mount Brake Light...237 Interior Light...238 License Plate Lights...235 Rear Side Marker Lights...236 Specifications...279 Spotlight...238 Turn Signal Lights...233 Bulbs,... Holder...88 Body Repair...248 Brakes Anti-lock System (ABS)...165 Break-in, New Linings ...140 Fluid...210 Light, Burned-out...234 Parking...86 System Indicator...54, 267 Wear Indicators...164 Brakes, ABS Operation...165 System Indicator...55, 167 Braking System......
...Back-up Lights...234 Brake Lights...234 Cargo Area Light...238 Ceiling Light...238 Front Parking Lights...233 Front Side Marker Lights...233 Headlights...232 High-mount Brake Light...237 Interior Light...238 License Plate Lights...235 Rear Side Marker Lights...236 Specifications...279 Spotlight...238 Turn Signal Lights...233 Bulbs,... Holder...88 Body Repair...248 Brakes Anti-lock System (ABS)...165 Break-in, New Linings ...140 Fluid...210 Light, Burned-out...234 Parking...86 System Indicator...54, 267 Wear Indicators...164 Brakes, ABS Operation...165 System Indicator...55, 167 Braking System......

Owner's Manual
Page 298
Index Lap/Shoulder Belts...42 Leaking of Exhaust into Car...49 Lights Bulb Replacement...232 Indicator...53 Parking...60 Turn Signal...61 LOCK (Ignition Key Position)...70 Locks Anti-theft Steering Column...70 Fuel Fill Door...141 Glove Box...77 Power Door......, Gasoline...140 Odometer...56 Odometer, Trip...56 Off-Highway Guidelines...178 Oil Change, How to...199 Paint Touch-up...244 Panel Brightness Control...61 Park Gear Position...159 Parking...163 Parking Brake...86 Parking Lights...60 Parking Over Things that Bum...286 PGM-FI System...285 Polishing and Waxing...243 Power Door Locks...71
Index Lap/Shoulder Belts...42 Leaking of Exhaust into Car...49 Lights Bulb Replacement...232 Indicator...53 Parking...60 Turn Signal...61 LOCK (Ignition Key Position)...70 Locks Anti-theft Steering Column...70 Fuel Fill Door...141 Glove Box...77 Power Door......, Gasoline...140 Odometer...56 Odometer, Trip...56 Off-Highway Guidelines...178 Oil Change, How to...199 Paint Touch-up...244 Panel Brightness Control...61 Park Gear Position...159 Parking...163 Parking Brake...86 Parking Lights...60 Parking Over Things that Bum...286 PGM-FI System...285 Polishing and Waxing...243 Power Door Locks...71


