
Owner's Manual
Page 230
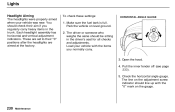
Open the hood. 4. Each headlight assembly has horizontal and vertical adjustment indicators. Make sure the fuel tank is full. HORIZONTAL ANGLE GAUGE 3. Maintenance These are aimed at the factory. Park the ... line on the adjustment screw indicator should be sitting in the trunk. You should check their "0" positions after the headlights are set to their aim if you normally cany. Lights Headlight Aiming The headlights were properly aimed when your vehicle with the "0" mark on level ground. 2. Check the horizontal angle gauge. The driver...
Open the hood. 4. Each headlight assembly has horizontal and vertical adjustment indicators. Make sure the fuel tank is full. HORIZONTAL ANGLE GAUGE 3. Maintenance These are aimed at the factory. Park the ... line on the adjustment screw indicator should be sitting in the trunk. You should check their "0" positions after the headlights are set to their aim if you normally cany. Lights Headlight Aiming The headlights were properly aimed when your vehicle with the "0" mark on level ground. 2. Check the horizontal angle gauge. The driver...

Owner's Manual
Page 233
... end into the hole, making sure the tabs are changing the bulb on the passenger's side, turn off the engine. Pivot it out of the headlight assembly. Install the rubber seal over the back of the way and remove the bulb. 5. Make sure it is right side up; If you are changing... hold -down wire from the inner fender. Replacing the Front Side Marker/ Turn Signal and Parking Light Bulb 1. it is marked 'TOP." 7. Turn on the headlights to remove the fastener from its slot. Use a flat-tip screwdriver to test the new bulb.
... end into the hole, making sure the tabs are changing the bulb on the passenger's side, turn off the engine. Pivot it out of the headlight assembly. Install the rubber seal over the back of the way and remove the bulb. 5. Make sure it is right side up; If you are changing... hold -down wire from the inner fender. Replacing the Front Side Marker/ Turn Signal and Parking Light Bulb 1. it is marked 'TOP." 7. Turn on the headlights to remove the fastener from its slot. Use a flat-tip screwdriver to test the new bulb.
Owner's Manual
Page 234
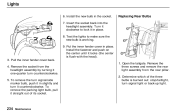
.... Replacing Rear Bulbs Maintenance Test the lights to lock it one-quarter turn counterclockwise. 5. Insert the socket back into the headlight assembly. Remove the three screws and remove the rear light assembly from the headlight assembly by turning it in place. Pull the inner fender cover back. 4. Remove the socket from the rear pillar. 2. Put...
.... Replacing Rear Bulbs Maintenance Test the lights to lock it one-quarter turn counterclockwise. 5. Insert the socket back into the headlight assembly. Remove the three screws and remove the rear light assembly from the headlight assembly by turning it in place. Pull the inner fender cover back. 4. Remove the socket from the rear pillar. 2. Put...


