
Owner's Manual
Page 4
Your Car at a Glance MIRROR CONTROLS (P.96) DOOR LOCK SWITCH (P.73) DIGITAL CLOCK (P.98) HEATING/COOLING CONTROL (P.106) AUDIO SYSTEM (P.121) POWER WINDOW SWITCHES (P.93) TRUNK RELEASE HANDLE/ FUEL FILL DOOR (P.78, 156) HOOD RELEASE HANDLE (P.158)
Your Car at a Glance MIRROR CONTROLS (P.96) DOOR LOCK SWITCH (P.73) DIGITAL CLOCK (P.98) HEATING/COOLING CONTROL (P.106) AUDIO SYSTEM (P.121) POWER WINDOW SWITCHES (P.93) TRUNK RELEASE HANDLE/ FUEL FILL DOOR (P.78, 156) HOOD RELEASE HANDLE (P.158)
Owner's Manual
Page 49
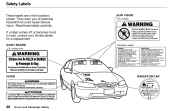
DASH BOARD U.S. Safety Labels These labels are in the locations shown. models only Canadian models SUN VISOR U.S. Read these labels carefully. If a label comes off or becomes hard to read, contact your Honda dealer for a replacement. They warn you of potential hazards that could cause serious injury. models HOOD RADIATOR CAP Driver and Passenger Safety
DASH BOARD U.S. Safety Labels These labels are in the locations shown. models only Canadian models SUN VISOR U.S. Read these labels carefully. If a label comes off or becomes hard to read, contact your Honda dealer for a replacement. They warn you of potential hazards that could cause serious injury. models HOOD RADIATOR CAP Driver and Passenger Safety
Owner's Manual
Page 51
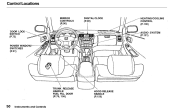
Control Locations MIRROR CONTROLS (P.96) DOOR LOCK SWITCH (P.73) DIGITAL CLOCK (P.98) HEATING/COOLING CONTROL (P.106) AUDIO SYSTEM (P.121) POWER WINDOW SWITCHES (P.91) TRUNK RELEASE HANDLE/ FUEL FILL DOOR (P.78, 156) HOOD RELEASE HANDLE (P.158) Instruments and Controls
Control Locations MIRROR CONTROLS (P.96) DOOR LOCK SWITCH (P.73) DIGITAL CLOCK (P.98) HEATING/COOLING CONTROL (P.106) AUDIO SYSTEM (P.121) POWER WINDOW SWITCHES (P.91) TRUNK RELEASE HANDLE/ FUEL FILL DOOR (P.78, 156) HOOD RELEASE HANDLE (P.158) Instruments and Controls
Owner's Manual
Page 154
...master key or the remote transmitter without using the key or the remote transmitter), or the hood, will cause it is cut. Comfort and Convenience Features If the system will not set if the hood, trunk, or any door (without triggering the alarm. Security System On SE, EX and ... side marker lights and taillights flashes if someone attempts to show you lock the doors, hood, and trunk. Since it to alarm. The horn sounds and a combination of the monitor display, manually check the hood. The security system sets automatically fifteen seconds after you the system is removed from theft...
...master key or the remote transmitter without using the key or the remote transmitter), or the hood, will cause it is cut. Comfort and Convenience Features If the system will not set if the hood, trunk, or any door (without triggering the alarm. Security System On SE, EX and ... side marker lights and taillights flashes if someone attempts to show you lock the doors, hood, and trunk. Since it to alarm. The horn sounds and a combination of the monitor display, manually check the hood. The security system sets automatically fifteen seconds after you the system is removed from theft...
Owner's Manual
Page 155
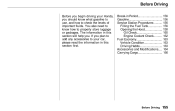
...your car, please read the information in Period...156 Gasoline...156 Service Station Procedures ...156 Filling the Fuel Tank...156 Opening the Hood...158 Oil Check...160 Engine Coolant Check...162 Fuel Economy...163 Vehicle Condition...163 Driving Habits...163 Accessories and Modifications...164 Carrying ...Cargo...166 Before Driving If you plan to add any accessories to your Honda, you . You also need to know what gasoline to use, and how to properly store luggage or packages. Break-in this...
...your car, please read the information in Period...156 Gasoline...156 Service Station Procedures ...156 Filling the Fuel Tank...156 Opening the Hood...158 Oil Check...160 Engine Coolant Check...162 Fuel Economy...163 Vehicle Condition...163 Driving Habits...163 Accessories and Modifications...164 Carrying ...Cargo...166 Before Driving If you plan to add any accessories to your Honda, you . You also need to know what gasoline to use, and how to properly store luggage or packages. Break-in this...

Owner's Manual
Page 158
... of the dashboard. Shift to the right of the hood to Park or Neutral and set the parking brake. Lift the hood. Slide your fingers under the lower left until it releases the hood. Push this handle up slightly. 2. Pull the hood release handle located under the front edge of center.... The hood will pop up until you can open the hood without lifting the hood latch handle, or the hood latch handle moves stiffly or does not ...
... of the dashboard. Shift to the right of the hood to Park or Neutral and set the parking brake. Lift the hood. Slide your fingers under the lower left until it releases the hood. Push this handle up slightly. 2. Pull the hood release handle located under the front edge of center.... The hood will pop up until you can open the hood without lifting the hood latch handle, or the hood latch handle moves stiffly or does not ...
Owner's Manual
Page 159
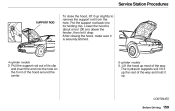
... lift it up the rest of the way and hold it up most of the way. Lower the hood to remove the support rod from the hole. Pull the support rod out of the hood around the center. 3. SUPPORT ROD 4-cylinder models 6-cylinder models 3. CONTINUED Before Driving Service Station Procedures To close... the hood, lift it up slightly to about a foot (30 cm) above the fender, then let it drop. Put the support rod back into its clip and ...
... lift it up the rest of the way and hold it up most of the way. Lower the hood to remove the support rod from the hole. Pull the support rod out of the hood around the center. 3. SUPPORT ROD 4-cylinder models 6-cylinder models 3. CONTINUED Before Driving Service Station Procedures To close... the hood, lift it up slightly to about a foot (30 cm) above the fender, then let it drop. Put the support rod back into its clip and ...

Owner's Manual
Page 160
Before Driving Service Station Procedures To close the hood, lower it is securely latched. Oil Check 4-cylinder models DIPSTICK 6-cylinder models DIPSTICK Check the engine oil level every time you check the oil. 1. Wait a few minutes after turning the engine off before you fill the car with your hands. After closing the hood, make sure it to about a foot (30 cm) above the fender, then press down firmly with fuel. Remove the dipstick (orange handle).
Before Driving Service Station Procedures To close the hood, lower it is securely latched. Oil Check 4-cylinder models DIPSTICK 6-cylinder models DIPSTICK Check the engine oil level every time you check the oil. 1. Wait a few minutes after turning the engine off before you fill the car with your hands. After closing the hood, make sure it to about a foot (30 cm) above the fender, then press down firmly with fuel. Remove the dipstick (orange handle).

Owner's Manual
Page 170
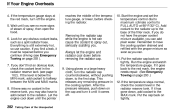
... windows, mirrors, and outside mirrors (see page 171). 12. Visually check the tires. Check the adjustment of the seat (see page 51). Check that the hood and trunk are fully closed and locked. 9. Fasten your passengers have fastened their seat belts (see page 65). 8. Remove frost, snow, or ice. 2. Preparing to...
... windows, mirrors, and outside mirrors (see page 171). 12. Visually check the tires. Check the adjustment of the seat (see page 51). Check that the hood and trunk are fully closed and locked. 9. Fasten your passengers have fastened their seat belts (see page 65). 8. Remove frost, snow, or ice. 2. Preparing to...
Owner's Manual
Page 193
... Manual Transmission...223 Brake and Clutch Fluid...224 Brake System...224 Clutch System...225 Power Steering...225 Air Cleaner Element...226 Hood Latch...229 Spark Plugs...229 Replacement...229 Specifications...230 Battery...233 Wiper Blades...236 Air Conditioning System...238 Air Conditioning Filter...239...Car...260 Maintenance See page 315 for simple maintenance tasks you may want to obtain a copy, or see your Honda dealer. This section also includes Maintenance Schedules for normal driving and severe driving conditions, a Maintenance Record, and instructions for information on...
... Manual Transmission...223 Brake and Clutch Fluid...224 Brake System...224 Clutch System...225 Power Steering...225 Air Cleaner Element...226 Hood Latch...229 Spark Plugs...229 Replacement...229 Specifications...230 Battery...233 Wiper Blades...236 Air Conditioning System...238 Air Conditioning Filter...239...Car...260 Maintenance See page 315 for simple maintenance tasks you may want to obtain a copy, or see your Honda dealer. This section also includes Maintenance Schedules for normal driving and severe driving conditions, a Maintenance Record, and instructions for information on...
Owner's Manual
Page 211
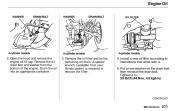
...Remove the oil filter and let the remaining oil drain. Install a new oil filter according to instructions that come with it to remove the filter. 4. Remove the oil drain bolt and washer from your Honda dealer) is required to : 33 lbf.ft (44 N.m, 4.5 kgf.m) CONTINUED Maintenance... Drain the oil into an appropriate container. 3. Engine Oil WASHER DRAIN BOLT WASHER DRAIN BOLT OIL FILTER 4-cylinder models 6-cylinder models 4-cylinder models 2. Open the hood and remove the ...
...Remove the oil filter and let the remaining oil drain. Install a new oil filter according to instructions that come with it to remove the filter. 4. Remove the oil drain bolt and washer from your Honda dealer) is required to : 33 lbf.ft (44 N.m, 4.5 kgf.m) CONTINUED Maintenance... Drain the oil into an appropriate container. 3. Engine Oil WASHER DRAIN BOLT WASHER DRAIN BOLT OIL FILTER 4-cylinder models 6-cylinder models 4-cylinder models 2. Open the hood and remove the ...
Owner's Manual
Page 216
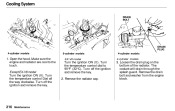
... on the bottom of the radiator. Turn the temperature control Dial all the way clockwise. Turn the temperature control dial to the touch. Open the hood.
... on the bottom of the radiator. Turn the temperature control Dial all the way clockwise. Turn the temperature control dial to the touch. Open the hood.

Owner's Manual
Page 229
...the Maintenance Schedule. CONTINUED Maintenance If you are not sure how to clean and grease the latch, contact your car should be replaced according to the time and distance recommendations in the maintenance schedule. Remove the spark plug cap by pulling it with a multipurpose grease. Remove... the spark plug with a mild cleaner, then lubricate it straight out. 3. Replacement SPARK PLUG CAP Clean the hood latch assembly with a five-eighths inch (16 mm) spark plug socket. Lubricate all the moving parts, including the pivot. Clean up any ...
...the Maintenance Schedule. CONTINUED Maintenance If you are not sure how to clean and grease the latch, contact your car should be replaced according to the time and distance recommendations in the maintenance schedule. Remove the spark plug cap by pulling it with a multipurpose grease. Remove... the spark plug with a mild cleaner, then lubricate it straight out. 3. Replacement SPARK PLUG CAP Clean the hood latch assembly with a five-eighths inch (16 mm) spark plug socket. Lubricate all the moving parts, including the pivot. Clean up any ...
Owner's Manual
Page 249
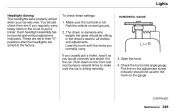
... these settings: 1. Load the trunk with the mark on the front and rear bumpers several times to make sure the car is full. Open the hood. 4. HORIZONTAL GAUGE CONTINUED Maintenance Push down on the gauge. These are aimed at the factory. The line on the adjustment screw indicator should line up...
... these settings: 1. Load the trunk with the mark on the front and rear bumpers several times to make sure the car is full. Open the hood. 4. HORIZONTAL GAUGE CONTINUED Maintenance Push down on the gauge. These are aimed at the factory. The line on the adjustment screw indicator should line up...
Owner's Manual
Page 251
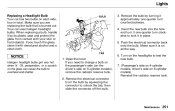
... you touch the glass, clean it in total. Lights Replacing a Headlight Bulb Your car has two bulbs on each side, four in place. 5. Open the hood. TAB NOTICE Halogen headlight bulbs get very hot when lit. If you are replacing the bulb that is on the headlights to overheat and shatter...
... you touch the glass, clean it in total. Lights Replacing a Headlight Bulb Your car has two bulbs on each side, four in place. 5. Open the hood. TAB NOTICE Halogen headlight bulbs get very hot when lit. If you are replacing the bulb that is on the headlights to overheat and shatter...
Owner's Manual
Page 277
...), but the engine does not run. Refer to rupture. 2. Do you do not try jump starting procedure? See Emergency Towing on page 171. Open the hood and check the physical condition of the battery (see page 288). There may be an electrical problem, such as no power to ON (II) for... take several precautions. Keep all the electrical accessories: climate control, stereo system, lights, etc. Turn the ignition switch to the fuel pump. To jump start a Honda with a frozen battery can explode if you have fuel? If it .
...), but the engine does not run. Refer to rupture. 2. Do you do not try jump starting procedure? See Emergency Towing on page 171. Open the hood and check the physical condition of the battery (see page 288). There may be an electrical problem, such as no power to ON (II) for... take several precautions. Keep all the electrical accessories: climate control, stereo system, lights, etc. Turn the ignition switch to the fuel pump. To jump start a Honda with a frozen battery can explode if you have fuel? If it .

Owner's Manual
Page 280
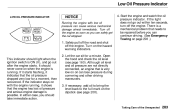
...an overheated engine can seriously scald you do not see steam or spray coming from under the hood, turn off the heating and cooling system and all other accessories. NOTICE Driving with the ...A/C running and watch the temperature gauge. Do not open the hood if steam is due to overloading (climbing a long, steep hill on the hazard warning indicators. 2....stay in Neutral or Park and set the parking brake. Steam and spray from under the hood. If it climbs to the midpoint then continue driving. Turn on a hot day with the...
...an overheated engine can seriously scald you do not see steam or spray coming from under the hood, turn off the heating and cooling system and all other accessories. NOTICE Driving with the ...A/C running and watch the temperature gauge. Do not open the hood if steam is due to overloading (climbing a long, steep hill on the hazard warning indicators. 2....stay in Neutral or Park and set the parking brake. Steam and spray from under the hood. If it climbs to the midpoint then continue driving. Turn on a hot day with the...
Owner's Manual
Page 281
... MIN mark, add coolant to halfway between the MIN and MAX marks. 8. If there was no more signs of steam or spray, then open the hood. 6. Using gloves or a large heavy cloth, turn it until you find an obvious leak, check the coolant level in the reserve tank, you can add...
... MIN mark, add coolant to halfway between the MIN and MAX marks. 8. If there was no more signs of steam or spray, then open the hood. 6. Using gloves or a large heavy cloth, turn it until you find an obvious leak, check the coolant level in the reserve tank, you can add...
Owner's Manual
Page 282
... should light when the ignition switch is possible. If it starts flashing, it shows that the oil pressure dropped very low for a minute. Open the hood and check the oil level (see page 208). Although oil level and oil pressure are not directly connected, an engine that is a mechanical problem that...
... should light when the ignition switch is possible. If it starts flashing, it shows that the oil pressure dropped very low for a minute. Open the hood and check the oil level (see page 208). Although oil level and oil pressure are not directly connected, an engine that is a mechanical problem that...

Owner's Manual
Page 287
To open an interior fuse box, open , then take it out of the Unexpected The under-hood fuse box is located in the back of the engine compartment on each side of the dashboard. Taking Care of its hinges by pulling it , push the tabs as shown. These fuses are located on the passenger's side. INTERIOR UNDER-HOOD TAB The interior fuse boxes are located in your car have fuses to protect them from a short circuit or overload. To open it toward you. Pull the cover open the car door. Fuses All the electrical circuits in three fuse boxes.
To open an interior fuse box, open , then take it out of the Unexpected The under-hood fuse box is located in the back of the engine compartment on each side of the dashboard. Taking Care of its hinges by pulling it , push the tabs as shown. These fuses are located on the passenger's side. INTERIOR UNDER-HOOD TAB The interior fuse boxes are located in your car have fuses to protect them from a short circuit or overload. To open it toward you. Pull the cover open the car door. Fuses All the electrical circuits in three fuse boxes.

