
Owner's Manual
Page 4
Your Car at a Glance MIRROR CONTROLS (P.96) DOOR LOCK SWITCH (P.73) DIGITAL CLOCK (P.98) HEATING/COOLING CONTROL (P.106) AUDIO SYSTEM (P.121) POWER WINDOW SWITCHES (P.93) TRUNK RELEASE HANDLE/ FUEL FILL DOOR (P.78, 156) HOOD RELEASE HANDLE (P.158)
Your Car at a Glance MIRROR CONTROLS (P.96) DOOR LOCK SWITCH (P.73) DIGITAL CLOCK (P.98) HEATING/COOLING CONTROL (P.106) AUDIO SYSTEM (P.121) POWER WINDOW SWITCHES (P.93) TRUNK RELEASE HANDLE/ FUEL FILL DOOR (P.78, 156) HOOD RELEASE HANDLE (P.158)

Owner's Manual
Page 6
... Children Should Sit in your Supplemental Restraint System. Adjust the Seat-Backs...13 4. Adjust the Front Seats...12 Adjust the Steering Wheel...16 7. Close and Lock the Doors...12 2. Fasten and Position the Seat Belts...14 6. It shows you how to use seat belts properly. And it tells you how to properly......47 Safety Labels...48 Driver and Passenger Safety Important Safety Precautions ...6 Your Car's Safety Features...7 Seat Belts...8 Airbags...9 Seats & Seat-Backs...10 Head Restraints...10 Door Locks...10 Pre-Drive Safety Checklist...11 Protecting Adults...12 1.
... Children Should Sit in your Supplemental Restraint System. Adjust the Seat-Backs...13 4. Adjust the Front Seats...12 Adjust the Steering Wheel...16 7. Close and Lock the Doors...12 2. Fasten and Position the Seat Belts...14 6. It shows you how to use seat belts properly. And it tells you how to properly......47 Safety Labels...48 Driver and Passenger Safety Important Safety Precautions ...6 Your Car's Safety Features...7 Seat Belts...8 Airbags...9 Seats & Seat-Backs...10 Head Restraints...10 Door Locks...10 Pre-Drive Safety Checklist...11 Protecting Adults...12 1.

Owner's Manual
Page 8
... passengers during a crash; and a collapsible steering column. (1) Safety Cage (2) Crush Zones (3) Seats & Seat-Backs (4) Head Restraints (5) Collapsible Steering Column (6) Seat Belts (7) Front Airbags (8) Side Airbags* (9) Door Locks * : On all V- 6 models and 4-cylinder EX model with many features that work together to protect you and your part. However, you and your seat belts...
... passengers during a crash; and a collapsible steering column. (1) Safety Cage (2) Crush Zones (3) Seats & Seat-Backs (4) Head Restraints (5) Collapsible Steering Column (6) Seat Belts (7) Front Airbags (8) Side Airbags* (9) Door Locks * : On all V- 6 models and 4-cylinder EX model with many features that work together to protect you and your part. However, you and your seat belts...

Owner's Manual
Page 11
...moving. For maximum protection, the back of your safety. It also helps prevent occupants from accidentally opening your doors locked reduces the chance of being injured by striking the inside of the car, or by seat belts and the...as possible, and keep you in a comfortable, upright position so you can help protect you from unexpectedly opening a door and falling out, and outsiders from whiplash and other injuries. For example, sitting too close to keep adjustable seat-backs... restraints can take full advantage of the protection offered by an inflating airbag. Door Locks Keeping your...
...moving. For maximum protection, the back of your safety. It also helps prevent occupants from accidentally opening your doors locked reduces the chance of being injured by striking the inside of the car, or by seat belts and the...as possible, and keep you in a comfortable, upright position so you can help protect you from unexpectedly opening a door and falling out, and outsiders from whiplash and other injuries. For example, sitting too close to keep adjustable seat-backs... restraints can take full advantage of the protection offered by an inflating airbag. Door Locks Keeping your...

Owner's Manual
Page 12
... section gives more detailed information about how you drive away: All adults, and children who have outgrown child safety seats, are closed and locked (see page 13). All doors are wearing their seat belts and wearing them properly (see page 19). Your Car's Safety Features Pre-Drive Safety Checklist To make sure...
... section gives more detailed information about how you drive away: All adults, and children who have outgrown child safety seats, are closed and locked (see page 13). All doors are wearing their seat belts and wearing them properly (see page 19). Your Car's Safety Features Pre-Drive Safety Checklist To make sure...
Owner's Manual
Page 13
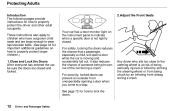
... belts. (See page 34 for important additional guidelines on how to properly protect larger children.) 1.Close and Lock the Doors After everyone has entered the car, be sure the doors are closed . These instructions also apply to children who sits too close to indicate when a specific... fall out. Protecting Adults Introduction The following pages provide instructions on how to a stop. For safety, locking the doors reduces the chance that a passenger, especially a child, will open a door while the car is at risk of the car during a crash. Driver and Passenger Safety For security...
... belts. (See page 34 for important additional guidelines on how to properly protect larger children.) 1.Close and Lock the Doors After everyone has entered the car, be sure the doors are closed . These instructions also apply to children who sits too close to indicate when a specific... fall out. Protecting Adults Introduction The following pages provide instructions on how to a stop. For safety, locking the doors reduces the chance that a passenger, especially a child, will open a door while the car is at risk of the car during a crash. Driver and Passenger Safety For security...
Owner's Manual
Page 23
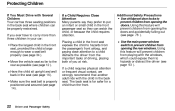
Additional Safety Precautions Use childproof door locks to prevent children from opening the doors. Use the main power window switch to prevent children from opening the doors and accidentally falling out (see page 14). Driver and Passenger Safety The back seat is properly positioned and secured (see page 78 ). Placing a child in ...
Additional Safety Precautions Use childproof door locks to prevent children from opening the doors. Use the main power window switch to prevent children from opening the doors and accidentally falling out (see page 14). Driver and Passenger Safety The back seat is properly positioned and secured (see page 78 ). Placing a child in ...
Owner's Manual
Page 40
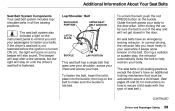
... into the buckle, then tug on the belt to the door pillar. If the driver's seat belt is not fastened before the ignition is latched. The seat belts in all five seating positions. The beeper will stop , the retractor automatically locks the belt to help restrain your body to make sure the... the instrument panel to remind you move freely in your seat while it keeps some tension on the buckle. All seat belts have an additional locking mechanism that goes over your shoulder, across your chest and across your body. The seat belt system also includes a light on how to fasten your...
... into the buckle, then tug on the belt to the door pillar. If the driver's seat belt is not fastened before the ignition is latched. The seat belts in all five seating positions. The beeper will stop , the retractor automatically locks the belt to help restrain your body to make sure the... the instrument panel to remind you move freely in your seat while it keeps some tension on the buckle. All seat belts have an additional locking mechanism that goes over your shoulder, across your chest and across your body. The seat belt system also includes a light on how to fasten your...
Owner's Manual
Page 50
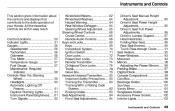
...Wheel Adjustment...65 Steering Wheel Controls ...66 Cruise Control...66 Remote Audio Controls ...68 Keys and Locks...69 Keys...69 Immobilizer System...70 Ignition Switch...71 Door Locks...72 Power Door Locks...73 Remote Transmitter...74 Childproof Door Locks...78 Trunk...78 Glove Box...79 HomeLink Universal Transmitter...80 Important Safety Precautions...80 Training the ... Instruments and Controls Instruments and Controls This section gives information about the controls and displays that contribute to the daily operation of your Honda. All the essential controls are within easy reach.
...Wheel Adjustment...65 Steering Wheel Controls ...66 Cruise Control...66 Remote Audio Controls ...68 Keys and Locks...69 Keys...69 Immobilizer System...70 Ignition Switch...71 Door Locks...72 Power Door Locks...73 Remote Transmitter...74 Childproof Door Locks...78 Trunk...78 Glove Box...79 HomeLink Universal Transmitter...80 Important Safety Precautions...80 Training the ... Instruments and Controls Instruments and Controls This section gives information about the controls and displays that contribute to the daily operation of your Honda. All the essential controls are within easy reach.
Owner's Manual
Page 51
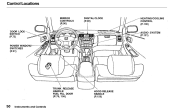
Control Locations MIRROR CONTROLS (P.96) DOOR LOCK SWITCH (P.73) DIGITAL CLOCK (P.98) HEATING/COOLING CONTROL (P.106) AUDIO SYSTEM (P.121) POWER WINDOW SWITCHES (P.91) TRUNK RELEASE HANDLE/ FUEL FILL DOOR (P.78, 156) HOOD RELEASE HANDLE (P.158) Instruments and Controls
Control Locations MIRROR CONTROLS (P.96) DOOR LOCK SWITCH (P.73) DIGITAL CLOCK (P.98) HEATING/COOLING CONTROL (P.106) AUDIO SYSTEM (P.121) POWER WINDOW SWITCHES (P.91) TRUNK RELEASE HANDLE/ FUEL FILL DOOR (P.78, 156) HOOD RELEASE HANDLE (P.158) Instruments and Controls
Owner's Manual
Page 52
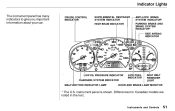
Instruments and Controls Differences for Canadian models are noted in the text. Indicator Lights The instrument panel has many indicators to give you important information about your car. CRUISE CONTROL INDICATOR SUPPLEMENTAL RESTRAINT SYSTEM INDICATOR HIGH BEAM INDICATOR ANTI-LOCK BRAKE SYSTEM INDICATOR* PARKING BRAKE AND BRAKE SYSTEM INDICATOR* SIDE AIRBAG INDICATOR LOW OIL PRESSURE INDICATOR CHARGING SYSTEM INDICATOR MALFUNCTION INDICATOR LAMP LOW FUEL INDICATOR SEAT BELT REMINDER LIGHT DOOR AND BRAKE LAMP MONITOR * The U.S. instrument panel is shown.
Instruments and Controls Differences for Canadian models are noted in the text. Indicator Lights The instrument panel has many indicators to give you important information about your car. CRUISE CONTROL INDICATOR SUPPLEMENTAL RESTRAINT SYSTEM INDICATOR HIGH BEAM INDICATOR ANTI-LOCK BRAKE SYSTEM INDICATOR* PARKING BRAKE AND BRAKE SYSTEM INDICATOR* SIDE AIRBAG INDICATOR LOW OIL PRESSURE INDICATOR CHARGING SYSTEM INDICATOR MALFUNCTION INDICATOR LAMP LOW FUEL INDICATOR SEAT BELT REMINDER LIGHT DOOR AND BRAKE LAMP MONITOR * The U.S. instrument panel is shown.

Owner's Manual
Page 70
... set heavy objects on your car: Ignition Doors Trunk Glove box Trunk release handle Trunk pass-through cover, rear seat trunk access and glove box locked when you ever have received a key number plate with a soft cloth. Do not try to replace a key, use only Honda-approved key blanks. The master key fits... activated by the Immobilizer System. The keys do not contain batteries. Protect the keys from liquids. Keep the plate stored in the ignition and the door locks. If they get a lost key replaced.
... set heavy objects on your car: Ignition Doors Trunk Glove box Trunk release handle Trunk pass-through cover, rear seat trunk access and glove box locked when you ever have received a key number plate with a soft cloth. Do not try to replace a key, use only Honda-approved key blanks. The master key fits... activated by the Immobilizer System. The keys do not contain batteries. Protect the keys from liquids. Keep the plate stored in the ignition and the door locks. If they get a lost key replaced.
Owner's Manual
Page 73
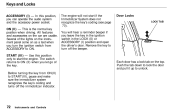
.... Instruments and Controls Before turning the key from ACCESSORY to start if the Immobilizer System does not recognize the key's coding (see page 70). Door Locks LOCK TAB Each door has a lock tab on the car are usable. ON (II) - Remove the key to START(III), pause and make sure the immobilizer system recognizes the... key's coding and turns off the beeper. START (III) - Push the tab down to lock the door and pull it up to ON (II) when you leave the key in the ignition switch in the...
.... Instruments and Controls Before turning the key from ACCESSORY to start if the Immobilizer System does not recognize the key's coding (see page 70). Door Locks LOCK TAB Each door has a lock tab on the car are usable. ON (II) - Remove the key to START(III), pause and make sure the immobilizer system recognizes the... key's coding and turns off the beeper. START (III) - Push the tab down to lock the door and pull it up to ON (II) when you leave the key in the ignition switch in the...

Owner's Manual
Page 74
... close the door. On all doors. The front doors can be locked and unlocked from the outside door handle and push the lock tab in the driver's door lock, turn the key and hold it . Power Door Locks MASTER DOOR LOCK SWITCH To lock any passenger's door when getting out of the car, push the lock tab down and close the door. To lock the driver's door, pull...
... close the door. On all doors. The front doors can be locked and unlocked from the outside door handle and push the lock tab in the driver's door lock, turn the key and hold it . Power Door Locks MASTER DOOR LOCK SWITCH To lock any passenger's door when getting out of the car, push the lock tab down and close the door. To lock the driver's door, pull...
Owner's Manual
Page 75
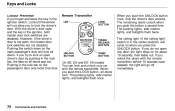
... light (if the ceiling light switch is not open and the key in the lock tab on when you push the LOCK button, all doors. With the driver's door open , the master door lock switches are disabled. Pushing in the ignition, both master door lock switches are not disabled. TRUNK RELEASE BUTTON UNLOCK BUTTON PANIC BUTTON On SE...
... light (if the ceiling light switch is not open and the key in the lock tab on when you push the LOCK button, all doors. With the driver's door open , the master door lock switches are disabled. Pushing in the ignition, both master door lock switches are not disabled. TRUNK RELEASE BUTTON UNLOCK BUTTON PANIC BUTTON On SE...
Owner's Manual
Page 79
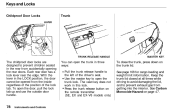
... the lid, and to prevent children seated in three ways: Pull the trunk release handle to open the door, pull the lock tab up and use the outside door handle. See page 168 for cargo loading and weight limit information. Instruments and Controls The valet key does ...be opened from the inside regardless of the position of the driver's seat. To open the trunk lock. Keys and Locks Childproof Door Locks LEVER Trunk TRUNK RELEASE HANDLE MASTER KEY The childproof door locks are designed to prevent exhaust gas from getting into the interior. See Carbon Monoxide Hazard on the...
... the lid, and to prevent children seated in three ways: Pull the trunk release handle to open the door, pull the lock tab up and use the outside door handle. See page 168 for cargo loading and weight limit information. Instruments and Controls The valet key does ...be opened from the inside regardless of the position of the driver's seat. To open the trunk lock. Keys and Locks Childproof Door Locks LEVER Trunk TRUNK RELEASE HANDLE MASTER KEY The childproof door locks are designed to prevent exhaust gas from getting into the interior. See Carbon Monoxide Hazard on the...
Owner's Manual
Page 154
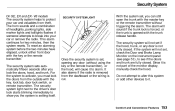
... forced, or the trunk is cut. The security system light next to the driver's door lock starts blinking immediately to show you can still open the trunk with the key, lock tab, door lock switch, or remote transmitter. If the system will not set , you the system is not fully closed . The... security system will not set , opening any door is setting itself. V6 models The security system helps to ...
... forced, or the trunk is cut. The security system light next to the driver's door lock starts blinking immediately to show you can still open the trunk with the key, lock tab, door lock switch, or remote transmitter. If the system will not set , you the system is not fully closed . The... security system will not set , opening any door is setting itself. V6 models The security system helps to ...
Owner's Manual
Page 313
..., 222 Engine Oil...160 Directional Signals...62 Disabled, Towing Your Car If...293 Disc Brake Wear Indicators...181 Disposal of Used Oil...212 Doors Locking and Unlocking...72 Power Door Locks...72 Economy, Fuel...163 Emergencies on the Road...269 Battery, Jump Starting...278 Brake System Indicator...286 Changing a Flat Tire...271 Charging System...
..., 222 Engine Oil...160 Directional Signals...62 Disabled, Towing Your Car If...293 Disc Brake Wear Indicators...181 Disposal of Used Oil...212 Doors Locking and Unlocking...72 Power Door Locks...72 Economy, Fuel...163 Emergencies on the Road...269 Battery, Jump Starting...278 Brake System Indicator...286 Changing a Flat Tire...271 Charging System...
Owner's Manual
Page 316
Index Locks Anti-theft Steering Column...71 Fuel Fill Door...156 Glove Box...79 Power Door...73 Trunk...78 Low Coolant Level...162 Lower Gear, Downshifting to a...173 Low Oil Pressure Indicator...52, 283 Lubricant Specifications Chart...298 Luggage...166 ...Position...176 Parking...180 Parking Brake...97 Parking Lights...60 Parking Over Things that Burn...307 PGM-FI System...306 Polishing and Waxing...263 Power Door Locks...72 Mirrors...96 Steering...225 Windows...93 Pre-Drive Safety Checklist...11 Pregnancy, Using Seat Belts...17 Protecting Adults...12 Additional Safety Precautions...18 Advice...
Index Locks Anti-theft Steering Column...71 Fuel Fill Door...156 Glove Box...79 Power Door...73 Trunk...78 Low Coolant Level...162 Lower Gear, Downshifting to a...173 Low Oil Pressure Indicator...52, 283 Lubricant Specifications Chart...298 Luggage...166 ...Position...176 Parking...180 Parking Brake...97 Parking Lights...60 Parking Over Things that Burn...307 PGM-FI System...306 Polishing and Waxing...263 Power Door Locks...72 Mirrors...96 Steering...225 Windows...93 Pre-Drive Safety Checklist...11 Pregnancy, Using Seat Belts...17 Protecting Adults...12 Additional Safety Precautions...18 Advice...
Owner's Manual
Page 317
... Setting the Clock...98 Shifting The Automatic Transmission...174 The 5-speed Manual Transmission...173 Shift Lever Position Indicator...175 Shift Lock Release...178 CONTINUED Radiator Overheating...281 Radio/Cassette Sound System ...121 Rear End Towing...293 Rear Lights, Bulb Replacement...254...Element...226 Coolant...215 Engine Oil and Filter...210 Fuses...289 Safety Belts...8 Safety Defects, Reporting* ...314 Safety Features...7 Airbags...9 Door Locks...10 Head Restraints...10 Seat Belts...8 Seats & Seat-Backs...10 Safety Labels, Location of...48 Safety Messages...ii Seat Belt, Additional...
... Setting the Clock...98 Shifting The Automatic Transmission...174 The 5-speed Manual Transmission...173 Shift Lever Position Indicator...175 Shift Lock Release...178 CONTINUED Radiator Overheating...281 Radio/Cassette Sound System ...121 Rear End Towing...293 Rear Lights, Bulb Replacement...254...Element...226 Coolant...215 Engine Oil and Filter...210 Fuses...289 Safety Belts...8 Safety Defects, Reporting* ...314 Safety Features...7 Airbags...9 Door Locks...10 Head Restraints...10 Seat Belts...8 Seats & Seat-Backs...10 Safety Labels, Location of...48 Safety Messages...ii Seat Belt, Additional...


