
Owner's Manual
Page 249
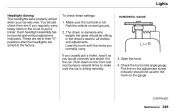
...rear bumpers several times to make sure the car is full. Check the horizontal angle gauge. Lights Headlight Aiming The headlights were properly aimed when your car was new. Each headlight assembly has horizontal and vertical adjustment indicators. If you usually pull a trailer, load it to their ... ground. 2. HORIZONTAL GAUGE CONTINUED Maintenance Open the hood. 4. The line on the gauge. You should check their "0" positions after the headlights are set to the car. These are aimed at the factory. Make sure the fuel tank is sitting normally. 3. Load the trunk with...
...rear bumpers several times to make sure the car is full. Check the horizontal angle gauge. Lights Headlight Aiming The headlights were properly aimed when your car was new. Each headlight assembly has horizontal and vertical adjustment indicators. If you usually pull a trailer, load it to their ... ground. 2. HORIZONTAL GAUGE CONTINUED Maintenance Open the hood. 4. The line on the gauge. You should check their "0" positions after the headlights are set to the car. These are aimed at the factory. Make sure the fuel tank is sitting normally. 3. Load the trunk with...
Owner's Manual
Page 252
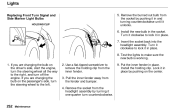
Insert the socket back into the headlight assembly. Turn it clockwise to the left. 2. If you are changing the bulb on the center. Put the inner fender in the socket. Maintenance Turn it ... away from the inner fender. 3. Lock it one-quarter turn the steering wheel to lock it in place. 8. Remove the burned out bulb from the headlight assembly by turning it in place by pushing it in and turning counterclockwise until it unlocks. 6. Use a flat-tipped screwdriver to lock it in place. 7. Install...
Insert the socket back into the headlight assembly. Turn it clockwise to the left. 2. If you are changing the bulb on the center. Put the inner fender in the socket. Maintenance Turn it ... away from the inner fender. 3. Lock it one-quarter turn the steering wheel to lock it in place. 8. Remove the burned out bulb from the headlight assembly by turning it in place by pushing it in and turning counterclockwise until it unlocks. 6. Use a flat-tipped screwdriver to lock it in place. 7. Install...


