Owner's Manual
Page 17
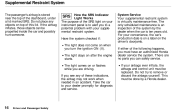
...the following happens, you turn the ignition ON (II). If either of the system by a Honda dealer. If your dealer promptly for diagnosis and service. Driver and Passenger Safety System Service Your...ten years old. Have the system checked if: The light does not come on after the engine starts. If the airbag inflates, those objects can safely service. The light stays on when .... If you can be propelled inside the car and possibly hurt someone. Do not try to remove or discard the airbags yourself. Supplemental Restraint System The passenger's airbag is on a label on ...
...the following happens, you turn the ignition ON (II). If either of the system by a Honda dealer. If your dealer promptly for diagnosis and service. Driver and Passenger Safety System Service Your...ten years old. Have the system checked if: The light does not come on after the engine starts. If the airbag inflates, those objects can safely service. The light stays on when .... If you can be propelled inside the car and possibly hurt someone. Do not try to remove or discard the airbags yourself. Supplemental Restraint System The passenger's airbag is on a label on ...

Owner's Manual
Page 51
...to ON (see page 33). Keys and Locks LOCK (0) - All features and accessories on the tailgate also locks and unlocks when you can insert or remove the key only in slightly as a test when you turn the ignition switch from ACCESSORY to release the anti-theft lock. The switch returns to... start the engine. Either switch locks and unlocks all doors, and up to lock all doors. You can operate the audio system and the cigarette lighter. Push the...
...to ON (see page 33). Keys and Locks LOCK (0) - All features and accessories on the tailgate also locks and unlocks when you can insert or remove the key only in slightly as a test when you turn the ignition switch from ACCESSORY to release the anti-theft lock. The switch returns to... start the engine. Either switch locks and unlocks all doors, and up to lock all doors. You can operate the audio system and the cigarette lighter. Push the...

Owner's Manual
Page 79
Heating and Cooling To Heat To Heat and Dehumidify with the heater, it cools, removes moisture from the air. Switch the fan on . 2. Select and 4. Select and 3. Switch the fan on . 2. Turn on the rear window defogger to the desired ... and Convenience Features Turn on the air conditioning. 3. Adjust the temperature control lever so the mixture of the windows: 1. To remove fog from the defroster vents feels warm. 5. Start the engine. 2. Adjust the warmth of the air with the temperature control lever. Air conditioning, as it makes the interior warm and dry...
Heating and Cooling To Heat To Heat and Dehumidify with the heater, it cools, removes moisture from the air. Switch the fan on . 2. Select and 4. Select and 3. Switch the fan on . 2. Turn on the rear window defogger to the desired ... and Convenience Features Turn on the air conditioning. 3. Adjust the temperature control lever so the mixture of the windows: 1. To remove fog from the defroster vents feels warm. 5. Start the engine. 2. Adjust the warmth of the air with the temperature control lever. Air conditioning, as it makes the interior warm and dry...

Owner's Manual
Page 80
Select and 3. To rapidly remove exterior frost or ice from the windshield and side windows after the car has been sitting out in cold weather: 1. MODE BUTTONS RECIRCULATION BUTTON FRESH AIR BUTTON TEMPERATURE CONTROL LEVER FAN CONTROL LEVER AIR CONDITIONING SWITCH Comfort and Convenience Features Start the engine. 2. Heating and Cooling To remove exterior frost or ice from the windshield (on very cold days), first select Once the windshield is clear, select to maximum. Switch the fan and temperature controls to avoid fogging the windows.
Select and 3. To rapidly remove exterior frost or ice from the windshield and side windows after the car has been sitting out in cold weather: 1. MODE BUTTONS RECIRCULATION BUTTON FRESH AIR BUTTON TEMPERATURE CONTROL LEVER FAN CONTROL LEVER AIR CONDITIONING SWITCH Comfort and Convenience Features Start the engine. 2. Heating and Cooling To remove exterior frost or ice from the windshield (on very cold days), first select Once the windshield is clear, select to maximum. Switch the fan and temperature controls to avoid fogging the windows.

Owner's Manual
Page 110
Stop the engine and keep heat, sparks, and flame away. Stop filling the tank after the fuel pump automatically clicks off " the tank, leave some room for the .... 4. Open the fuel fill door by pulling on (see page 208). 6. You can be burned or seriously injured when handling fuel. Wipe up spills immediately. 3. Remove the fuel fill cap slowly. Pull 1. Handle fuel only outdoors. You may come on the handle to the service station pumps. 2. Service Station Procedures Filling...
Stop the engine and keep heat, sparks, and flame away. Stop filling the tank after the fuel pump automatically clicks off " the tank, leave some room for the .... 4. Open the fuel fill door by pulling on (see page 208). 6. You can be burned or seriously injured when handling fuel. Wipe up spills immediately. 3. Remove the fuel fill cap slowly. Pull 1. Handle fuel only outdoors. You may come on the handle to the service station pumps. 2. Service Station Procedures Filling...

Owner's Manual
Page 112
Insert it all the way back in its tube. Before Driving Wait at least two minutes after turning the engine off before you fill the car with a clean cloth or paper towel. 3. Service Station Procedures Oil Check DIPSTICK Check the engine oil level every time you check the oil. 1. Wipe the dipstick with fuel. Remove the dipstick (orange handle). 2.
Insert it all the way back in its tube. Before Driving Wait at least two minutes after turning the engine off before you fill the car with a clean cloth or paper towel. 3. Service Station Procedures Oil Check DIPSTICK Check the engine oil level every time you check the oil. 1. Wipe the dipstick with fuel. Remove the dipstick (orange handle). 2.

Owner's Manual
Page 113
... for information on adding the proper coolant. If it is below the lower mark, see Adding Engine Coolant on page 152 for information on page 148 . Look at the coolant level in your Honda. If it is between the upper and lower marks. Before Driving It should be between the ...MAX and M I N line, see Adding Oil on checking other items in the radiator reserve tank. Remove the dipstick again and check the level. Make sure...
... for information on adding the proper coolant. If it is below the lower mark, see Adding Engine Coolant on page 152 for information on page 148 . Look at the coolant level in your Honda. If it is between the upper and lower marks. Before Driving It should be between the ...MAX and M I N line, see Adding Oil on checking other items in the radiator reserve tank. Remove the dipstick again and check the level. Make sure...

Owner's Manual
Page 118
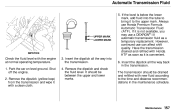
... check the tires. Check the adjustment of the inside are clean and unobstructed. Check the adjustment of the seat (see page 33). Start the engine (see page 44). 8. Remove frost, snow, or ice. 2. Check that any items you may be carrying with you drive your seat belt. Fasten your car. 1. Check the...
... check the tires. Check the adjustment of the inside are clean and unobstructed. Check the adjustment of the seat (see page 33). Start the engine (see page 44). 8. Remove frost, snow, or ice. 2. Check that any items you may be carrying with you drive your seat belt. Fasten your car. 1. Check the...

Owner's Manual
Page 121
Pull the shift lever towards you can remove the key from the ignition switch. To avoid transmission damage, come to shift into Park. This position mechanically locks the transmission. The shift lever must ... Neutral, come to Reverse from Neutral. If you are turning off the accelerator pedal. Use Park whenever you have your foot off or starting the engine. To shift out of Park, you to a complete stop before shifting into Reverse from Park, see Shift Lock Release on the brake pedal and have...
Pull the shift lever towards you can remove the key from the ignition switch. To avoid transmission damage, come to shift into Park. This position mechanically locks the transmission. The shift lever must ... Neutral, come to Reverse from Neutral. If you are turning off the accelerator pedal. Use Park whenever you have your foot off or starting the engine. To shift out of Park, you to a complete stop before shifting into Reverse from Park, see Shift Lock Release on the brake pedal and have...

Owner's Manual
Page 123
The engine will feel the engine cut in the engine's computer controls. Shift Lock Release This allows you reduce speed or shift. Set the Parking brake. 2. Remove the key from the Shift Lock Release slot. If you need to use the Shift Lock Release, it means your Honda dealer. SHIFT LOCK RELEASE...of Park to move the shift lever out of pushing on the steering column. 4. Remove the key from the ignition switch. 3. This is developing a problem. Depress the brake pedal and restart the engine. Driving Insert the key in this table are the maximums for the given position....
The engine will feel the engine cut in the engine's computer controls. Shift Lock Release This allows you reduce speed or shift. Set the Parking brake. 2. Remove the key from the Shift Lock Release slot. If you need to use the Shift Lock Release, it means your Honda dealer. SHIFT LOCK RELEASE...of Park to move the shift lever out of pushing on the steering column. 4. Remove the key from the ignition switch. 3. This is developing a problem. Depress the brake pedal and restart the engine. Driving Insert the key in this table are the maximums for the given position....
Owner's Manual
Page 147
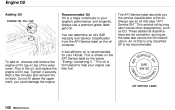
... fill cap. This is shown on top of the oil. To add oil, unscrew and remove the engine oil fill cap on the API Service label by the words "Energy Conserving I I . Always use less fuel. This service rating may also include other designations, ... oil container. " This oil is not recommended. Always use an oil that is only classified SF is formulated to your Honda. The API Service label also tells you could damage the engine. Wait a few minutes and recheck the oil level. These additional classifications are not a problem, as long as CD. you the...
... fill cap. This is shown on top of the oil. To add oil, unscrew and remove the engine oil fill cap on the API Service label by the words "Energy Conserving I I . Always use less fuel. This service rating may also include other designations, ... oil container. " This oil is not recommended. Always use an oil that is only classified SF is formulated to your Honda. The API Service label also tells you could damage the engine. Wait a few minutes and recheck the oil level. These additional classifications are not a problem, as long as CD. you the...
Owner's Manual
Page 149
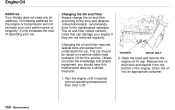
... can damage your car. Open the hood and remove the engine oil fill cap. Remove the oil drain bolt and washer from underneath the car. The car should have this service. Engine Oil Additives Your Honda does not need any oil additives. WASHER DRAIN BOLT 2. Maintenance Run the engine until it reaches normal operating temperature, then...
... can damage your car. Open the hood and remove the engine oil fill cap. Remove the oil drain bolt and washer from underneath the car. The car should have this service. Engine Oil Additives Your Honda does not need any oil additives. WASHER DRAIN BOLT 2. Maintenance Run the engine until it reaches normal operating temperature, then...

Owner's Manual
Page 150
...OIL FILTER NOTICE Improper disposal of the used oil properly. If necessary, add oil to bring the level to remove the filter. 4. If it does not, turn off the engine, let it sit for several minutes and check the drain bolt and oil filter for several minutes, then check.... 3. Tighten it . 5. If you change capacity (including filter): 4.0 US qt (3.8 ,3.3 Imp qt) 7. Let the engine run for leaks. 9. Replace the engine oil fill cap. Turn off the engine and reinspect your Honda dealer) is required to the upper mark on the drain bolt, then reinstall the drain bolt. The oil...
...OIL FILTER NOTICE Improper disposal of the used oil properly. If necessary, add oil to bring the level to remove the filter. 4. If it does not, turn off the engine, let it sit for several minutes and check the drain bolt and oil filter for several minutes, then check.... 3. Tighten it . 5. If you change capacity (including filter): 4.0 US qt (3.8 ,3.3 Imp qt) 7. Let the engine run for leaks. 9. Replace the engine oil fill cap. Turn off the engine and reinspect your Honda dealer) is required to the upper mark on the drain bolt, then reinstall the drain bolt. The oil...

Owner's Manual
Page 151
...MAX line. Removing the radiator cap while the engine is not available, you . Never add straight antifreeze or plain water. Always let the engine and radiator cool down before removing the radiator cap. Cooling System Adding Engine Coolant RESERVE ...TANK Always use another major-brand non-silicate coolant as possible. However, continued use of 50 percent antifreeze and 50 percent water. If the coolant level in corrosion, causing the cooling system to spray out, seriously scalding you may use Genuine Honda...
...MAX line. Removing the radiator cap while the engine is not available, you . Never add straight antifreeze or plain water. Always let the engine and radiator cool down before removing the radiator cap. Cooling System Adding Engine Coolant RESERVE ...TANK Always use another major-brand non-silicate coolant as possible. However, continued use of 50 percent antifreeze and 50 percent water. If the coolant level in corrosion, causing the cooling system to spray out, seriously scalding you may use Genuine Honda...

Owner's Manual
Page 152
Remove the radiator cap by pushing down on the reserve tank. Put the cap back on it, until it ... They may not be up to halfway between the MAX and MIN marks. The coolant level should be compatible with the coolant or engine components. Turn the radiator cap counterclockwise, without pressing down and turning counterclockwise. 4. This relieves any rust inhibitors or other additives to ... coolant if it fully. 6. Cooling System Do not add any pressure remaining in the cooling system. 3. Make sure the engine and radiator are cool. 2. Pour coolant into the reserve tank.
Remove the radiator cap by pushing down on the reserve tank. Put the cap back on it, until it ... They may not be up to halfway between the MAX and MIN marks. The coolant level should be compatible with the coolant or engine components. Turn the radiator cap counterclockwise, without pressing down and turning counterclockwise. 4. This relieves any rust inhibitors or other additives to ... coolant if it fully. 6. Cooling System Do not add any pressure remaining in the cooling system. 3. Make sure the engine and radiator are cool. 2. Pour coolant into the reserve tank.

Owner's Manual
Page 153
... underside of the radiator. Loosen the drain plug on the bottom of the car. Remove the drain bolt and washer from the engine block. Make sure the engine and radiator are cool to maximum heat. Maintenance Only use Genuine Honda antifreeze/coolant. The coolant will drain through the splash guard. Slide the heater temperature...
... underside of the radiator. Loosen the drain plug on the bottom of the car. Remove the drain bolt and washer from the engine block. Make sure the engine and radiator are cool to maximum heat. Maintenance Only use Genuine Honda antifreeze/coolant. The coolant will drain through the splash guard. Slide the heater temperature...

Owner's Manual
Page 154
....m,83 N.m) 6. Put the cap on the radiator, and tighten it straight up to the first stop. Remove the reserve tank from its holder. 5. When the coolant stops draining, tighten the drain plug in the engine block. Drain the coolant, then put the tank back in a steady stream with an equal amount of...
....m,83 N.m) 6. Put the cap on the radiator, and tighten it straight up to the first stop. Remove the reserve tank from its holder. 5. When the coolant stops draining, tighten the drain plug in the engine block. Drain the coolant, then put the tank back in a steady stream with an equal amount of...

Owner's Manual
Page 155
... reservoir's fluid level by removing the cap and looking at least monthly during normal usage. Maintenance This increases the cleaning capability and prevents freezing in the radiator, add coolant if needed. Use only commercially-available windshield washer fluid. 10.Turn off the engine. Check the level in...to the MAX mark. Fill the reservoir with a good-quality windshield washer fluid. In bad weather, when you use engine antifreeze or a vinegar/water solution in the windshield washer reservoir. The windshield washer reservoir is located behind the driver's side headlight.
... reservoir's fluid level by removing the cap and looking at least monthly during normal usage. Maintenance This increases the cleaning capability and prevents freezing in the radiator, add coolant if needed. Use only commercially-available windshield washer fluid. 10.Turn off the engine. Check the level in...to the MAX mark. Fill the reservoir with a good-quality windshield washer fluid. In bad weather, when you use engine antifreeze or a vinegar/water solution in the windshield washer reservoir. The windshield washer reservoir is located behind the driver's side headlight.
Owner's Manual
Page 156
... way back in the maintenance schedule. If the level is below the lower mark, add fluid into the transmission. 4. Shut off the engine. 2. Maintenance If it to the time and distance recommendations in the transmission. UPPER MARK LOWER MARK DIPSTICK Check the fluid level with... with new fluid according to the upper mark. However, continued use can affect shift quality. Remove the dipstick (yellow loop) from the transmission and wipe it is not available, you may use Honda Premium Formula Automatic Transmission Fluid (ATF). Insert the dipstick all the way into the tube to...
... way back in the maintenance schedule. If the level is below the lower mark, add fluid into the transmission. 4. Shut off the engine. 2. Maintenance If it to the time and distance recommendations in the transmission. UPPER MARK LOWER MARK DIPSTICK Check the fluid level with... with new fluid according to the upper mark. However, continued use can affect shift quality. Remove the dipstick (yellow loop) from the transmission and wipe it is not available, you may use Honda Premium Formula Automatic Transmission Fluid (ATF). Insert the dipstick all the way into the tube to...
Owner's Manual
Page 159
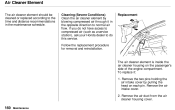
...access to compressed air (such as a service station), ask your Honda dealer to the time and distance recommendations in the opposite direction to normal air flow. Follow the replacement procedure for removal and reinstallation. Remove the two pins holding the air intake cover by blowing compressed air... through it : 1. Remove the air duct from the air cleaner housing cover. Cleaning (Severe Conditions) Clean the air cleaner element by pulling the head on the passenger's side of the engine compartment. Replacement The air cleaner element is inside the...
...access to compressed air (such as a service station), ask your Honda dealer to the time and distance recommendations in the opposite direction to normal air flow. Follow the replacement procedure for removal and reinstallation. Remove the two pins holding the air intake cover by blowing compressed air... through it : 1. Remove the air duct from the air cleaner housing cover. Cleaning (Severe Conditions) Clean the air cleaner element by pulling the head on the passenger's side of the engine compartment. Replacement The air cleaner element is inside the...


