Owner's Manual
Page 32
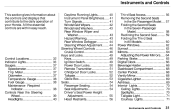
... Gauges...37 Speedometer...37 Trip Meter...37 Odometer...37 Temperature Gauge...38 Fuel Gauge...38 Maintenance Required Indicator...38 Controls Near the Steering Wheel...39 Headlights...40 All the essential controls are within easy reach. Instruments and Controls This section gives information about the controls and displays that contribute to the...
... Gauges...37 Speedometer...37 Trip Meter...37 Odometer...37 Temperature Gauge...38 Fuel Gauge...38 Maintenance Required Indicator...38 Controls Near the Steering Wheel...39 Headlights...40 All the essential controls are within easy reach. Instruments and Controls This section gives information about the controls and displays that contribute to the...

Owner's Manual
Page 37
... you turn the ignition to ON (II) with the headlight switch off and the parking brake set the cruise control. There may also be a problem with the high beam headlights. DRL High Beam Indicator This light comes on with the high beam headlights. CRUISE CONTROL Cruise Control Indicator This lights when you set... . See page 46 for information on the headlight controls. On Canadian models, this indicator comes on with the DRL. See page 40 for information on operating the cruise control. Low Fuel Indicator This ...
... you turn the ignition to ON (II) with the headlight switch off and the parking brake set the cruise control. There may also be a problem with the high beam headlights. DRL High Beam Indicator This light comes on with the high beam headlights. CRUISE CONTROL Cruise Control Indicator This lights when you set... . See page 46 for information on the headlight controls. On Canadian models, this indicator comes on with the DRL. See page 40 for information on operating the cruise control. Low Fuel Indicator This ...

Owner's Manual
Page 40
... contain controls for the sunroof, cruise control and instrument panel brightness. The controls near the left lever controls the turn signals, headlights, and high beams. The right lever controls the windshield washers and wipers. Controls Near the Steering Wheel The two levers on ...tilt the steering wheel. CRUISE CONTROL HAZARD WARNING LIGHT SHIFT LEVER REAR WINDOW DEFOGGER HORN BUTTONS SUNROOF SWITCH INSTRUMENT BRIGHTNESS HEADLIGHTS/ TURN SIGNALS TILT ADJUSTMENT WINDSHIELD WIPERS/WASHERS Instruments and Controls The left air vent are on the dashboard under the center air...
... contain controls for the sunroof, cruise control and instrument panel brightness. The controls near the left lever controls the turn signals, headlights, and high beams. The right lever controls the windshield washers and wipers. Controls Near the Steering Wheel The two levers on ...tilt the steering wheel. CRUISE CONTROL HAZARD WARNING LIGHT SHIFT LEVER REAR WINDOW DEFOGGER HORN BUTTONS SUNROOF SWITCH INSTRUMENT BRIGHTNESS HEADLIGHTS/ TURN SIGNALS TILT ADJUSTMENT WINDSHIELD WIPERS/WASHERS Instruments and Controls The left air vent are on the dashboard under the center air...

Owner's Manual
Page 41
... with the switch. The blue high beam indicator will stay on for as long as you hold the lever back, no matter what position the headlight switch is in ACCESSORY (I) or LOCK (0), you will come on with reduced brightness when you turn the ignition off, even if you hear a click, ...on the left lever controls the lights. They remain on until you set the parking brake. Daytime Running Lights (Canadian Models) With the headlight switch off, the high beam headlights come on and go . Turning this switch to ON (II) and release the parking brake. The high beams will hear a reminder chime...
... with the switch. The blue high beam indicator will stay on for as long as you hold the lever back, no matter what position the headlight switch is in ACCESSORY (I) or LOCK (0), you will come on with reduced brightness when you turn the ignition off, even if you hear a click, ...on the left lever controls the lights. They remain on until you set the parking brake. Daytime Running Lights (Canadian Models) With the headlight switch off, the high beam headlights come on and go . Turning this switch to ON (II) and release the parking brake. The high beams will hear a reminder chime...
Owner's Manual
Page 65
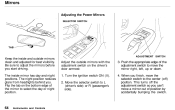
...). 2. Flip the tab on the driver's door armrest: 1. Move the selector switch to select the day or night position. The night position reduces glare from headlights behind you start driving. The inside and outside mirrors with the adjustment switch on the bottom edge of position by accidentally bumping the switch. This...
...). 2. Flip the tab on the driver's door armrest: 1. Move the selector switch to select the day or night position. The night position reduces glare from headlights behind you start driving. The inside and outside mirrors with the adjustment switch on the bottom edge of position by accidentally bumping the switch. This...

Owner's Manual
Page 129
... frequently. "Clear" roads can lock up on all directions and being passed by, other drivers are important in preventing "hydroplaning" (loss of ice, so your headlights. The road surface can become covered with areas of water puddles mixed with areas of traction on your traction can be seen more difficult in...
... frequently. "Clear" roads can lock up on all directions and being passed by, other drivers are important in preventing "hydroplaning" (loss of ice, so your headlights. The road surface can become covered with areas of water puddles mixed with areas of traction on your traction can be seen more difficult in...
Owner's Manual
Page 136
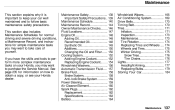
...Winter Driving...175 Snow Tires...176 Tire Chains...176 Lights...177 Headlight Aiming...177 Replacing Bulbs...179 Storing Your Car...184 Maintenance Maintenance This section explains why it is important to keep your Honda dealer. See page 235 for simple maintenance tasks you may want...This section also includes Maintenance Schedules for normal driving and severe driving conditions, a Maintenance Record, and instructions for information on your Honda, you may want to follow basic maintenance safety precautions. If you have the skills and tools to perform more complex maintenance tasks ...
...Winter Driving...175 Snow Tires...176 Tire Chains...176 Lights...177 Headlight Aiming...177 Replacing Bulbs...179 Storing Your Car...184 Maintenance Maintenance This section explains why it is important to keep your Honda dealer. See page 235 for simple maintenance tasks you may want...This section also includes Maintenance Schedules for normal driving and severe driving conditions, a Maintenance Record, and instructions for information on your Honda, you may want to follow basic maintenance safety precautions. If you have the skills and tools to perform more complex maintenance tasks ...

Owner's Manual
Page 145
See page 112. See page 113. See page 157. See page 158. Examine the tread for fuel. Check every time you are unsure of the headlights, parking lights, taillights, high-mount brake light, turn to use the washers frequently, check the reservoir each time you fill the fuel tank. Windshield washer ...
See page 112. See page 113. See page 157. See page 158. Examine the tread for fuel. Check every time you are unsure of the headlights, parking lights, taillights, high-mount brake light, turn to use the washers frequently, check the reservoir each time you fill the fuel tank. Windshield washer ...

Owner's Manual
Page 155
... solution can damage the windshield washer pump. In bad weather, when you stop for fuel. The windshield washer reservoir is located behind the driver's side headlight. Install the radiator cap, and tighten it fully. 11.Fill the reserve tank to the cap. Cooling System, Windshield Washers Windshield Washers Check the level...
... solution can damage the windshield washer pump. In bad weather, when you stop for fuel. The windshield washer reservoir is located behind the driver's side headlight. Install the radiator cap, and tighten it fully. 11.Fill the reserve tank to the cap. Cooling System, Windshield Washers Windshield Washers Check the level...

Owner's Manual
Page 176
... Turn signals Back-up with the items you regularly carry heavy items in the driver's seat for all checks and adjustments. Headlight Aiming The headlights were properly aimed when your intentions to other drivers. The line on the adjustment screw indicator should line up lights Hazard light...angle gauge. CONTINUED Maintenance These are set to the car. The driver or someone who weighs the same should check their "0" positions after the headlights are burned out, replace them as soon as you usually pull a trailer, load it to their aim if you normally carry. Open the...
... Turn signals Back-up with the items you regularly carry heavy items in the driver's seat for all checks and adjustments. Headlight Aiming The headlights were properly aimed when your intentions to other drivers. The line on the adjustment screw indicator should line up lights Hazard light...angle gauge. CONTINUED Maintenance These are set to the car. The driver or someone who weighs the same should check their "0" positions after the headlights are burned out, replace them as soon as you usually pull a trailer, load it to their aim if you normally carry. Open the...
Owner's Manual
Page 178
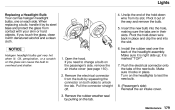
... wire back in place and clip the end into the hole, making sure the tabs are in place. it is marked "TOP". 7. Turn on the headlights to overheat and shatter. 1. Oil, perspiration, or a scratch on the passenger's side, remove the air intake cover (see page 160). 2. If you touch the glass... seal over the back of the new bulb. Maintenance Pivot it by its slot. Make sure it with your skin or hard objects. NOTICE Halogen headlight bulbs get very hot when lit. Insert the new bulb into the slot. 6. If you need to unlock the tab. Remove the electrical connector from...
... wire back in place and clip the end into the hole, making sure the tabs are in place. it is marked "TOP". 7. Turn on the headlights to overheat and shatter. 1. Oil, perspiration, or a scratch on the passenger's side, remove the air intake cover (see page 160). 2. If you touch the glass... seal over the back of the new bulb. Maintenance Pivot it by its slot. Make sure it with your skin or hard objects. NOTICE Halogen headlight bulbs get very hot when lit. Insert the new bulb into the slot. 6. If you need to unlock the tab. Remove the electrical connector from...

Owner's Manual
Page 199
...Check these things: Check the transmission interlock. Turn the ignition switch to START (III). Turn on page 202. See Jump Starting on the headlights and check their brightness. You can hear the starter motor operating normally, or the starter motor sounds like it is spinning faster than normal, ...transmission must be in Park or Neutral or the starter will need a qualified technician to determine the problem. (See Towing on page 215.) If the headlights dim noticeably or go out when you try jump starting the car from a booster battery (see page 164). You will not operate. Taking Care ...
...Check these things: Check the transmission interlock. Turn the ignition switch to START (III). Turn on page 202. See Jump Starting on the headlights and check their brightness. You can hear the starter motor operating normally, or the starter motor sounds like it is spinning faster than normal, ...transmission must be in Park or Neutral or the starter will need a qualified technician to determine the problem. (See Towing on page 215.) If the headlights dim noticeably or go out when you try jump starting the car from a booster battery (see page 164). You will not operate. Taking Care ...

Owner's Manual
Page 209
... something electrical in the under-hood fuse box by looking through the top at the wire inside. Determine from the fuse box. Make sure the headlights and all the fuses before deciding that a blown fuse is in the engine compartment on the fuse box lid, which fuse or fuses control that...
... something electrical in the under-hood fuse box by looking through the top at the wire inside. Determine from the fuse box. Make sure the headlights and all the fuses before deciding that a blown fuse is in the engine compartment on the fuse box lid, which fuse or fuses control that...
Owner's Manual
Page 234
... Bulb Replacement Back-up Lights...181 Brake Lights...181 Ceiling Light...183 Front Parking Lights...180 Front Side Marker Lights...180 Headlights...179 License Plate Lights...182 Specifications...221 Turn Signal Lights...180 Bulbs, Halogen...179 Center Pocket...68 Certification Label...218 Chains...176 Change Oil How ...
... Bulb Replacement Back-up Lights...181 Brake Lights...181 Ceiling Light...183 Front Parking Lights...180 Front Side Marker Lights...180 Headlights...179 License Plate Lights...182 Specifications...221 Turn Signal Lights...180 Bulbs, Halogen...179 Center Pocket...68 Certification Label...218 Chains...176 Change Oil How ...
Owner's Manual
Page 235
... Do...202 Defects, Reporting Safety...234 Defogger, Rear Window...43 Defrosting the Windows...79 DEXRON® III Automatic Transmission Fluid...157 Dimensions...220 Dimming the Headlights...40 Dipstick Automatic Transmission...157 Engine Oil...112 Directional Signals...41 Disabled, Towing Your Car If...215 Disc Brake Wear Indicators...125 Disposal of Used...
... Do...202 Defects, Reporting Safety...234 Defogger, Rear Window...43 Defrosting the Windows...79 DEXRON® III Automatic Transmission Fluid...157 Dimensions...220 Dimming the Headlights...40 Dipstick Automatic Transmission...157 Engine Oil...112 Directional Signals...41 Disabled, Towing Your Car If...215 Disc Brake Wear Indicators...125 Disposal of Used...
Owner's Manual
Page 236
... Switch ...40 Hood, Opening the ...111 Horn...39 Hot Coolant, Warning about...152 Hydroplaning...129 Gas Mileage, Improving...114 Gasohol...108 Halogen Headlight Bulbs...179 Hazard Warning Flashers...43 Headlights...40 Aiming...177 Daytime Running Lights...40 High Beam Indicator...36 High Beams, Turning on...40 Low Beams, Turning on...40 Reminder...
... Switch ...40 Hood, Opening the ...111 Horn...39 Hot Coolant, Warning about...152 Hydroplaning...129 Gas Mileage, Improving...114 Gasohol...108 Halogen Headlight Bulbs...179 Hazard Warning Flashers...43 Headlights...40 Aiming...177 Daytime Running Lights...40 High Beam Indicator...36 High Beams, Turning on...40 Low Beams, Turning on...40 Reminder...
Owner's Manual
Page 237
......218 Keys...49 Label, Certification...218 Lane Change, Signaling...41 Lap Belt...7 Lap/Shoulder Belts...6 Leaking of Exhaust into Car...29 Lighter, Cigarette...69 Lights Headlight Aiming...177 Bulb Replacement...179 Indicator...33 Parking...40 Turn Signal...41 Maintenance...137 Owner Maintenance Checks...146 Record...144-145 Required Indicator...38 Safety...
......218 Keys...49 Label, Certification...218 Lane Change, Signaling...41 Lap Belt...7 Lap/Shoulder Belts...6 Leaking of Exhaust into Car...29 Lighter, Cigarette...69 Lights Headlight Aiming...177 Bulb Replacement...179 Indicator...33 Parking...40 Turn Signal...41 Maintenance...137 Owner Maintenance Checks...146 Record...144-145 Required Indicator...38 Safety...

