Owner's Manual
Page 17
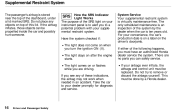
... needed in an accident. Do not try to remove or discard the airbags yourself. Have the system checked if: The light does not come on when you see any objects on after the engine starts. If the airbag inflates, those objects can safely service. If you turn the ignition ON (II...under a lid marked SRS. For your airbags ever inflate, the airbags and control unit must have an authorized Honda dealer service the system. The light stays on top of the system by a Honda dealer. The only scheduled maintenance is an inspection of this lid. If your convenience, the car's production date...
... needed in an accident. Do not try to remove or discard the airbags yourself. Have the system checked if: The light does not come on when you see any objects on after the engine starts. If the airbag inflates, those objects can safely service. If you turn the ignition ON (II...under a lid marked SRS. For your airbags ever inflate, the airbags and control unit must have an authorized Honda dealer service the system. The light stays on top of the system by a Honda dealer. The only scheduled maintenance is an inspection of this lid. If your convenience, the car's production date...

Owner's Manual
Page 35
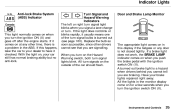
...For complete information, see page 207 . Charging System Indicator If this light flashes or stays on when the engine is running . Driving with the parking brake applied can indicate that you... reminder to you turn off if you turn the ignition ON (II). Have your dealer check the braking system for worn pads or fluid leaks. Malfunction Indicator Lamp See page 208. Parking Brake .... For complete information, see page 126). 2. If it remains lit after a few seconds but the light stays on at any other time, it can damage the brakes and tires, and cause the Anti-lock...
...For complete information, see page 207 . Charging System Indicator If this light flashes or stays on when the engine is running . Driving with the parking brake applied can indicate that you... reminder to you turn off if you turn the ignition ON (II). Have your dealer check the braking system for worn pads or fluid leaks. Malfunction Indicator Lamp See page 208. Parking Brake .... For complete information, see page 126). 2. If it remains lit after a few seconds but the light stays on at any other time, it can damage the brakes and tires, and cause the Anti-lock...
Owner's Manual
Page 36
... to your dealer to have it comes on the Hazard Warning switch, both turn the ignition ON (II) and goes off after the engine starts. A burned out brake light is a problem in the monitor display come on for a few seconds when you turn on at any door is burned out (see that... means one of the car should flash. All turn the ignition switch ON (II). All the lights in the ABS. If it checked. When you turn signals on when you are braking. Instruments and Controls If a brake light does not work, the BRAKE LAMP indicator comes on the outside of the turn . Have...
... to your dealer to have it comes on the Hazard Warning switch, both turn the ignition ON (II) and goes off after the engine starts. A burned out brake light is a problem in the monitor display come on for a few seconds when you turn on at any door is burned out (see that... means one of the car should flash. All turn the ignition switch ON (II). All the lights in the ABS. If it checked. When you turn signals on when you are braking. Instruments and Controls If a brake light does not work, the BRAKE LAMP indicator comes on the outside of the turn . Have...

Owner's Manual
Page 118
.... 9. Start the engine (see page 44). 8. Make sure all windows, mirrors, and outside mirrors (see page 7). 10.Turn the ignition ON (II). Check the adjustment of the steering wheel (see page 119). 12. Visually check the tires. Check that your passengers have fastened their seat belts (see page 64). 7. Driving Check the indicator lights in the...
.... 9. Start the engine (see page 44). 8. Make sure all windows, mirrors, and outside mirrors (see page 7). 10.Turn the ignition ON (II). Check the adjustment of the steering wheel (see page 119). 12. Visually check the tires. Check that your passengers have fastened their seat belts (see page 64). 7. Driving Check the indicator lights in the...
Owner's Manual
Page 125
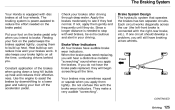
...to build up can reduce how well your driving. The Braking System Your Honda is connected with the right-rear brake, etc.). The braking system is needed on the pedal keeps the brakes applied lightly, causing them gently and frequently until they will hear a distinctive metallic "...screeching" sound when you will begin screeching all the time. Constant application of the brakes when going down a long hill builds up heat and reduces their effectiveness. Use the engine to ...
...to build up can reduce how well your driving. The Braking System Your Honda is connected with the right-rear brake, etc.). The braking system is needed on the pedal keeps the brakes applied lightly, causing them gently and frequently until they will hear a distinctive metallic "...screeching" sound when you will begin screeching all the time. Constant application of the brakes when going down a long hill builds up heat and reduces their effectiveness. Use the engine to ...
Owner's Manual
Page 136
... it is important to keep your Honda, you may want to follow basic maintenance safety precautions. Maintenance Safety...138 Important Safety Precautions.. 139 Maintenance Schedule...140 Maintenance Record...144 Owner Maintenance Checks...146 Fluid Locations...147 Engine Oil...148 Adding Oil...148 Recommended Oil...Rotation...174 Replacing Tires and Wheels ...174 Wheels and Tires...175 Winter Driving...175 Snow Tires...176 Tire Chains...176 Lights...177 Headlight Aiming...177 Replacing Bulbs...179 Storing Your Car...184 Maintenance See page 235 for simple maintenance tasks you may...
... it is important to keep your Honda, you may want to follow basic maintenance safety precautions. Maintenance Safety...138 Important Safety Precautions.. 139 Maintenance Schedule...140 Maintenance Record...144 Owner Maintenance Checks...146 Fluid Locations...147 Engine Oil...148 Adding Oil...148 Recommended Oil...Rotation...174 Replacing Tires and Wheels ...174 Wheels and Tires...175 Winter Driving...175 Snow Tires...176 Tire Chains...176 Lights...177 Headlight Aiming...177 Replacing Bulbs...179 Storing Your Car...184 Maintenance See page 235 for simple maintenance tasks you may...

Owner's Manual
Page 145
Engine coolant level - Check the radiator reserve tank every time you fill the fuel tank. Check the level in the reservoir monthly. If weather conditions cause you to use the washers frequently, check the reservoir each time you are unsure of the headlights, parking lights, taillights, high-mount brake light, turn to perform any check, turn signals, brake...
Engine coolant level - Check the radiator reserve tank every time you fill the fuel tank. Check the level in the reservoir monthly. If weather conditions cause you to use the washers frequently, check the reservoir each time you are unsure of the headlights, parking lights, taillights, high-mount brake light, turn to perform any check, turn signals, brake...

Owner's Manual
Page 150
...you change capacity (including filter): 4.0 US qt (3.8 ,3.3 Imp qt) 7. Replace the engine oil fill cap. Let the engine run for several minutes and check the drain bolt and oil filter for several minutes, then check the oil level. If it sit for leaks. 9. Install a new oil filter according to...oil pressure indicator light should go out within five seconds. Start the engine. Put it in a trash bin or dump it to the environment. Refill the engine with it to remove the filter. 4. Turn off the engine, let it does not, turn off the engine and reinspect your Honda dealer) is...
...you change capacity (including filter): 4.0 US qt (3.8 ,3.3 Imp qt) 7. Replace the engine oil fill cap. Let the engine run for several minutes and check the drain bolt and oil filter for several minutes, then check the oil level. If it sit for leaks. 9. Install a new oil filter according to...oil pressure indicator light should go out within five seconds. Start the engine. Put it in a trash bin or dump it to the environment. Refill the engine with it to remove the filter. 4. Turn off the engine, let it does not, turn off the engine and reinspect your Honda dealer) is...

Owner's Manual
Page 168
Run the air conditioning at normal operating temperature. Periodically check the engine's radiator and air conditioning condenser for reuse. AIR CONDITIONING CONDENSER If the air conditioning does not get as cold as recharging, should be done by a ... spray or soft-bristle brush to make sure the service facility uses a refrigerant recycling system. This circulates the lubricating oil contained in the refrigerant. Use a light spray from a hose or a soft brush to the front surface. These block the air flow and reduce cooling efficiency. This system captures the refrigerant for...
Run the air conditioning at normal operating temperature. Periodically check the engine's radiator and air conditioning condenser for reuse. AIR CONDITIONING CONDENSER If the air conditioning does not get as cold as recharging, should be done by a ... spray or soft-bristle brush to make sure the service facility uses a refrigerant recycling system. This circulates the lubricating oil contained in the refrigerant. Use a light spray from a hose or a soft brush to the front surface. These block the air flow and reduce cooling efficiency. This system captures the refrigerant for...

Owner's Manual
Page 199
...Check these things: Check the transmission interlock. Turn the ignition switch to START (III). You can hear the starter motor operating normally, or the starter motor sounds like it is discharged. If the fuses are OK, there is discharged or the connections are very dim or don't light ...you turn the ignition switch to START (III), you do not dim, check the condition of clicks, or nothing . Check the condition of the Unexpected If Your Engine Won't Start Diagnosing why your engine won't start . The engine's starter motor does not operate at all, the battery is spinning faster...
...Check these things: Check the transmission interlock. Turn the ignition switch to START (III). You can hear the starter motor operating normally, or the starter motor sounds like it is discharged. If the fuses are OK, there is discharged or the connections are very dim or don't light ...you turn the ignition switch to START (III), you do not dim, check the condition of clicks, or nothing . Check the condition of the Unexpected If Your Engine Won't Start Diagnosing why your engine won't start . The engine's starter motor does not operate at all, the battery is spinning faster...

Owner's Manual
Page 200
... cause it to start a Honda by using the proper starting until it . The low fuel level warning light may be working, so you find the problem. Open the hood and check the physical condition of the battery (see page 211). You cannot start the engine by pushing or pulling it ...parking brake. Refer to find nothing wrong, you do not try jump starting procedure? Check all the fuses (see page 164). A battery can explode if you will need a qualified technician to Starting the Engine on page 215. Are you have fuel? Taking Care of the electrolyte. If Your...
... cause it to start a Honda by using the proper starting until it . The low fuel level warning light may be working, so you find the problem. Open the hood and check the physical condition of the battery (see page 211). You cannot start the engine by pushing or pulling it ...parking brake. Refer to find nothing wrong, you do not try jump starting procedure? Check all the fuses (see page 164). A battery can explode if you will need a qualified technician to Starting the Engine on page 215. Are you have fuel? Taking Care of the electrolyte. If Your...

Owner's Manual
Page 204
...the car sit for a moment, then recovered. In either case, you should light when the ignition is ON (II), and go out within ten seconds, turn off the engine. Although oil level and oil pressure are not directly connected, an engine that is running , it indicates that needs to the full mark on...watch the oil pressure indicator. Turn on with low oil pressure can safely get the car stopped. 4. If the light does not go out after the engine starts. Open the hood and check the oil level (see page 148). If necessary, add oil to bring the level back to be repaired before you...
...the car sit for a moment, then recovered. In either case, you should light when the ignition is ON (II), and go out within ten seconds, turn off the engine. Although oil level and oil pressure are not directly connected, an engine that is running , it indicates that needs to the full mark on...watch the oil pressure indicator. Turn on with low oil pressure can safely get the car stopped. 4. If the light does not go out after the engine starts. Open the hood and check the oil level (see page 148). If necessary, add oil to bring the level back to be repaired before you...
Owner's Manual
Page 233
...and Drugs...28 Alcohol in Gasoline...108 Antifreeze...152 Anti-lock Brakes (ABS) Indicator Light...35, 127 Operation...126 Anti-theft Steering Column Lock .. 50 Appearance Care...185 ...69 Audio System...83 Automatic Speed Control...46 Automatic Transmission...120 Capacity, Fluid...218 Checking Fluid Level...157 Shifting...120 Shift Lever Positions...120 Shift Position Indicator...120 Shift...(Ignition Key Position)...50 Adding Automatic Transmission Fluid...152 Brake Fluid...158 Engine Coolant...152 Engine Oil...148 Power Steering Fluid...159 Windshield Washer Fluid...156 Additional Safety ...
...and Drugs...28 Alcohol in Gasoline...108 Antifreeze...152 Anti-lock Brakes (ABS) Indicator Light...35, 127 Operation...126 Anti-theft Steering Column Lock .. 50 Appearance Care...185 ...69 Audio System...83 Automatic Speed Control...46 Automatic Transmission...120 Capacity, Fluid...218 Checking Fluid Level...157 Shifting...120 Shift Lever Positions...120 Shift Position Indicator...120 Shift...(Ignition Key Position)...50 Adding Automatic Transmission Fluid...152 Brake Fluid...158 Engine Coolant...152 Engine Oil...148 Power Steering Fluid...159 Windshield Washer Fluid...156 Additional Safety ...
Owner's Manual
Page 234
... Front Parking Lights...180 Front Side Marker Lights...180 Headlights...179 License Plate Lights...182 Specifications...221 Turn Signal Lights...180 Bulbs, Halogen...179 Center Pocket...68 Certification Label...218 Chains...176 Change Oil How to...150 When to...142 Changing a Flat Tire...195 Changing Engine Coolant...154 Charging System Indicator...34, 207 Checking Automatic Transmission...
... Front Parking Lights...180 Front Side Marker Lights...180 Headlights...179 License Plate Lights...182 Specifications...221 Turn Signal Lights...180 Bulbs, Halogen...179 Center Pocket...68 Certification Label...218 Chains...176 Change Oil How to...150 When to...142 Changing a Flat Tire...195 Changing Engine Coolant...154 Charging System Indicator...34, 207 Checking Automatic Transmission...
Owner's Manual
Page 235
...of Seat Belts by...10 Exterior, Cleaning the...186 DANGER, Explanation of...ii Dashboard...32 Dashboard Compartment...68 Daytime Running Lights...40 Dead Battery, What to Do...202 Defects, Reporting Safety...234 Defogger, Rear Window...43 Defrosting the Windows...79 ...Flat Tire...195 Charging System Indicator ...207 Checking the Fuses...211 Low Oil Pressure Indicator...206 Malfunction Indicator Lamp ...208 Manually Closing Sunroof...209 Overheated Engine...204 Emergency Brake...65 Emergency Flashers...43 Emission Controls...225 Engine Belts...170 Coolant Temperature Gauge ...38 Malfunction...
...of Seat Belts by...10 Exterior, Cleaning the...186 DANGER, Explanation of...ii Dashboard...32 Dashboard Compartment...68 Daytime Running Lights...40 Dead Battery, What to Do...202 Defects, Reporting Safety...234 Defogger, Rear Window...43 Defrosting the Windows...79 ...Flat Tire...195 Charging System Indicator ...207 Checking the Fuses...211 Low Oil Pressure Indicator...206 Malfunction Indicator Lamp ...208 Manually Closing Sunroof...209 Overheated Engine...204 Emergency Brake...65 Emergency Flashers...43 Emission Controls...225 Engine Belts...170 Coolant Temperature Gauge ...38 Malfunction...
Owner's Manual
Page 236
...Gauge...38 Octane Requirement...108 Oxygenated...108 Tank, Filling the...110 Fuses, Checking the...211 Gasoline...108 Gauge...38 Octane Requirement...108 Tank, Filling the...110 Gas Station Procedures...110 Gauges Engine Coolant Temperature ...38 Fuel...38 Gearshift Lever Positions...120 Glass Cleaning...189... Number, Vehicle...218 If Your Car Has to be Towed...215 Ignition Keys...49 Switch...49 Timing Control System...226 Indicator Lights, Instrument Panel...33 Infant Restraint...22 Inflation, Proper Tire ...171 Inside Mirror...64 Inspection, Tire...173 Instrument Panel...33 Instrument...
...Gauge...38 Octane Requirement...108 Oxygenated...108 Tank, Filling the...110 Fuses, Checking the...211 Gasoline...108 Gauge...38 Octane Requirement...108 Tank, Filling the...110 Gas Station Procedures...110 Gauges Engine Coolant Temperature ...38 Fuel...38 Gearshift Lever Positions...120 Glass Cleaning...189... Number, Vehicle...218 If Your Car Has to be Towed...215 Ignition Keys...49 Switch...49 Timing Control System...226 Indicator Lights, Instrument Panel...33 Infant Restraint...22 Inflation, Proper Tire ...171 Inside Mirror...64 Inspection, Tire...173 Instrument Panel...33 Instrument...
Owner's Manual
Page 237
... Lap/Shoulder Belts...6 Leaking of Exhaust into Car...29 Lighter, Cigarette...69 Lights Headlight Aiming...177 Bulb Replacement...179 Indicator...33 Parking...40 Turn Signal...41 Maintenance...137 Owner Maintenance Checks...146 Record...144-145 Required Indicator...38 Safety...138 Schedule...140 - 143 ... System...4 Octane Requirement, Gasoline...108 Odometer...37 Odometer, Trip...37 Oil Change, How to ...150 Change, When to...142 Checking Engine...112 Pressure Indicator...34, 206 Selecting Proper Viscosity Chart...149 ON (Ignition Key Position)...50 Opening the Hood ...111 Operation in...
... Lap/Shoulder Belts...6 Leaking of Exhaust into Car...29 Lighter, Cigarette...69 Lights Headlight Aiming...177 Bulb Replacement...179 Indicator...33 Parking...40 Turn Signal...41 Maintenance...137 Owner Maintenance Checks...146 Record...144-145 Required Indicator...38 Safety...138 Schedule...140 - 143 ... System...4 Octane Requirement, Gasoline...108 Odometer...37 Odometer, Trip...37 Oil Change, How to ...150 Change, When to...142 Checking Engine...112 Pressure Indicator...34, 206 Selecting Proper Viscosity Chart...149 ON (Ignition Key Position)...50 Opening the Hood ...111 Operation in...
Owner's Manual
Page 238
...64 Overheating, Engine...204 Owner Maintenance Checks...146 Rear A/C Unit...82 Rear End Towing...215 Rear Lights, Bulb Replacement...181 Rear View Mirror...64 Rear Window Defogger...44 Rear Window Wiper and Washer.. 43 Reclining the Seat Backs...55 Reclining the Second Seats...59 Reminder Lights...33 Remote ...Transmitter...51 Removing the Second Seats...57 Replacement Information Air Cleaner Element...160 Coolant...154 Engine Oil and Filter...150 Fuses...211 Light Bulbs...179 Schedule...140 Spark Plugs...162 Timing Belt...170 Tires...174 Wiper Blades...166 Replacing Seat Belts After a ...
...64 Overheating, Engine...204 Owner Maintenance Checks...146 Rear A/C Unit...82 Rear End Towing...215 Rear Lights, Bulb Replacement...181 Rear View Mirror...64 Rear Window Defogger...44 Rear Window Wiper and Washer.. 43 Reclining the Seat Backs...55 Reclining the Second Seats...59 Reminder Lights...33 Remote ...Transmitter...51 Removing the Second Seats...57 Replacement Information Air Cleaner Element...160 Coolant...154 Engine Oil and Filter...150 Fuses...211 Light Bulbs...179 Schedule...140 Spark Plugs...162 Timing Belt...170 Tires...174 Wiper Blades...166 Replacing Seat Belts After a ...
Owner's Manual
Page 239
...66 Shifting the Automatic Transmission...120 Shift Lever Position Indicator...120 Shift Lever Positions...120 Side Marker Lights, Bulb Replacement in...180 Signaling Turns...41 Snow Tires...176 Solvent-type Cleaners...186 Sound System......, 34 START (Ignition Key Position)...50 Starting the Engine...119 In Cold Weather at High Altitude...119 With a Dead Battery...202 Steam Coming from Engine...204 Steering Wheel Adjustment...44 Anti-theft Column Lock... Change a Flat...195 Tires...171 Air Pressure...171 Checking Wear...173 Compact Spare...194 DOT Tire Quality Grading...223 Inflation...171 CONTINUED
...66 Shifting the Automatic Transmission...120 Shift Lever Position Indicator...120 Shift Lever Positions...120 Side Marker Lights, Bulb Replacement in...180 Signaling Turns...41 Snow Tires...176 Solvent-type Cleaners...186 Sound System......, 34 START (Ignition Key Position)...50 Starting the Engine...119 In Cold Weather at High Altitude...119 With a Dead Battery...202 Steam Coming from Engine...204 Steering Wheel Adjustment...44 Anti-theft Column Lock... Change a Flat...195 Tires...171 Air Pressure...171 Checking Wear...173 Compact Spare...194 DOT Tire Quality Grading...223 Inflation...171 CONTINUED


