
Owner's Manual
Page 31
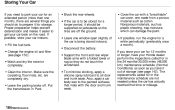
RADIATOR CAP BATTERY Driver and Passenger Safety If a label comes off or becomes hard to read, contact your Honda dealer for a replacement. Read these labels carefully and don't remove them. Safety Labels These labels are in the locations shown. They warn you of potential hazards that could cause serious injury.
RADIATOR CAP BATTERY Driver and Passenger Safety If a label comes off or becomes hard to read, contact your Honda dealer for a replacement. Read these labels carefully and don't remove them. Safety Labels These labels are in the locations shown. They warn you of potential hazards that could cause serious injury.

Owner's Manual
Page 35
... parking brake. For complete information, see page 126). 2. Have your dealer check the braking system for worn pads or fluid leaks. This is running , the battery is low. If you do . Malfunction Indicator Lamp See page 208. If it indicates a problem in the supplemental restraint system. SRS Instruments and Controls Charging...
... parking brake. For complete information, see page 126). 2. Have your dealer check the braking system for worn pads or fluid leaks. This is running , the battery is low. If you do . Malfunction Indicator Lamp See page 208. If it indicates a problem in the supplemental restraint system. SRS Instruments and Controls Charging...

Owner's Manual
Page 85
... with each Preset button. 2. Pick the Preset button you want for a station with a strong signal. Audio System You can store the frequencies of your vehicle's battery goes dead, is disconnected or the radio fuse is stored, simply press and release the proper Preset button to tune to it . TUNE - SEEK - Press...
... with each Preset button. 2. Pick the Preset button you want for a station with a strong signal. Audio System You can store the frequencies of your vehicle's battery goes dead, is disconnected or the radio fuse is stored, simply press and release the proper Preset button to tune to it . TUNE - SEEK - Press...

Owner's Manual
Page 92
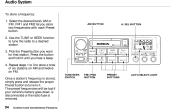
... your favorite stations. PWR/VOL KNOB AM BUTTON STEREO INDICATOR TUNE/SEEK SWITCH FM1/FM2 BUTTON PRESET BUTTONS Comfort and Convenience Features EX model Your Honda's audio system provides clear reception on both AM and FM bands, while the preset buttons allow you must enter a code number (see page 106). * Dolby...
... your favorite stations. PWR/VOL KNOB AM BUTTON STEREO INDICATOR TUNE/SEEK SWITCH FM1/FM2 BUTTON PRESET BUTTONS Comfort and Convenience Features EX model Your Honda's audio system provides clear reception on both AM and FM bands, while the preset buttons allow you must enter a code number (see page 106). * Dolby...
Owner's Manual
Page 94
... . Once a station's frequency is removed. SEL BUTTON FM1 and FM2 let you want for that station. The preset frequencies will be lost if your vehicle's battery goes dead, is disconnected or the radio fuse is stored, simply press and release the proper Preset button to tune to it until you hear...
... . Once a station's frequency is removed. SEL BUTTON FM1 and FM2 let you want for that station. The preset frequencies will be lost if your vehicle's battery goes dead, is disconnected or the radio fuse is stored, simply press and release the proper Preset button to tune to it until you hear...

Owner's Manual
Page 106
... your audio system's code number and serial number. It is entered correctly, the radio will disable itself . If your Honda dealer. If you must obtain the code number from your car's battery is nearly impossible. You will need the system's serial number. Use the Preset buttons to lose the card, you should...
... your audio system's code number and serial number. It is entered correctly, the radio will disable itself . If your Honda dealer. If you must obtain the code number from your car's battery is nearly impossible. You will need the system's serial number. Use the Preset buttons to lose the card, you should...
Owner's Manual
Page 119
... than 15 seconds. Return to step 2. The thinner air found at a time. Make sure the shift lever is harder to reduce the drain on the battery. 2. Push the accelerator pedal halfway to the floor and hold the ignition key in START (III) for at High Altitude (Above 8,000 feet/ 2,400 meters... , keep the ignition key in step 2, push the accelerator pedal to the floor and hold the key in order to reduce the drain on the battery. 3. If the engine does not start the engine for no more than 15 seconds. Starting the Engine 1. If the engine does not start within 15...
... than 15 seconds. Return to step 2. The thinner air found at a time. Make sure the shift lever is harder to reduce the drain on the battery. 2. Push the accelerator pedal halfway to the floor and hold the ignition key in START (III) for at High Altitude (Above 8,000 feet/ 2,400 meters... , keep the ignition key in step 2, push the accelerator pedal to the floor and hold the key in order to reduce the drain on the battery. 3. If the engine does not start the engine for no more than 15 seconds. Starting the Engine 1. If the engine does not start within 15...
Owner's Manual
Page 136
... System...158 Anti-lock Brake System...159 Power Steering...159 Air Cleaner Element...160 Spark Plugs...162 Replacement...162 Specifications...163 Battery...164 Windshield Wipers...166 Air Conditioning System...169 Drive Belts...170 Timing Belt...170 Tires...171 Inflation...171 Inspection...173 Maintenance......Car...184 Maintenance See page 235 for simple maintenance tasks you may want to obtain a copy, or see your Honda dealer. This section also includes Maintenance Schedules for normal driving and severe driving conditions, a Maintenance Record, and instructions for information on...
... System...158 Anti-lock Brake System...159 Power Steering...159 Air Cleaner Element...160 Spark Plugs...162 Replacement...162 Specifications...163 Battery...164 Windshield Wipers...166 Air Conditioning System...169 Drive Belts...170 Timing Belt...170 Tires...171 Inflation...171 Inspection...173 Maintenance......Car...184 Maintenance See page 235 for simple maintenance tasks you may want to obtain a copy, or see your Honda dealer. This section also includes Maintenance Schedules for normal driving and severe driving conditions, a Maintenance Record, and instructions for information on...

Owner's Manual
Page 138
Burns from the battery and all fuel-related parts. Keep cigarettes, sparks, and flames away from hot parts. Use a nonflammable solvent, not gasoline, to eliminate several potential hazards: Carbon ... operate the engine. Be sure there is off. Do not run the engine unless instructed to do so. Also, be careful when working near the battery or when using compressed air. Injury from engine exhaust. You should wear eye protection and protective clothing when working around gasoline or...
Burns from the battery and all fuel-related parts. Keep cigarettes, sparks, and flames away from hot parts. Use a nonflammable solvent, not gasoline, to eliminate several potential hazards: Carbon ... operate the engine. Be sure there is off. Do not run the engine unless instructed to do so. Also, be careful when working near the battery or when using compressed air. Injury from engine exhaust. You should wear eye protection and protective clothing when working around gasoline or...

Owner's Manual
Page 163
... turn brown. To remove it off the battery with a solution of your car's battery monthly. Coat the terminals with plain water. Maintenance When this stops, wash it , cover the terminals with a cloth or paper towel. Check the battery condition by looking at the test indicator window... on the battery explains the test indicator's colors. Dry off with grease to help prevent future corrosion. TEST INDICATOR WINDOW Check...
... turn brown. To remove it off the battery with a solution of your car's battery monthly. Coat the terminals with plain water. Maintenance When this stops, wash it , cover the terminals with a cloth or paper towel. Check the battery condition by looking at the test indicator window... on the battery explains the test indicator's colors. Dry off with grease to help prevent future corrosion. TEST INDICATOR WINDOW Check...

Owner's Manual
Page 164
... to enter the five-digit code (see "Code" in the frequency display. The battery gives off explosive hydrogen gas during normal operation. NOTICE Charging the battery with the cables connected can cause the battery to explode with a terminal cleaning tool or wire brush. Maintenance EX model If your... are severely corroded, clean them with grease. Then use a wrench to a charger. Detach the battery cables before connecting the battery to loosen and remove the cables from the terminals. Battery If you will disable itself. The next time you turn on the radio you need to connect the...
... to enter the five-digit code (see "Code" in the frequency display. The battery gives off explosive hydrogen gas during normal operation. NOTICE Charging the battery with the cables connected can cause the battery to explode with a terminal cleaning tool or wire brush. Maintenance EX model If your... are severely corroded, clean them with grease. Then use a wrench to a charger. Detach the battery cables before connecting the battery to loosen and remove the cables from the terminals. Battery If you will disable itself. The next time you turn on the radio you need to connect the...
Owner's Manual
Page 183
...things you should be supported on the road. To minimize sticking, apply a silicone spray lubricant to all door and trunk seals. Disconnect the battery. The replacements called for in the 24 months/30,000 miles (48,000 km) maintenance schedule (Normal Conditions) as soon as plastic sheeting..., run the engine for a while periodically (preferably once a month). If you store your car for 12 months or longer, have your Honda dealer perform the inspections called for in Park. Nonporous materials, such as you take it should do not touch the windshield. Maintenance Make sure...
...things you should be supported on the road. To minimize sticking, apply a silicone spray lubricant to all door and trunk seals. Disconnect the battery. The replacements called for in the 24 months/30,000 miles (48,000 km) maintenance schedule (Normal Conditions) as soon as plastic sheeting..., run the engine for a while periodically (preferably once a month). If you store your car for 12 months or longer, have your Honda dealer perform the inspections called for in Park. Nonporous materials, such as you take it should do not touch the windshield. Maintenance Make sure...

Owner's Manual
Page 199
... interlock. Turn on page 202. If the headlights do not hear the normal noise of the engine trying to start the engine, either the battery is discharged. You will not operate. You can hear the starter motor operating normally, or the starter motor sounds like it is probably something ...electrical circuit for the ignition switch or starter motor. Taking Care of the Unexpected The engine's starter motor does not operate at all , the battery is discharged or the connections are OK, there is spinning faster than normal, but the engine does not start up and run. The transmission must...
... interlock. Turn on page 202. If the headlights do not hear the normal noise of the engine trying to start the engine, either the battery is discharged. You will not operate. You can hear the starter motor operating normally, or the starter motor sounds like it is probably something ...electrical circuit for the ignition switch or starter motor. Taking Care of the Unexpected The engine's starter motor does not operate at all , the battery is discharged or the connections are OK, there is spinning faster than normal, but the engine does not start up and run. The transmission must...

Owner's Manual
Page 200
... will need a qualified technician to the fuel pump. Check all sparks, open flames, and smoking materials away from the battery. Open the hood and check the physical condition of the electrolyte. A battery can explode if you have fuel? Keep all the fuses (see page 164). NOTICE If... system, lights, etc. If you find the problem. If it seems slushy or like a simple procedure, you using a booster battery. Turn the ignition switch to start a Honda by using the proper starting until it . See Towing on page 119. Put the transmission in extreme cold, the electrolyte, inside ...
... will need a qualified technician to the fuel pump. Check all sparks, open flames, and smoking materials away from the battery. Open the hood and check the physical condition of the electrolyte. A battery can explode if you have fuel? Keep all the fuses (see page 164). NOTICE If... system, lights, etc. If you find the problem. If it seems slushy or like a simple procedure, you using a booster battery. Turn the ignition switch to start a Honda by using the proper starting until it . See Towing on page 119. Put the transmission in extreme cold, the electrolyte, inside ...

Owner's Manual
Page 201
...the positive ( + ) terminal on your car, then the booster battery. If the booster battery is running, disconnect the negative cable from your car, then from your Honda's battery. 4. Disconnect the positive cable from the booster battery. Connect the second jumper cable to the positive ( + ) ...terminal on the booster battery. Taking Care of the engine. 5. Connect the other part ...
...the positive ( + ) terminal on your car, then the booster battery. If the booster battery is running, disconnect the negative cable from your car, then from your Honda's battery. 4. Disconnect the positive cable from the booster battery. Connect the second jumper cable to the positive ( + ) ...terminal on the booster battery. Taking Care of the engine. 5. Connect the other part ...
Owner's Manual
Page 205
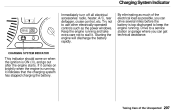
...accessories: radio, heater, A/C, rear defogger, cruise control, etc. Try not to stall it indicates that the charging system has stopped charging the battery. CHARGING SYSTEM INDICATOR This indicator should come on brightly when the engine is top discharged to a service station or garage where you can get technical... assistance. By eliminating as possible, you can drive several miles before the battery is running . Starting the engine will discharge the battery rapidly. Drive to keep the engine running , it .
...accessories: radio, heater, A/C, rear defogger, cruise control, etc. Try not to stall it indicates that the charging system has stopped charging the battery. CHARGING SYSTEM INDICATOR This indicator should come on brightly when the engine is top discharged to a service station or garage where you can get technical... assistance. By eliminating as possible, you can drive several miles before the battery is running . Starting the engine will discharge the battery rapidly. Drive to keep the engine running , it .
Owner's Manual
Page 229
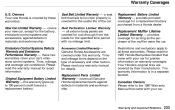
... coverage for exact information. Please read the warranty manual for a replacement battery purchased from the inside for the useful life of accessory and other factors. Accessory Limited Warranty - Replacement Parts Limited Warranty - Original Equipment Battery Limited Warranty - Please read the 1997 Honda Warranties booklet that came with your car's emissions control systems. Time, mileage...
... coverage for exact information. Please read the warranty manual for a replacement battery purchased from the inside for the useful life of accessory and other factors. Accessory Limited Warranty - Replacement Parts Limited Warranty - Original Equipment Battery Limited Warranty - Please read the 1997 Honda Warranties booklet that came with your car's emissions control systems. Time, mileage...
Owner's Manual
Page 233
... Position...18 Seat-back Position...18 Storing Cargo Safely...19 Additives, Engine Oil...150 Adjustments Mirrors...64 Head Restraints...56 Seats...54 Steering Wheel...44 Battery Charging System Indicator...34, 207 Jump Starting...202 Maintenance...164 Specifications...221 Before Driving...107 Belts, Seat...5 Beverage Holder...66 Body Repair...191 Brakes Anti...
... Position...18 Seat-back Position...18 Storing Cargo Safely...19 Additives, Engine Oil...150 Adjustments Mirrors...64 Head Restraints...56 Seats...54 Steering Wheel...44 Battery Charging System Indicator...34, 207 Jump Starting...202 Maintenance...164 Specifications...221 Before Driving...107 Belts, Seat...5 Beverage Holder...66 Body Repair...191 Brakes Anti...
Owner's Manual
Page 234
... Oil How to...150 When to...142 Changing a Flat Tire...195 Changing Engine Coolant...154 Charging System Indicator...34, 207 Checking Automatic Transmission Fluid...157 Battery Condition...164 Brake Fluid...158 Drive Belts...170 Engine Coolant...113 Engine Oil...112 Fuses...211 Power Steering Fluid...159 Checklist, Before Driving...118 Child...
... Oil How to...150 When to...142 Changing a Flat Tire...195 Changing Engine Coolant...154 Charging System Indicator...34, 207 Checking Automatic Transmission Fluid...157 Battery Condition...164 Brake Fluid...158 Drive Belts...170 Engine Coolant...113 Engine Oil...112 Fuses...211 Power Steering Fluid...159 Checklist, Before Driving...118 Child...
Owner's Manual
Page 235
...Seat Belts by...10 Exterior, Cleaning the...186 DANGER, Explanation of...ii Dashboard...32 Dashboard Compartment...68 Daytime Running Lights...40 Dead Battery, What to Do...202 Defects, Reporting Safety...234 Defogger, Rear Window...43 Defrosting the Windows...79 DEXRON® III Automatic Transmission ...Unlocking...50 Power Door Locks...50 DOT Tire Quality Grading...223 Drive Belts...170 Economy, Fuel...114 Emergencies on the Road...193 Battery, Jump Starting...202 Changing a Flat Tire...195 Charging System Indicator ...207 Checking the Fuses...211 Low Oil Pressure Indicator...206 Malfunction...
...Seat Belts by...10 Exterior, Cleaning the...186 DANGER, Explanation of...ii Dashboard...32 Dashboard Compartment...68 Daytime Running Lights...40 Dead Battery, What to Do...202 Defects, Reporting Safety...234 Defogger, Rear Window...43 Defrosting the Windows...79 DEXRON® III Automatic Transmission ...Unlocking...50 Power Door Locks...50 DOT Tire Quality Grading...223 Drive Belts...170 Economy, Fuel...114 Emergencies on the Road...193 Battery, Jump Starting...202 Changing a Flat Tire...195 Charging System Indicator ...207 Checking the Fuses...211 Low Oil Pressure Indicator...206 Malfunction...


