eMachines T2542 Support Question
eMachines T2542 Support Question
Find answers below for this question about eMachines T2542 - 256 MB RAM.Need a eMachines T2542 manual? We have 2 online manuals for this item!
Question posted by jbyrd3115 on December 4th, 2021
When I Turn The Computer On The Tower Only Comes On And The Monitor Comes On But
Self test check your PC and signal cable
Current Answers
Answer #1: Posted by hzplj9 on December 4th, 2021 1:44 PM
hzplj9

Member since:
June 25th, 2012 Points: 4,873,510

Member since:
June 25th, 2012 Points: 4,873,510
Check the signal cable from the back of the unit. It is a small rectangular connector which will have 2 screws to release it. It may well have come adrift. This is a youtube video which gives advice.
www.youtube.com/watch?v=QCuZRBfrgjI
This is a user guide if it helps in any way.
https://www.manualslib.com/manual/371346/Emachines-A26ev17f.htmlGood luck.
Answer #2: Posted by SonuKumar on December 5th, 2021 7:27 AM
SonuKumar

Member since:
May 9th, 2021 Points: 16,604,800
Member since:
May 9th, 2021 Points: 16,604,800
https://electronic-servicing.com/e_machines_emachines_desktop_pc/q373463-emachine_t2542_power
https://manuall.co.uk/emachines-t2542-desktop-computer/
https://www.manualslib.com/products/Emachines-T2542-256-Mb-Ram-104769.html
Please respond to my effort to provide you with the best possible solution by using the "Acceptable Solution" and/or the "Helpful" buttons when the answer has proven to be helpful.
Regards,
Sonu
Your search handyman for all e-support needs!!
Related eMachines T2542 Manual Pages
User Guide - Page 7
Connecting Your Peripheral Devices 2-3 4. Turning the Computer On and Off 2-4
Turning On the Computer 2-4 Turning Off the Computer 2-4
Using Your Computer
Using an Optional Floppy Disk Drive 3-1 Using an ...
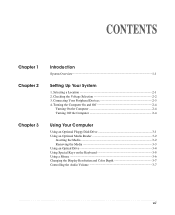
vii CONTENTS
Chapter 1 Chapter 2
Chapter 3
Introduction
System Overview...1-1
Setting Up Your System
1. Selecting a Location 2-1 2. Checking the Voltage Selection 2-2 3.
User Guide - Page 8

Solving Common Problems
Power ...A-1 Hard Disk Drive ...A-1 Optical Drive ...A-2 Audio ...A-2 Floppy Disk Drive A-3 Display & Monitor A-3 Keyboard ...A-4 Mouse ...A-4
Appendix B. Chapter 4
Installing and Removing Drives
Removing the Cover 4-1 Replacing the Cover 4-3 Installing an Expansion Card 4-4 Installing an Additional Hard Disk Drive 4-6 Installing ...
User Guide - Page 11

... inches of heat. You need one outlet for the computer, one for the monitor, and an additional outlet for a printer and any other peripheral devices.
Chapter ... grounded outlets. Good air circulation. Setting Up Your System
This chapter describes how to set up and turn on your disks, damage the computer's circuitry, and prevent proper ventilation. Soft surfaces like beds and ...
User Guide - Page 12
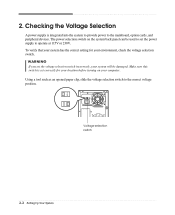
To verify that your system has the correct setting for your computer. Checking the Voltage Selection
A power supply is set the voltage selection switch incorrectly, your environment, check the voltage selection switch.
The power selection switch on your location before turning on the system back panel can be damaged. WARNING If you set correctly...
User Guide - Page 13
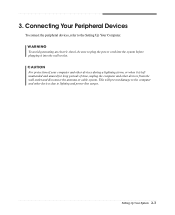
... protection of time, unplug the computer and other devices due to the computer and other devices from the wall outlet and disconnect the antenna or cable system. 3. WARNING To avoid generating an electric shock, be sure to the Setting Up Your Computer. Connecting Your Peripheral Devices
To connect the peripheral devices...
User Guide - Page 14

... . NOTE If the Restore CD is in the optical drive (D:) while your computer, follow these steps: 1. Turning the Computer On and Off
Follow the instructions below to turn on the computer or to turn on the monitor, and any other peripheral devices connected to shut down the system. 4.
Click the Start button, and then...
User Guide - Page 15

... up and the metal shutter leading into place.
Eject button
Metal shutter
Chapter 1
Floppy disk
When you turn off the computer while a disk drive light is off the computer.
Using Your Computer 3-1 Windows® may come with already installed on . Using an Optional Floppy Disk Drive
To use your computer, you are...
User Guide - Page 17
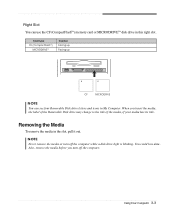
...media in the slot, pull it out. Using Your Computer 3-3
NOTE Never remove the media or turn off the computer while a disk drive light is blinking. Also, remove the media before you insert ...drive may change to the title of the media, if your media has its title. When you turn off the computer. Card type CF (CompactFlashTM)
MICRODRIVETM
Insertion Facing up Facing up
CF
MICRODRIVE
NOTE
...
User Guide - Page 18
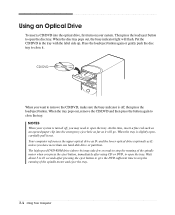
... want to close it will flash. At this time, insert a fine rod such as an opened paper clip into the optical drive, first turn on your system is turned off ; Your computer references the upper optical drive as D: and the lower optical drive (optional) as E: unless you press the eject button, immediately...
User Guide - Page 19
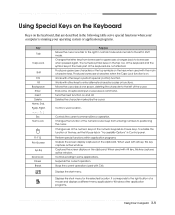
Using Special Keys on the Keyboard
Keys on and off. changes back to uppercase; Turns the insert function on the keyboard, that are not affected. Controls the current command line or operation. Changes use of the cursor.
Perform special functions ...
User Guide - Page 20
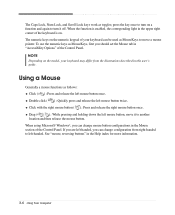
..., you should set the Mouse tab in the Mouse section of the Control Panel. To use the numeric keys as MouseKeys to turn on .
press the key once to turn it to left mouse button twice.
Double click ( ) : Quickly press and release the left -handed. Using a Mouse
Generally a mouse functions as toggles...
User Guide - Page 21
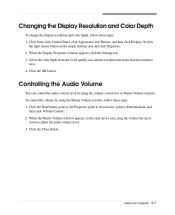
... the color depth from the Color quality area and the resolution from the Screen resolution
area. 4. Or click
the right mouse button on the empty desktop area and click Properties. 2. Click the OK button. Controlling the Audio Volume
You can control the audio volume level by using the volume control box...
User Guide - Page 23

...your computer. Then disconnect the computer from the back panel. NOTE Turn off the computer and peripheral devices including the monitor and printer. Installing and Removing Drives
This chapter describes how to...or modems before performing any cables connected to the computer. Then disconnect any of all, disconnect the power cable from the electrical outlet and from its internal components....
User Guide - Page 25
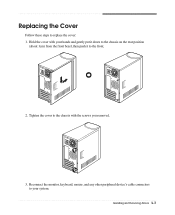
Reconnect the monitor, keyboard, mouse, and any other peripheral device's cable connectors to your hands and gently put it down to the chassis on the rear position
(about 1cm) from the front bezel, then push it ...
User Guide - Page 27
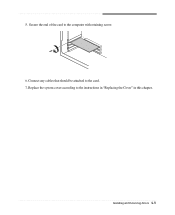
Installing and Removing Drives 4-5 Replace the system cover according to the card. 7. Connect any cables that should be attached to the instructions in "Replacing the Cover" in this chapter. 5. Secure the end of the card to the computer with retaining screw. 6.
User Guide - Page 28
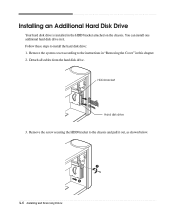
..." in the HDD bracket attached on the chassis. Installing an Additional Hard Disk Drive
Your hard disk drive is installed in this chapter. 2. Detach all cables from the hard disk drive. HDD bracket
Hard disk drive
3.
User Guide - Page 37
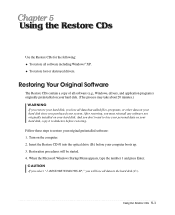
.... 4. RESTORE WINDOWS XP," you select "1. Using the Restore CDs 5-1 To restore lost or destroyed drivers.
Insert the Restore CD #1 into the optical drive (D:) before restoring.
Turn on your system.
User Guide - Page 43

... is not properly connected to see whether the wall outlet works, plug other wall outlet. To turn on your computer. To open Windows Help, click the Start button, and then click Help and...first, followed by running Disk Defragmenter. (For more information,refer to the Windows Help. Check for lost allocation units by the solution.
Hard Disk Drive
Cause Hard disk drive operation seems...
User Guide - Page 44
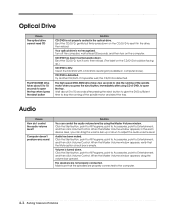
... window appears, verify that the speakers are not properly connected. Make sure that the Mute option check box is dirty. Wait about 5 to 10 seconds to open the tray.
A-2 Solving Common ...on the computer. Eject the CD/DVD, gently but firmly press down . Eject the CD/DVD, turn on the CD/DVD should be facing up or down .
Computer doesn't produce any sound
Solution
...
User Guide - Page 45

...the display resolution or color depth, use another diskette or check the diskette by running Check Disk. (For detail information, refer to a grounded wall outlet.
The cable connecting the monitor to cover the hole. To change the display resolution ...properly Adjust the brightness and contrast controls on the empty desktop area and click Properties. 2. Diskette is incorrectly inserted.
Similar Questions

El1300g-when Power Button Pressed, Fan Comes On, And Hard Drive Runs. No Output
power supply is good, hard drive is good, no light in power switch. No display . tried using new win...
power supply is good, hard drive is good, no light in power switch. No display . tried using new win...
(Posted by rfull4 3 years ago)


Connecting Two Monitors El1352-23e Nivida Geforce 6150se Graphics
I am trying to connect two monitors with a splitter and it is not showing that there are two monitor...
I am trying to connect two monitors with a splitter and it is not showing that there are two monitor...
(Posted by eyounger 11 years ago)

How To Remove Front Panel For W 4685 Emachines Tower
(Posted by roseprincess 12 years ago)

Mouse Doesn't Work, Hard Drive Doesn't Always Start Up Cd Drive Won't Open
we came to our business the other day and the computer was off. I never shut it off as we have a flo...
we came to our business the other day and the computer was off. I never shut it off as we have a flo...
(Posted by carlock 13 years ago)