eMachines T2542 Support Question
eMachines T2542 Support Question
Find answers below for this question about eMachines T2542 - 256 MB RAM.Need a eMachines T2542 manual? We have 2 online manuals for this item!
Question posted by carlock on April 20th, 2011
Mouse Doesn't Work, Hard Drive Doesn't Always Start Up Cd Drive Won't Open
we came to our business the other day and the computer was off. I never shut it off as we have a floral shop and orders come over the net 24/7 I turned it back on and got error messages and my mouse won't move any suggestions on what I can do to get it going again?
Current Answers
Related eMachines T2542 Manual Pages
User Guide - Page 7
... the Computer On and Off 2-4
Turning On the Computer 2-4 Turning Off the Computer 2-4
Using Your Computer
Using an Optional Floppy Disk Drive 3-1 Using an Optional Media Reader 3-2
Inserting the Media 3-2 Removing the Media 3-3 Using an Optical Drive 3-4 Using Special Keys on the Keyboard 3-5 Using a Mouse ...3-6 Changing the Display Resolution and Color Depth 3-7 Controlling the Audio...
User Guide - Page 8

... 5
Using the Restore CDs
Restoring Your Original Software 5-1
Chapter 6
Using the PowerDVD
About DVD ...6-1 Playing the PowerDVD 6-1
How to Run the PowerDVD 6-1 Buttons of the PowerDVD 6-2
Appendix A.
Solving Common Problems
Power ...A-1 Hard Disk Drive ...A-1 Optical Drive ...A-2 Audio ...A-2 Floppy Disk Drive A-3 Display & Monitor A-3 Keyboard ...A-4 Mouse ...A-4
Appendix B.
User Guide - Page 9

...
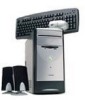
(optional) Power button
Emergency eject hole Load/Eject button Floppy disk drive(optional)
Media reader slots(optional) Power indicator Hard disk drive access indicator
IEEE 1394 connectors (optional)
USB 2.0 connectors (optional)
Headphone jack
Microphone jack USB 2.0 connectors (optional)
NOTE
Chapter 1 Your optical drives may differ from the illustrations described in this user's guide...
User Guide - Page 18
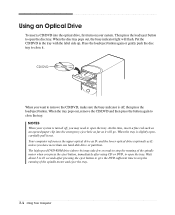
... tray.
3-4 Using Your Computer CD/DVD
When you want to remove the CD/DVD, make sure the busy indicator is turned off ; Using an Optical Drive
To insert a CD/DVD into the emergency eject hole as far as E: unless you have more than one hard disk drive or partition. When the tray is slightly open the tray. Your computer...
User Guide - Page 19
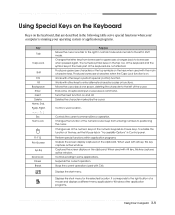
... Turns the insert function on the clipboard. Deletes the character marked by the cursor. Displays the start menu. Produces lowercase characters when the Caps Lock function is running your computer is on. Works with...programs. Outputs the screen display captured on the top row of the key, set the Mouse tab in "Accessibility Options" in Control panel. When used with other keys to the ...
User Guide - Page 20
... key once to move it off.
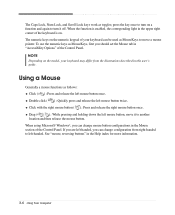
The Caps Lock, Num Lock, and Scroll Lock keys work as follows:
Click ( ) : Press and release the left mouse button once. NOTE Depending on a function and again to turn it to left mouse button twice.
When using Microsoft® Windows®, you can be used as MouseKeys, first...
User Guide - Page 21
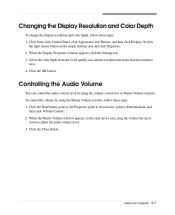
...and Color Depth
To change the display resolution and color depth, follow these steps: 1. Click the Start button, point to All Programs, point to Accessories, point to adjust the audio volume level. 3.... To control the volume by using the Master Volume window, follow these steps: 1. Click Start, click Control Panel, click Appearance and Themes, and then click Display. Select the color ...
User Guide - Page 25
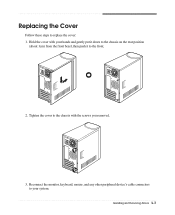
... to the chassis on the rear position
(about 1cm) from the front bezel, then push it to replace the cover: 1. Installing and Removing Drives 4-3 Reconnect the monitor, keyboard, mouse, and any other peripheral device's cable connectors to the chassis with your system. Replacing the Cover
Follow these steps to the front.
2. Hold...
User Guide - Page 28
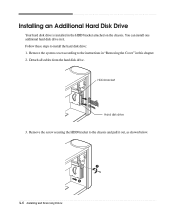
... it out, as shown below.
4-6 Installing and Removing Drives Remove the system cover according to install the hard disk drive: 1.
Follow these steps to the instructions in "Removing the Cover" in the HDD bracket attached on the chassis. Installing an Additional Hard Disk Drive
Your hard disk drive is installed in this chapter. 2. Remove the screw securing...
User Guide - Page 29

Installing and Removing Drives 4-7 4. Slide the hard disk drive into the HDD bracket. 6. With using the screws, secure the hard disk drive to CS (Cable Select). 5. Set the jumper of the new hard disk drive to the HDD bracket.
User Guide - Page 30

Connect the power and hard disk drive cable to the instructions in "Replacing the Cover" in this chapter. 4-8 Installing and Removing Drives Replace the system cover according to your hard disk drive. (If you removed the hard disk drive cable from the motherboard, replace it with the retaining screw, as shown below.
8. Slide the HDD bracket into the chassis and secure it .)
9. 7.
User Guide - Page 31
... system chassis.
Remove the HDD bracket from the optical drive. Remove the cover according to install a 3.5-inch hard disk drive, you can add an optional device such as a CD/DVD-ROM drive, hard disk drive, LS-120 drive, or ZIP drive in this chapter. 2. If only one device (e.g., CD-ROM/DVDROM drive) is installed in this chapter. To install an optional...
User Guide - Page 33

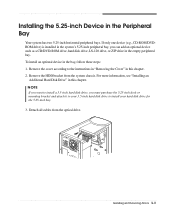
...jumper of E-IDE cable marked "SLAVE." Installing and Removing Drives 4-11 NOTES Like a hard disk drive, most optional devices have jumpers that must set for the drive to location of the front panel using a tool such ... 5.25-inch drive bay you can use , remove it from the front panel. You must be set the jumper of your system recognizes the device according to work properly with your...
User Guide - Page 37
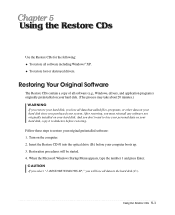
And you don't want to lose your personal data on your
hard disk since you purchased your original preinstalled software: 1. Using the Restore CDs 5-1 Insert the Restore CD #1 into the optical drive (D:) before your hard disk, copy it to restore your system. RESTORE WINDOWS XP," you lose all data that added files, programs, or other data...
User Guide - Page 38
... PC !!Warning!!
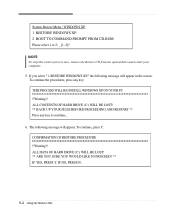
CONFIRMATION OF RESTORE PROCEDURE !!Warning!! If you select "1. IF NO, PRESS N.
5-2 Using the Restore CDs
ALL CONTENTS OF HARD DRIVE (C:) WILL BE LOST! ** BACK UP YOUR FILES BEFORE PROCEEDING AND RESTART ** Press any key. ALL DATA OF HARD DRIVE (C:) WILL BE LOST! ** ARE YOU SURE YOU WOULD LIKE TO PROCEED? ** IF YES, PRESS Y.
User Guide - Page 39

..." menu will start. To continue the restoration, remove the Restore CD from your optical drive and restart the computer.
13. Enter your system has two or three Restore CDs.
11. You can update drivers in the Drivers folder of you lose drivers, install these by using your hard disk. 10. message appears, replace the Restore CD
#2 with...
User Guide - Page 43

...works, plug other wall outlet. To open Windows Help, click the Start button, and then click Help and Support.)
The files stored on your hard disk may be corrupted. When the computer turned... the power button. Hard Disk Drive
Cause Hard disk drive operation seems slow
Hard disk drive access indicator light stays on
Solution
The files stored on your hard disk may be fragmented...
User Guide - Page 44
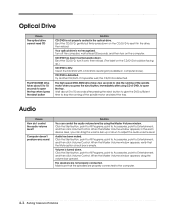
...Click the Start button, point to All Programs, point to Accessories, point to seat it in the optical drive. Make sure that the Mute option check box is defected.
Eject the CD/DVD, turn on the CD/DVD should ... audio volume level by using CD or DVD, to open the tray.
If it over, then reload. (The label on the computer. Wait about 5 to 10 seconds to open the tray when I control ...
User Guide - Page 45

... to a diskette
Floppy disk drive can't read the diskette
Solution
Diskette is not properly connected to a grounded wall outlet. Remove the write-protection or use the Display Properties window. To open Windows Help, click the Start button, and then click Help and Support.)
Display & Monitor
Cause The monitor doesn't work
How do I change the...
User Guide - Page 46
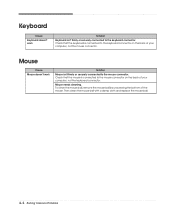
Check that the mouse is connected to the mouse connector. Mouse needs cleaning.
Mouse
Cause Mouse doesn't work
Solution
Keyboard isn't firmly or securely connected to the mouse connector on the back of your computer, not the keyboard connector.
To clean the mouse ball, remove the mouse ball by unscrewing the bottom of the mouse. A-4 Solving Common Problems
Check that the...
Similar Questions

I Put A Hard Drive From Another Pc In My T5082 And It Worked Yesterday And Today
I put a hard drive from another PC in my T5082 and it worked yesterday. I tried to start it today an...
I put a hard drive from another PC in my T5082 and it worked yesterday. I tried to start it today an...
(Posted by mspor914 3 years ago)

Transfer Hard Drive Data
I have a C2160 eMachine, 2003, and am trying to transfer all data from the hard drive to a travel dr...
I have a C2160 eMachine, 2003, and am trying to transfer all data from the hard drive to a travel dr...
(Posted by ToddBulock 8 years ago)

How To Set Hard Drive Configuration To Factory Default On Emachine Desktop
(Posted by ddeldg 10 years ago)

Emachines El1352g-01w Hard Drive Replace
Is there a diagram somewhere showing how to remove and replace the hard drive in an emachines EL1352...
Is there a diagram somewhere showing how to remove and replace the hard drive in an emachines EL1352...
(Posted by dusenbery52 11 years ago)

My Hard Drive Configuration Is Not Set To The Factory Default
my hard drive is not set to the factory default can you fix it?i just had my computer reformated cau...
my hard drive is not set to the factory default can you fix it?i just had my computer reformated cau...
(Posted by melissatolson 12 years ago)