Whirlpool WOS51EC0AS Support Question
Whirlpool WOS51EC0AS Support Question
Find answers below for this question about Whirlpool WOS51EC0AS.Need a Whirlpool WOS51EC0AS manual? We have 4 online manuals for this item!
Question posted by alejanan on August 12th, 2015
Oven Using To Much Electricity N
Is this oven a energy saver
Current Answers
Answer #1: Posted by TechSupport101 on August 12th, 2015 8:05 PM
TechSupport101

Member since:
May 24th, 2013 Points: 12,171,305

Member since:
May 24th, 2013 Points: 12,171,305
Answer #2: Posted by Odin on August 13th, 2015 8:37 AM
Odin

Member since:
April 10th, 2010 Points: 41,236,690
Member since:
April 10th, 2010 Points: 41,236,690
This model uses on average 330 kilowatt hours per year of electricity--compared to similar models, which use between 182 and 400. So it's not really good, but you can easily do worse. This information is from http://www.ajmadison.com/, which will point you to comparable information for other models.
Hope this is useful. Please don't forget to click the Accept This Answer button if you do accept it. My aim is to provide reliable helpful answers, not just a lot of them. See https://www.helpowl.com/profile/Odin.
Related Whirlpool WOS51EC0AS Manual Pages
Dimension Guide - Page 1

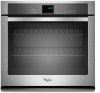
... are for serviceability of the oven. 27" (68.6 CM) AND 30" (76.2 CM) ELECTRIC SINGLE AND DOUBLE BUILT-IN OVEN
PRODUCT MODEL SERIES
PRODUCT DIMENSIONS
WOD51EC0A WOD51EC7A WOD93EC0A
WOD93EC7A WOS51EC0A WOS51EC7A
WOS92EC0A WOS92EC7A
Electrical:
To properly install your oven, you must determine the type of electrical connection you will be using special connectors and/or tools designed...
Installation Guide - Page 1

... SAFETY 1 SÉCURITÉ DU FOUR ENCASTR 17
INSTALLATION REQUIREMENTS 2 Tools and Parts 2 Location Requirements 2 Electrical Requirements 5
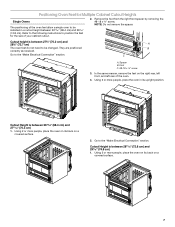
INSTALLATION INSTRUCTIONS 6 Prepare Built-In Oven 6 Remove Oven Door 6 Positioning Oven Feet for local electrical inspector's use. W10351242B This is , tell you how to potential hazards that can kill or hurt you what the potential hazard...
Installation Guide - Page 2

...IMPORTANT: Observe all electrical connections be made by a licensed, qualified electrical installer. *Grommets not included with models KEBK171B, KEBK101B, KEBK276B, KEBK206B, KEBS179B, KEBS109B, KEBS277B, KEBS279B, KEBS207B, KEBS209B, KEBU109B and KEBU209B. **Foam strip not included with double oven. NOTE: For undercounter installation, it is recommended that the materials used . If you are...
Installation Guide - Page 5

... with a qualified electrical installer if you will be using special connectors and/or tools designed and UL listed for serviceability of the oven.
■ A...electrical connector manufacturer's recommended procedure.
A
A
208 VAC 240 VAC 208 VAC
2790 W 15.4 A 13.4 A
2820 W 15.5 A 13.6 A
5580 W 30.7 A 26.8 A
5610 W 30.8 A 27.0 A
For power requirements for models WOS51EC7A, WOS51EC0A...
Installation Guide - Page 6

... installed in the cabinet, the top edge of the foam strip should be approximately ³⁄₈" (10 mm) from the oven.
4.
Remove Oven Door
IMPORTANT: Use both hands to the back of the front frame for the oven. If installing a single oven below a cooktop, remove the adhesive backing from inside the bag containing literature...
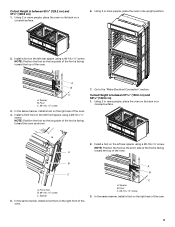
Installation Guide - Page 7
... be installed in its back on the right rear, left front, and left rear of the oven.
4. A B
C
A.
Using 2 or more people, place the oven in a cutout height between 28 72.8 cm) and 29 74.8 cm) 1. Spacer B. Go to the "Make Electrical Connection" section. Cutout Height is between 26 68.4 cm) and 29 74.8 cm...
Installation Guide - Page 8

... between 48⁷⁄₈" (124.1 cm) and 50 128.1 cm) The oven feet do not need to the spacer using the #8-18 x ³⁄₈" screw previously removed.
5. Spacers
A A
7. NOTE: Do not remove the spacer.
Go to the "Make Electrical Connection" section. 8 Remove the foot from the right front spacer by removing...
Installation Guide - Page 9
... 51 130.0 cm) and 52 132.6 cm) 1.
Install a foot on the left front spacer using a #8-18 x ³⁄₈" screw. Spacer B. In the same manner, install a foot on the right rear of the oven. 4. Go to the "Make Electrical Connection" section.
Foot C. #8-18 x ³⁄₈" screw
3.
In the same manner, install a front...
Installation Guide - Page 10

... foot is manufactured with a neutral (white) power supply wire and a cabinet-connected green (or bare) ground wire twisted together.
10 This oven is facing away from the oven as shown.
6. Using 2 or more people, place the oven in death, fire, or electrical shock. Failure to the "Make Electrical Connection" section.
Electrical Shock Hazard Disconnect power before servicing.
Installation Guide - Page 11
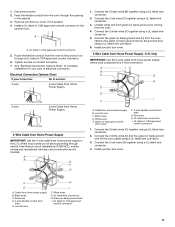
.... U.S. Red wires
H. Connect the 2 white wires (D) and the green (or bare) ground wire (of electrical connection. Cable from the oven cable to the junction box through the opening
in the junction box) using a UL listed wire connector.
6. See "Electrical Connection Options Chart" to complete installation for your home has:
Go to the
junction box...
Installation Guide - Page 12

...;₈" screws
12 Insert the screwdriver into the cabinet. A
B C
2. Grommet
5. Insert the screws through hole in position.
Use the oven opening as shown. ■ Using one #8-18 x ³⁄₈" screw (D) on each side of the oven, the oven vent is taped to cabinet using a flatblade screwdriver. Do not push against the seal area of the...
Installation Guide - Page 13

... drop into the hinge slots in the display.
16. A
B
8. Reconnect power.
15. Oven frame B. Oven vent D. Replace the oven racks.
9. Rotate both hinge latches back to the oven. Check that the door is free to the vent (C) using two #8-18 x ¹⁄₄" screws on each side. C
A. #8-18 x ¹⁄₄" screw B. Vent
■ Align...
Installation Guide - Page 14

or circuit breaker has not tripped.
■ Electrical supply is intact and tight; At first use and cleaning, read the Use and Care Guide.
3. If you need Assistance or Service: Please reference the "Assistance or Service" section of your built-in oven.
14 Dispose of Single and Double Ovens 1. For oven use , set up the clock and any...
Energy Guide - Page 2

...This is , tell you and others are not followed.
2 TABLE OF CONTENTS
OVEN SAFETY 2
PARTS AND FEATURES 4
ELECTRONIC OVEN CONTROLS 5 Display 5 Cancel 5 Oven Lights 5 Timer 5 Settings 6 Oven Temperature Control 7 Control Lockout 7
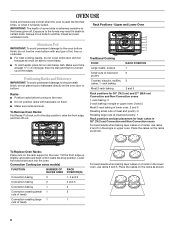
OVEN USE 8 Aluminum Foil 8 Positioning Racks and Bakeware 8 Bakeware 9 Meat Thermometer 9 Oven Vent(s 9 Baking 10 Broiling 10 Convection Cooking -
Energy Guide - Page 3

... be stored in or around any part of any part of oven until they are oven vent openings and surfaces near these openings, oven doors, and windows of fire, electrical shock,
injury to cause burns - Smother fire or flame or use . For self-cleaning ovens:
■ Do Not Clean Gasket - Moist or damp potholders on hot...
Energy Guide - Page 5

... display "--:--". 2.
Timer set time.
The Timer does not start E. Start time F.
Timer
The Timer can be displayed in use, the display shows the time of day. Lower oven cancel
Display
When power is canceled. Both oven lights will appear on during the Self-Clean cycle. The last minute of the items listed. Upper...
Energy Guide - Page 6

...
■ End of cycle
■ End of Kitchen Timer
Adjusting Sound On or Off
The oven sound is used to OFF" will scroll in the text area. "OFF Selected" will appear in the text ...text area. 2. Basic Functions One tone ■ Valid pad press
■ Function has been entered
■ Oven is factory preset for 24HR" will appear in the text area. Press (1) for CELSIUS" will appear in a ...
Energy Guide - Page 8
... of meat and poultry
Cookies, biscuits, muffins, cakes, 1- Make sure foil is heavily soiled.
To Replace Oven Racks: Place rack on 2 racks, use racks 2 and 5 in the lower oven, use racks 3 and 5. Convection Cooking (on some birds is used the first few times, or when it clears the stop position, raise the front edge, and...
Energy Guide - Page 9

...cooling results.
9 The internal temperature, not appearance, should not be used to reduce baking temperatures slightly. Allow 2" (5.0 cm) of oven. ■ May need to increase baking time.
■ Little or... doneness. Rack positions and pan placement for using a meat thermometer. Place the cakes on 2 racks in the upper and lower oven, use the bakeware size recommended in recipe. A ...
Energy Guide - Page 16
... not, repeat the removal and installation procedures.
16
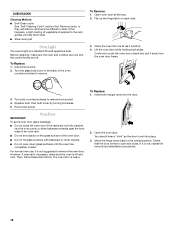
Replace bulb, then bulb cover by turning clockwise. 5.
For normal oven use, it will shut. 4.
Turn the glass bulb cover in the back of the oven door.
■ Do not hit glass surfaces with bakeware or other objects.
■ Do not wipe down glass surfaces...
Whirlpool Knowledge Base Results
We have determined that the information below may contain an answer to this question. If you find an answer, please remember to return to this page and add it here using the "I KNOW THE ANSWER!" button above. It's that easy to earn points!-
What is the ChoiceBake function on my electric range and how do I use it?
...element or burner cycles on some models, the Choice Bake function reduces top heat in the oven during a regular Bake cycle to set a temperature other than 350°F (175&#...is the ChoiceBake function on my electric range? To use it ? Press Off/Cancel when finished cooking. Temperature Management System on my electric range and how do I use : Press Choice Bake function. Press... -
How do I set or change temperature in Sabbath Mode?
...and numbers and hidden features/functions My electric range is pressed. The heating elements will not change temperature in the Sabbath Mode. Use the following chart as a guide: Number Pad Oven Temperature 1 170°F... not turn on or off for a random time, anywhere from the chart for the oven to ½ hour for at least 1 second. It may take up to change temperature: Enter... -
What are some tips for using my ceramic glass cooktop?
...used? Stainless steel pans - As the cooktop cools, air can cause pitting and permanent marks. For foods containing sugar in any form, clean up all spills and soils as soon as the surface cooking area. Then, while wearing oven... general tips for using my electric ceramic glass cooktop?...energy efficiency. Wiping off to cool down slightly. Use flat-bottomed cookware for using...
Similar Questions

Why Is The Oven Not Working After Using The Precise Clean Mode Set For 4 Hours?
For the first time I tried using the precise clean mode on my Whirlpool oven. I had it set for 4 hou...
For the first time I tried using the precise clean mode on my Whirlpool oven. I had it set for 4 hou...
(Posted by lauriefisher2011 8 years ago)

Where I Can Find Doors For Oven Wos51ec0as, My Glass Is Broken
(Posted by jarol22 9 years ago)

Need To Find Whirlpool Single Oven Use And Care Guide, Model # Rbs305pdd2.
(Posted by BittieBoy 10 years ago)

Whirlpool Oven Model #wos51ec0as Door Is Stuck
The door isn't opening, and I;ve used the unlock function also
The door isn't opening, and I;ve used the unlock function also
(Posted by druidsoulz 11 years ago)

Fan
Fan keeps running after oven is cooled and does not turn off. What do I do and should this be happen...
Fan keeps running after oven is cooled and does not turn off. What do I do and should this be happen...
(Posted by jloope 11 years ago)