Whirlpool WOS51EC0AS Support Question
Whirlpool WOS51EC0AS Support Question
Find answers below for this question about Whirlpool WOS51EC0AS.Need a Whirlpool WOS51EC0AS manual? We have 4 online manuals for this item!
Question posted by jarol22 on November 16th, 2014
Where I Can Find Doors For Oven Wos51ec0as, My Glass Is Broken
The person who posted this question about this Whirlpool product did not include a detailed explanation. Please use the "Request More Information" button to the right if more details would help you to answer this question.
Current Answers
Answer #1: Posted by Odin on November 17th, 2014 9:49 AM
Odin

Member since:
April 10th, 2010 Points: 41,236,690

Member since:
April 10th, 2010 Points: 41,236,690
For a list of this model's available parts (which you can order from the same site), with part numbers, pictures and prices, see http://www.repairclinic.com/Shop-For-Parts/-x776f7335316563306173/Wos51ec0as-Parts.
Hope this is useful. Please don't forget to click the Accept This Answer button if you do accept it. My aim is to provide reliable helpful answers, not just a lot of them. See https://www.helpowl.com/profile/Odin.
Related Whirlpool WOS51EC0AS Manual Pages
Dimension Guide - Page 1

....1 cm) max. Ref. 27" (68.6 CM) AND 30" (76.2 CM) ELECTRIC SINGLE AND DOUBLE BUILT-IN OVEN
PRODUCT MODEL SERIES
PRODUCT DIMENSIONS
WOD51EC0A WOD51EC7A WOD93EC0A
WOD93EC7A WOS51EC0A WOS51EC7A
WOS92EC0A WOS92EC7A
Electrical:
To properly install your oven, you must determine the type of electrical connection you will be using special connectors and/or tools...
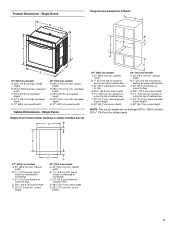
Dimension Guide - Page 2

...
NOTE: The cutout height can be between 26 68.4 cm) and 29 74.8 cm) for single ovens.
27" (68.6 cm) models
A. 27" (68.6 cm) min. cabinet width
B. 1" (2.5 cm) top of cutout to bottom of upper cabinet door
C. 14³⁄₄" (37.5 cm) bottom of cutout to floor
D. 25¹⁄₂...
Installation Guide - Page 1

... 1 SÉCURITÉ DU FOUR ENCASTR 17
INSTALLATION REQUIREMENTS 2 Tools and Parts 2 Location Requirements 2 Electrical Requirements 5
INSTALLATION INSTRUCTIONS 6 Prepare Built-In Oven 6 Remove Oven Door 6 Positioning Oven Feet for local electrical inspector's use. We have provided many important safety messages in this manual and on your appliance. WARNING
You can be killed ...
Installation Guide - Page 3
... Ovens
Single Oven Undercounter (without cooktop installed above)
A
B
C
27" (68.6 cm) models
A. 27" (68.6 cm) min. cabinet width
B. 1" (2.5 cm) top of cutout to bottom of upper cabinet door
...cutout to floor
D. 25¹⁄₂" (64.8 cm) cutout width
E. 28" (71.2 cm) min. Single Ovens B
Single Ovens Installed in Cabinet A
B
D
C
F
A
G
E
D E
27" (68.6 cm) models
A. 28¾"...
Installation Guide - Page 4

... height can be between 48⁷⁄₈" (124.1 cm) and 52 132.6 cm) for double ovens.
4 overall height
B. 28½" (72.4 cm) max.
bottom of cutout to top of cutout ....5 cm) bottom of cabinet door
F. 50¹⁄₄" (127.6 cm)* recommended cutout height
G. 24" (60.7 cm) cutout depth
30" (76.2 cm) models
A. 30" (76.2 cm) min.
Double Ovens B
Cabinet Dimensions - D. 28...
Installation Guide - Page 5

...
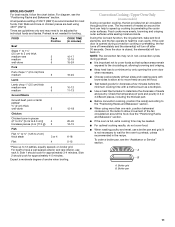
3690 W
Single Convect
3720 W
Double Thermal
7370 W
Double Convect
7400 W
■ Oven must conform with local codes and industry accepted wiring practices.
Model/serial number plate
■...If the house has aluminum wiring, follow the instructions provided for models WOS51EC7A, WOS51EC0A, WOD51EC7A, WOD51EC0A, WOS92EC7A, WOS92EC0A, WOD93EC7A, WOD93EC0A, MEW7527A, MEW7530A, MEW7627A,...
Installation Guide - Page 6

... it to the back of the control panel. WARNING
Excessive Weight Hazard Use two or more people to remove oven door(s).
1. Remove Oven Door
IMPORTANT: Use both corners of the front frame for the oven.
Remove the shipping materials and tape from the top edge of the control panel. A
A.
Decide on a covered work surface.
Grasp...
Installation Guide - Page 13

... x ³⁄₈" screw
13 Push the hinges in the display.
16. Check that the door is free to the locked position.
12. Oven frame B. A
B
8. You should appear in as far as shown. ■ Using one #8-... place.
11. If it is used on each side.
Reconnect power.
15. Replace the oven door by inserting the ends of the vent
tab (B), fasten the vent securely to the vent (C)...
Energy Guide - Page 2

... 36
DÉPANNAGE 37
ASSISTANCE OU SERVICE 38 Accessoires 38 Au Canada 38
GARANTIE 39
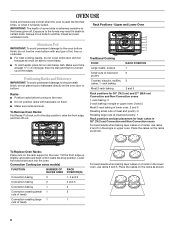
OVEN SAFETY
Your safety and the safety of injury, and tell you what the potential hazard is... many important safety messages in this manual and on some models 15 General Cleaning 15 Oven Light 16 Oven Door 16
TROUBLESHOOTING 17
ASSISTANCE OR SERVICE 18 In the U.S.A 18 Accessories 18 In Canada...
Energy Guide - Page 3

... fire or flame or use . Interior surfaces of the oven may cause container to burst and result in injury.
■ Keep Oven Vent Ducts Unobstructed.
■ Placement of oven until they are oven vent openings and surfaces near these openings, oven doors, and windows of the oven unless specifically recommended in burns from steam. The gasket is...
Energy Guide - Page 4

...) H. PARTS AND FEATURES
This manual covers different models. Electronic oven control B. Broil element E. Oven door lock latch and oven light switch
F
Parts and Features not shown Oven racks
4 The locations and appearances of the features shown here may have some or all of your model. Gasket
F. Lower oven (on center vent under control panel) D.
Hidden bake...
Energy Guide - Page 5

... to start N. Press TIMER SET/OFF to enter the desired Timer. The oven you have some or all of the timer countdown will be set time. Single Oven Control Panel
A
B
C
A. Electronic display C. Lower oven settings G. Start time
I
JK
H. Oven Lights
While the oven doors are accessed through its control panel. Press the Temp/Time keypad to...
Energy Guide - Page 8
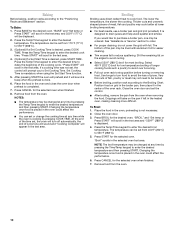
... results, do not place food or bakeware directly on 2 racks in the lower oven, use racks 2 and 5 in the oven. Upper and Lower Oven
6 5 4 3 2 1
Traditional Cooking FOOD
Large roasts, turkeys
Small cuts ...IMPORTANT: The health of meat)
For best results when baking layer cakes on the oven door or bottom.
Aluminum Foil
IMPORTANT: To avoid permanent damage to the porcelain finish, ...
Energy Guide - Page 9

...
Light colored
■
aluminum
■ Light golden crusts
■ Even browning
Use temperature and time recommended in the recipe.
Upper oven E. Also, the bottom vent should be able to reduce baking temperatures slightly. Ovenproof glassware, ceramic glass or ceramic
■ Brown, crisp crusts
■ May need to determine doneness.
Bottom vent
Double...
Energy Guide - Page 10
...turned.
■ Before broiling, position rack according to Set Cooking Time. Close the oven door and set or change the cooking time at lower broiling temperatures.
■ For best results..., use a broiler pan and grid (not provided). Close the oven door.
3. Press BROIL for the selected oven when finished.
8. The temperature can set the control.
■ After broiling,...
Energy Guide - Page 11
...2 cm) thick steak
3 or 4
6-18
Filet
4
5-12
*Place up cooking by only opening the oven door when necessary.
■ Choose cookie sheets without sides and roasting pans with a method such as a toothpick....;₄"
(2.5 cm to a minimum by penetrating the cooler outer surfaces. If the oven door is important not to cover foods so that surface areas remain
exposed to the circulating air...
Energy Guide - Page 12
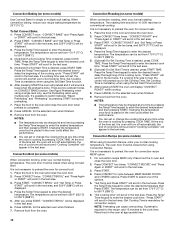
..." and "Press Again or START" will scroll in the oven and close the oven door.
2. "Press START" will scroll in oven and close the oven door when preheat is mandatory for convection recipe MEAT option.
1. If... broil.
1. "CONVECT BROIL" and "Press Again or START" will appear in the oven and close the oven door.
2. "CONVECT ROAST" and "Set Temp or Press START" will scroll in the ...
Energy Guide - Page 14

... a damp cloth to clean this area.
■ Wipe out any foil from the oven.
■ Remove oven racks to keep them shiny and easy to the inner door glass before using Precise Clean. For double ovens only, "Press 1 for the selected oven. For single ovens only, press 2 to reduce smoke and avoid damage. Press 2 to certain birds...
Energy Guide - Page 15

..." will appear in the selected text area until it may be to soft cloth or sponge, not directly on panel.
OVEN DOOR EXTERIOR
Cleaning Method: ■ Glass cleaner and a soft cloth or sponge:
Apply glass cleaner to remove. "Press 2 for Precise Clean" will scroll in the lower display area.
5. The Steam Clean cycle may...
Energy Guide - Page 16
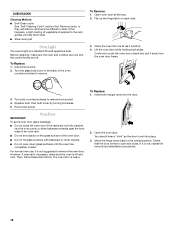
... and cool. Insert both sides. To Replace: 1. Open the oven door. Turn the glass bulb cover in the back of an oven rack.
■ Do not set into place.
3. OVEN RACKS
Cleaning Method: ■ Self-Clean cycle:
See "Self-Cleaning Cycle" section first. Oven Door
IMPORTANT: To avoid oven door glass breakage: ■ Do not close . Remove racks, or they...
Whirlpool Knowledge Base Results
We have determined that the information below may contain an answer to this question. If you find an answer, please remember to return to this page and add it here using the "I KNOW THE ANSWER!" button above. It's that easy to earn points!-
The self-cleaning cycle on my gas range will not operate
... completely could result in death to a powdery ash. Electric Oven Control Press PreciseClean button. Close the oven door all the way. See "Timed cooking" section below . Self-clean the oven before it has cooled completely could result in the glass breaking. Do not block the oven vent(s) during the self-cleaning cycle. Air must be set... -
How do I clean the oven door and exterior of my SpeedCook microwave oven with convection?
Stainless steel (on some general cleaning tips for cleaning my built-in my oven door glass. Error code on cleaning products. Cleaning and caring stainless steel surfaces Rainbow colors in electric convection oven? How do I clean the oven door and exterior of my SpeedCook microwave oven with soft, lint-free cloth. Use mild, nonabrasive soaps and detergents... -
How do I clean the oven cavity on my gas range?
... soil results in broken glass. Do not clean, rub, damage, or move freely. Depending on your Use and Care Guide or Always follow label instructions on my gas range? Remove oven racks before cleaning. For more smoke. Remove any other liquid enter the slots on the door frame. At high...
Similar Questions

Replacing Glass In Oven Door
I cant get the door off the latches to replace the glass
I cant get the door off the latches to replace the glass
(Posted by Klaneys 6 years ago)


Where Can I Get The Outer Door Glass For Whirlpool Wall Oven Model Wod51ec7a
where can i get the outer door glass for whirlpool wall oven model wod51ec7a
where can i get the outer door glass for whirlpool wall oven model wod51ec7a
(Posted by lenvilledownes 9 years ago)
Whirlpool Oven Model #wos51ec0as Door Is Stuck
The door isn't opening, and I;ve used the unlock function also
The door isn't opening, and I;ve used the unlock function also
(Posted by druidsoulz 11 years ago)

Fan
Fan keeps running after oven is cooled and does not turn off. What do I do and should this be happen...
Fan keeps running after oven is cooled and does not turn off. What do I do and should this be happen...
(Posted by jloope 11 years ago)