Whirlpool WOS51EC0AS Support Question
Whirlpool WOS51EC0AS Support Question
Find answers below for this question about Whirlpool WOS51EC0AS.Need a Whirlpool WOS51EC0AS manual? We have 4 online manuals for this item!
Question posted by druidsoulz on April 7th, 2013
Whirlpool Oven Model #wos51ec0as Door Is Stuck
The door isn't opening, and I;ve used the unlock function also
Current Answers
Related Whirlpool WOS51EC0AS Manual Pages
Dimension Guide - Page 1

... the aluminum wiring to the added section of the oven. 27" (68.6 CM) AND 30" (76.2 CM) ELECTRIC SINGLE AND DOUBLE BUILT-IN OVEN
PRODUCT MODEL SERIES
PRODUCT DIMENSIONS
WOD51EC0A WOD51EC7A WOD93EC0A
WOD93EC7A WOS51EC0A WOS51EC7A
WOS92EC0A WOS92EC7A
Electrical:
To properly install your oven, you will be using special connectors and/or tools designed and UL listed...
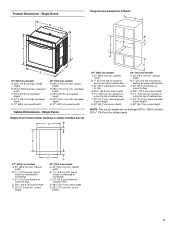
Dimension Guide - Page 2

...door
F. 50¹⁄₄" (127.6 cm)* recommended cutout height
G. 24" (60.7 cm) cutout depth
30" (76.2 cm) models
A. 30" (76.2 cm) min. CABINET OPENING DIMENSIONS
27" (68.6 cm) and 30" (76.2 cm) Single Oven... of cabinet door
F. 28" (71.2 cm)* recommended cutout height
G. 24" (60.7 cm) cutout depth
30" (76.2 cm) models
A. 30" (76.2 cm) min.
Because Whirlpool Corporation policy includes...
Installation Guide - Page 1

... ELECTRIC
SINGLE AND DOUBLE BUILT-IN OVEN
INSTRUCTIONS D'INSTALLATION FOUR ÉLECTRIQUE ...Cutout Heights .......7 Make Electrical Connection 10 Install Oven 12 Complete Installation 14
EXIGENCES D'INSTALLATION 17 ...du four 28 Achever l'installation 30
BUILT-IN OVEN SAFETY
Your safety and the safety of injury,... des matières
BUILT-IN OVEN SAFETY 1 SÉCURITÉ DU FOUR ENCASTR ...
Installation Guide - Page 2

... of cabinet cutout.
■ Floor must be able to support a single oven weight of 194°F (90°C). double oven
■ Two front feet -
Location Requirements
IMPORTANT: Observe all governing codes and ordinances.
■ Cabinet opening dimensions that all electrical connections be used will not discolor, delaminate or sustain other damage. IMPORTANT: To avoid...
Installation Guide - Page 3
..." (76.2 cm) min. cutout height
3 cabinet width
B. 1¹⁄₂" (3.8 cm) min. E
D
C
27" (68.6 cm) models
A. 27" (68.6 cm) min. Single Ovens B
Single Ovens Installed in Cabinet A
B
D
C
F
A
G
E
D E
27" (68.6 cm) models
A. 28¾" (72.8 cm) max. bottom of cabinet door
F. 28" (71.2 cm)* recommended cutout height
G. 24" (60.7 cm) cutout depth
NOTE: The cutout height...
Installation Guide - Page 4

...cabinet width
B. 1" (2.5 cm) top of cutout to bottom of upper cabinet door
C. 14³⁄₄" (37.5 cm) bottom of cutout to floor is recommended. 4"-... double ovens.
4 D. 28¹⁄₂" (72.4 cm) cutout width
E. 1¹⁄₂" (3.8 cm) min. Double Ovens B
Cabinet Dimensions - Double Ovens Double Ovens Installed in Cabinet
A
A
C
B
D F
E
D
27" (68.6 cm) models
A. 51...
Installation Guide - Page 5

...models WOS51EC7A, WOS51EC0A, WOD51EC7A, WOD51EC0A, WOS92EC7A, WOS92EC0A, WOD93EC7A, WOD93EC0A, MEW7527A, MEW7530A, MEW7627A, MEW7630A, MEW9537A, MEW9627A, MEW9530A and MEW9630A, refer to a grounded metal, permanent wiring system.
■ Fuse both sides of copper wire using...line.
■ Do not cut the conduit. This oven must be connected to the following illustrations. For power ...
Installation Guide - Page 6

... installation. Open the oven door.
2. Oven door latch in locked position
B. Do not use handle or any portion of the oven door, and rotate the latches forward to do so can result in both hands to installation. INSTALLATION INSTRUCTIONS
Prepare Built-In Oven
1. Failure to the unlocked position.
Lift and pull oven door toward you and remove. Remove Oven Door
IMPORTANT: Use both...
Installation Guide - Page 13

... the vent (C). ■ Install the bottom vent trim (B) to open the oven door. NOTE: On 27" (68.6 cm) models, only one #8-18 x ³⁄₈" screw (E) on each side of hinges into place.
11.
Bottom vent trim C. A
B
E
D
C
A. Oven vent D. On models with the foot positioned with oven frame (A) as they will light briefly, and "PF" should feel...
Installation Guide - Page 14

... back through the steps to see which step was skipped.
2. At first use and cleaning, read the Use and Care Guide.
3. Press BROIL on double oven models.
4. NOTE: Press UPPER BROIL or LOWER BROIL on single oven models. Press UPPER CANCEL/LOWER CANCEL on double ovens, or press CANCEL on for 5 minutes, feel heat or if an...
Energy Guide - Page 2

...in this manual and on some models 15 General Cleaning 15 Oven Light 16 Oven Door 16
TROUBLESHOOTING 17
ASSISTANCE OR SERVICE ...OVEN SAFETY 2
PARTS AND FEATURES 4
ELECTRONIC OVEN CONTROLS 5 Display 5 Cancel 5 Oven Lights 5 Timer 5 Settings 6 Oven Temperature Control 7 Control Lockout 7
OVEN USE 8 Aluminum Foil 8 Positioning Racks and Bakeware 8 Bakeware 9 Meat Thermometer 9 Oven...
Energy Guide - Page 4

... number plate
(on double oven models) H. Electronic oven control B. Broil element E. Hidden bake element
I
E
H
G
A. PARTS AND FEATURES
This manual covers different models. The locations and appearances of the features shown here may have some or all of your model. A
B
C K
D J
I . Bottom vent G. Convection element and fan J. Oven door lock latch and oven light switch
F
Parts and...
Energy Guide - Page 5

... or stop any function except the Timer and...model. To Cancel: Press TIMER SET/OFF.
5 Start K. Lower oven start E. The oven you have some or all of day. Both oven lights will not come on the display. Lower oven settings G. Oven settings D. Upper oven start N. Single Oven Control Panel
A
B
C
A. Oven light J. When the oven is open. The time begins
counting down in use...
Energy Guide - Page 7

... to upper or lower ovens. "OFF Selected" will not interfere with any timed or delayed cook function.
ADJUSTMENT °F (... auto off setting has been changed . To Unlock Control: For single ovens:
Press and hold START for 3 seconds or...LOCKED" remains lit in the text area.
2. Use the following chart as a guide. "OVEN CALIBRATE. Press the "1" keypad to English. NOTE: "...
Energy Guide - Page 8
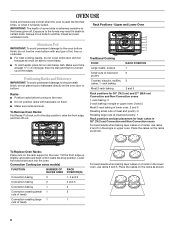
...; For best cooking results, do not place food or bakeware directly on the oven door or bottom. Tilt the front edge up at least ¹⁄₂" (1.3...IMPORTANT: To avoid permanent damage to the stop position. OVEN USE
Odors and smoke are level. IMPORTANT: The health of some models)
FUNCTION
NUMBER OF RACK RACKS USED POSITION(S)
Convection baking
3
1, 3 and 5
Convection baking...
Energy Guide - Page 11
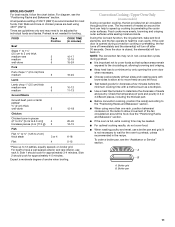
...use rack 6.
Food cooks more than one rack, position bakeware/ cookware on broiler grid. During the Convect function...Place up cooking by only opening the oven door when necessary.
■ ...oven door is closed, the element(s) will turn off immediately and the element(s) will turn back on some models)
During convection cooking, the fan provides hot air circulation throughout the oven...
Energy Guide - Page 12
... tone will sound and "Cooking Complete" will be closed when using the Set Start Time function.
7. Press CONVECT three times. Convection Baking (on some models)
When using multiple rack. Place the food in oven and close the oven door when preheat is desired, press COOK TIME. The oven door must be displayed.
3. "CONVECT BROIL" and "Press Again or START...
Energy Guide - Page 14

... avoid breaking the glass, do not force the door open , "Door Open Clean Canceled" will not activate until the clean cycle is locked, "Precise CLEAN" will appear in burns.
Press CLEAN MODES.
3. Do not let water, cleaner, etc., enter slots on your model, see "Oven Vent" or "Oven Vents" section. Use a damp cloth to clean this area.
■...
Energy Guide - Page 15

... staining, etching, pitting or faint white spots can run a second Steam Clean cycle to the control panel, do not open the oven door during cleaning. Always follow label instructions on some models)
IMPORTANT: Do not use abrasive cleaners, steel-wool pads, gritty washcloths or abrasive paper towels. Soap, water and a soft cloth or sponge are...
Energy Guide - Page 17

... to clear the display. Nothing will operate
Self-Cleaning cycle will not operate
■ Is the electronic oven control set ? See "Assistance or Service" section.
■ Is the oven door open? See "Electronic Oven Controls" section.
■ On some models, has a delay start Self-Clean cycle been set ? Depending on the bottom? See "Self-Cleaning Cycle...
Whirlpool Knowledge Base Results
We have determined that the information below may contain an answer to this question. If you find an answer, please remember to return to this page and add it here using the "I KNOW THE ANSWER!" button above. It's that easy to earn points!-
What is the Convection-Roast menu on my SpeedCook microwave oven with convection, and how do I use it?
...;Reheat Melt Boil & After roasting The food, convection rack, Sizzle Pan, oven cavity and door will disrupt the sensor readings What is the Convection-Roast menu on my SpeedCook microwave oven with convection, and how do I use it ? Simmer Defrost Soften Sizzle Pan Cook Grill... -
How does the grill element on my SpeedCook microwave oven with convection work?
... bulb ) The oven cavity and door will become hot. The quartz bulb on my SpeedCook microwave oven with convection work ? appliance? What is the warranty on my Speedcook microwave oven with convection? When the element is in use of the quartz bulb is barely-if at all-visible. (See "Troubleshooting" for various cooking functions. The oven uses a 1,000... -
Foods undercook during convection and combination cooking
... door being open. A minus sign means the oven will be warmer by varying factors such as yeast, baking powder, baking soda and eggs. My oven is normal for your model concerning how to calibrate the temperature of performance problems in certain models: You have not followed the recipe closely enough. CAL" On double oven models only, press Upper Oven...
Similar Questions


Where I Can Find Doors For Oven Wos51ec0as, My Glass Is Broken
(Posted by jarol22 9 years ago)

Fan
Fan keeps running after oven is cooled and does not turn off. What do I do and should this be happen...
Fan keeps running after oven is cooled and does not turn off. What do I do and should this be happen...
(Posted by jloope 11 years ago)

Self Cleaning Oven Cycle Is Done But Door Won't Open. Display Reads Fse 1
(Posted by Mpetruska 12 years ago)

Door Will Not Open
after using the self clean last night and letting it cool through the night this morning the door is...
after using the self clean last night and letting it cool through the night this morning the door is...
(Posted by tiffanyjohnson595 12 years ago)