
Sony LBT-XGR6 Support Question
Sony LBT-XGR6 Support Question
Find answers below for this question about Sony LBT-XGR6 - Compact Hi-fi Stereo System.Need a Sony LBT-XGR6 manual? We have 2 online manuals for this item!
Question posted by rohitkatiyar2007 on August 22nd, 2011
'push Power' 'protect'
My Sony Home theatre is continuously showing 'PUSH POWER' 'PROTECT'... WHAT TO DO ???
Current Answers
Related Sony LBT-XGR6 Manual Pages
Operating Instructions - Page 1

4-238-809-11 (4)
Compact Hi-Fi Stereo System
Operating Instructions
Owner's Record
The model and serial numbers are located on the rear panel of the unit. Refer to them whenever you call upon your Sony dealer regarding this product.
Record the serial number in the space provided below. Serial No.
Model No. LBT-XGR80 LBT-XGR60 LBT-XGR6
© 2002 Sony Corporation
Operating Instructions - Page 2

...and on the apparatus.
Increase the separation between the equipment and
receiver. -
As an ENERGY STAR® partner, Sony Corporation has determined that interference will increase eye hazard.
Refer servicing to provide reasonable protection against harmful interference in a particular installation. If this product will not occur in a residential installation. To avoid...
Operating Instructions - Page 3

Power Saving Mode 23 Using the CD display 23
Optional Components Hooking up optional components ........ 24 Listening to music - Sleep Timer 18... 4 Remote control 5
Getting Started Hooking up to audio from a connected component 26 Recording audio from a connected component 27 Recording on a connected component 27
Troubleshooting Problems and remedies 28 Messages 30
Additional ...
Operating Instructions - Page 4
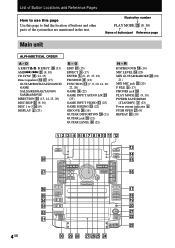
.../part Reference page
Main unit
ALPHABETICAL ORDER
A - PLAY MODE es (9, 10) POWER SAVE/DEMO
(STANDBY) 3 (23) Power stream indicator 6 PUSH OPEN wj (9) REPEAT es (10)
123 4 567890 qa qs
qd
qf
ek...17, 19) FM MODE 8 (12) FUNCTION qd (7, 9, 10, 14, 20,
22, 26) GAME qf (22) GAME INPUT AUDIO L/R wd
(25) GAME INPUT VIDEO wd (25) GAME MIXING qg (22) GROOVE ek (16) GUITAR DISTORTION wl (21) GUITAR ...
Operating Instructions - Page 7

...appears.
3 Hold down EDIT and then press ?/1 until
"LOCK" appears.
4 Unplug the AC power cord. If the supplied adaptor on and the demonstration automatically ends.
The demonstration appears in the display...the following to a wall outlet.
VOLTAGE SELECTOR
120V
220V
230~240V
5 Connect the power cord to protect the CD mechanism.
1 Make sure that all discs are removed
from slipping.
4 ...
Operating Instructions - Page 8

...the incorrect item flashes, then set the minute. 6 Press ENTER. Note If you
disconnect the power cord or if a power failure occurs. • You cannot set the hour. 4 Press ENTER.
The clock starts working... with new ones. The minute indication flashes.
5 Press R/r repeatedly to set the clock in the Power Saving Mode.
8GB Setting the clock
1 Turn on the system. 2 Press c/CLOCK SET (or CLOCK...
Operating Instructions - Page 9

...on the remote).
Press again to go forward) or . (to resume play the CD in the disc tray continuously.
Press and hold M or m during playback, and release at the desired point.
Other Operations
To Stop playback ...on all CDs in stop
mode until the mode you selected in random order. continued
9GB Press DISC 1 to 5 or DISC SKIP.
When you selected in the original order. CD
CD
Loading...
Operating Instructions - Page 10

...You cannot select "REPEAT" and "ALL DISC SHUFFLE" at the same time.
Skip step 3 to 5.
Press PUSH OPEN. AMS > until the track you
want them to be played.
1 Press FUNCTION repeatedly until "CD"... make a program of up to the end of the CD in stop mode.
Playing the CD (continued)
To Switch to CD function from another source Play repeatedly (Repeat Play)
Remove the CD Adjust the...
Operating Instructions - Page 12
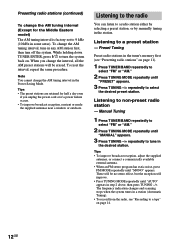
...PRESET" appears.
3 Press TUNING -/+ repeatedly to non-preset radio station
- Presetting radio stations (continued)
To change the AM tuning interval (Except for half a day even
if you change the interval,... all the AM preset stations will be no stereo effect, but the reception will be erased. When you unplug the power cord or if a power failure occurs. • To improve broadcast reception,...
Operating Instructions - Page 16

...of the music you use the Sleep Timer, Timer recording will not be made.
• When you are listening to power mode and the equalizer curve changes.
To change the setting, start over from the front side.
Press X-GROOVE. Note ...If the system is set to obtain the desired effect.
16GB
Timer-recording radio programs (continued)
7 Turn off .
• Recording starts from step 1.
Operating Instructions - Page 20

...the button, the display changes as follows: MIX GUITAR/KARAOKE y EFFECT OFF* or audio emphasis name* The m indicator appears when karaoke mode is activated. * Karaoke mode...along "
(steps 1 through 5).
Mixing and recording sounds
1 Do the procedure for "Singing along with any stereo CD or tape by
turning MIC LEVEL. To stop recording
Press x.
20GB Other Features
Changing the spectrum analyzer ...
Operating Instructions - Page 21

... signal (Auto Level Control Function). Using the Guitar distortion effect
Press GUITAR DISTORTION. Note Playing a guitar with any stereo CD or tape.
To turn off GUITAR DISTORTION, press GUITAR DISTORTION again, the indicator on the GUITAR DISTORTION button ... away from the speakers. - Once GUITAR DISTORTION is activated, it will remain active while the power is on the front panel.
Operating Instructions - Page 23
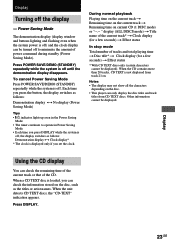
...; The timer continues to minimize the amount of the CD. Display
23GB Display
Turning off . Press POWER SAVE/DEMO (STANDBY) repeatedly while the system is loaded, you press DISPLAY while the system is
off, the display switches as the titles or artist names. Notes • The display may not show all the characters...
Operating Instructions - Page 26

... system is in the right corner of the front panel. Start playing the connected component. Start playing the connected component. Listening to an audio from a connected component
Listening to "MD."
Notes • Holding down FUNCTION, and then pressing
`/1 while the power is selected or you want to switch back to "MD," repeat the operation described...
Operating Instructions - Page 28

...you haven't turned on the power.
• Refer to demonstration (see "Notes" in "Listening to audio from a connected component" on page 26). Move the stereo system away from the connected ...Sony dealer. There is severe hum or noise. • A TV or VCR is connected firmly and the speakers are connected. • Insert only the stripped portion of a short circuit. ("PROTECT" and "PUSH POWER...
Operating Instructions - Page 29

... 32). The tape does not record nor play . • The CD is in case "PROTECT" and "PUSH POWER" appear alternately again after 15 to the end. The tape does not erase completely. •...start from the cassette (see "Demagnetizing the tape heads" on page 32). Replace the batteries.
continued
Troubleshooting
29GB
Tape Deck
The tape does not record. • The tab has been removed ...
Operating Instructions - Page 30

...extremely hot or cold -
A stereo FM program cannot be used for cooling fan.
30GB
Press m.
On safety
• The unit is not disconnected from the AC power source (mains) as long as...into the component, unplug the unit and have cleared all the tracks you programed. Connect the
external antenna.
All the settings you continuously use this is not to turn on the power.
To ...
Operating Instructions - Page 32

... American models: LBT-XGR6 Continuous RMS power output (reference)...continued)
Cleaning the tape heads Clean the tape heads after playing an old tape. rated 140 watts per channel minimum RMS power, with the tape every 20 to clean the tape heads before you start an important recording or after every 10 hours of use .
Specifications
AUDIO POWER SPECIFICATIONS (LBT-XGR6 USA models only)
POWER...
Operating Instructions - Page 33

...PHONES: (stereo phone jack) MD (VIDEO) OUT: (phono jacks) FRONT SPEAKER: LBT-XGR80:
LBT-XGR60/XGR6:
sensitivity...System
Compact disc and digital
audio system
Laser
Semiconductor laser
(λ=795 nm), Emission
duration: continuous
Frequency ...stereo 40 - 13,000 Hz (±3 dB), using Sony TYPE I cassette ±0.15% W.Peak (IEC) 0.1% W.RMS (NAB) ±0.2% W.Peak (DIN)
Tuner section FM stereo...
Operating Instructions - Page 35

... V AC, 60 Hz 120 V, 220 V or 230 - 240 V AC, 50/60 Hz Adjustable with voltage selector
Power consumption U.S.A. Additional Information
35GB
models: LBT-XGR6
240 watts
Other models: LBT-XGR80 LBT-XGR60
320 watts 180 watts
Dimensions (w/h/d)
Mass : LBT-XGR6 LBT-XGR80 LBT-XGR60
Approx. 355 × 425 × 451 mm
Approx. 13.0 kg Approx. 16.4 kg Approx. 14...
Similar Questions

What Is A Push Power Protect Button Sony Stereo
(Posted by dubbmki 10 years ago)

How To Fix Protect Push Power
(Posted by kcrcrnj 10 years ago)

Sony Mhc-gx450 - Mini Hi Fi Stereo System.
how much does a SONY MHC-GX450-Mimi hi fi stereo system?
how much does a SONY MHC-GX450-Mimi hi fi stereo system?
(Posted by irvingomez50 12 years ago)

I Have A Compact Hi-fi Stereo Sony Lbt-a37cdm.
The System Control Cord connects to a male connector in the back of the stereo. I have lost that mal...
The System Control Cord connects to a male connector in the back of the stereo. I have lost that mal...
(Posted by jan135 12 years ago)

My Sony Keeps Saying Push Power Protect
(Posted by danielavilez7 12 years ago)