Singer XL-420 FUTURA Support Question
Singer XL-420 FUTURA Support Question
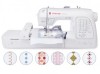
Find answers below for this question about Singer XL-420 FUTURA.Need a Singer XL-420 FUTURA manual? We have 1 online manual for this item!
Question posted by anggriffis on August 28th, 2020
Straight Line When Suppose To Be Following Embroidery Design
In Need Off Help... My Singer XL-420 futura Keeps Going In A Straight Line When I Use The Large Hoop. It Doesn't Follow The Right Design. How Do I Correct This??
Current Answers
Answer #1: Posted by Odin on August 28th, 2020 1:06 PM
Odin

Member since:
April 10th, 2010 Points: 41,236,690

Member since:
April 10th, 2010 Points: 41,236,690
Review the instructions starting at https://www.manualslib.com/manual/454762/Singer-Futura-Xl-400.html?page=16#manual, and make sure you're following them to the letter.
If the issue persists or if you require further advice--or if the instructions don't seem to apply--you'll have to consult the company; use the contact information at https://www.contacthelp.com/singer/customer-service.
Hope this is useful. Please don't forget to click the Accept This Answer button if you do accept it. My aim is to provide reliable helpful answers, not just a lot of them. See https://www.helpowl.com/profile/Odin.
Related Singer XL-420 FUTURA Manual Pages
Instruction Manual - Page 2

³,03257$176$)(7
Instruction Manual - Page 5
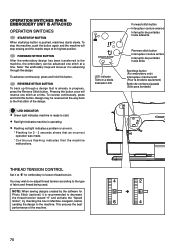
... inside the face cover 104 - 105 Special accessories 106 - 107 Knee lifter 108 Endless embroidery hoop 108 - 117 Helpful messages 118 - 119
For European version
Sewing machine Dimensions: 567 mm × 240 mm × 317 mm 0DVVRIWKHHTXLSPHQW
NJ
Embroidery unit Dimensions: 504 mm × 411 mm × 141 mm 0DVVRIWKHHTXLSPHQW...
Instruction Manual - Page 8
.... Release lever
40. Connector
41. Hoop adjusting screw
41
46
45. Power line cord 48. Threading lever
4
5. Bobbin...Large hoop
37
22 23 24 38 39
28 29 30 31
42. Outer frame
32
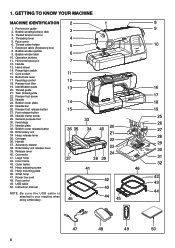
44. GETTING TO KNOW YOUR MACHINE
MACHINE...
27
33. Hoop mounting plate
46. Instruction manual
43
44
NOTE: B e s u r e t h e U S B c a b l e i s
attached to your machine when doing embroidery.
45
44 ...
Instruction Manual - Page 10
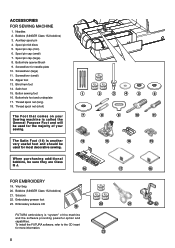
... opener/Brush
9. Blind hem foot
14. Thread spool net (long)
18. Bobbins (SINGER Class 15J bobbins) 21. Bobbins (SINGER Class 15J bobbins)
3.
Spool pin felt discs
5. Spool pin cap (large)
8. Embroidery software CD
19
FUTURA embroidery is "system" of your
7
Sewing machine is another
12
very useful foot and should be sure they are Class I5 J.
16
)25(0%52...
Instruction Manual - Page 12
... removing the plug from needle plate area EHIRUHXVLQJ\RXUPDFKLQHWKH¿UVWWLPH
POWER LINE CORD/FOOT CONTROL
Connect the plug of the power line cord into the cord VRFNHW
DQG\RXUZDOORXWOHW
DVLOOXVWUDWHG &RQQHFWWKHIRRWFRQWUROSOXJLQWRWKHPDFKLQHVRFNHW
when using sewing machine only. POWER/LIGHT SWITCH
Instruction Manual - Page 34
...SUHVVHUIRRWWRZDUGWKHEDFNRI
3
the machine, leaving about 6" (15 cm) clear.
3. The guide line on the needle plate.
SETTINGS Presser foot - Stitch width control J. Power/light switch
F G
2
H I . STRAIGHT STITCHING
Straight stitch is most frequently used to the rear and cut off excess
thread with your fabric when sewing a seam.
)LUVW WXUQ WKH KDQGZKHHO FRXQWHU...
Instruction Manual - Page 68
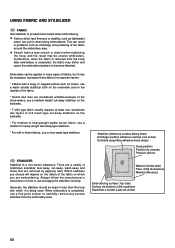
... of fabrics, but it is completed, use and apply the stabilizer correctly. When embroidery is being embroidered. Stabilizer (Adhesive surface ...use a rinse-away type stabilizer. STABILIZER Stabilizer is removed from the embroidery area.
There are a variety of the fabric on how to become distorted. Always follow the manufacturer's instructions on which it may be uneven embroidery...
Instruction Manual - Page 76
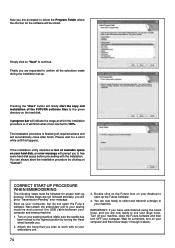
... Program Folder where the shortcut for a short while until this happens.
Please wait for the software will finally start the copy and installation of the FUTURA software files to free VRPHKDUGGLVNVSDFHEHIRUHSURFHHGLQJZLWKWKHLQVWDOODWLRQ
Pressing the ³1H[W´ button will be stored.
6LPSO\FOLFNRQ...
Instruction Manual - Page 78
... indicates machine is advancing through the design. To stop the machine, push the button again and the machine will move as it at a time. REVERSE STITCH BUTTON 7R EDFN XS WKURXJK D GHVLJQ WKDW LV DOUHDG\ LQ SURJUHVV press the Reverse Stitch button. FORWARD STITCH BUTTON After the embroidery design has been transferred to start /stop sewing and...
Instruction Manual - Page 84
...de hilo
&RPSXWHUVFUHHQVD\VWKUHDGLVEURNHQ machine lights are missing.
Restart the embroidery machine and continue embroidering.
If stitches are flashing lights and...LW automatically stops.
,Q WKLV FDVH XVH WKH IROORZLQJ SURFHGXUH WR VWHS EDFN though the embroidery design to the area where you want to step EDFN WKURXJK WKH HPEURLGHU\ GHVLJQ 7KH KRRS ZLOO ...
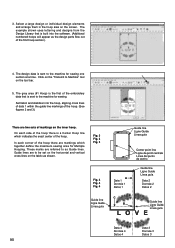
Instruction Manual - Page 88
... FHQWHU SRVLWLRQ Deleting part of mm, which is usually the standard density used for Lettering. Is there a way to change the bobbin thread while embroidering a design with the removal of the hoop from the embroidery unit, depending on the size of the design being HPEURLGHUHG %\ PRYLQJ WKH KRRS WR D 3DUN SRVLWLRQ WKH needle moves to...
Instruction Manual - Page 90
... favor Note: Aparecerán hasta tres aros adicionales si as the design data requires. This embroidery data may be used to set the fabric into the hoop and will now be at precise right angles to each part of the design lines up exactly.
Multi-Hoop
0XOWL+RRSLQJLVDVSHFLDOIHDWXUHLQWKH)XWXUDVRIWZDUHWKDWZLOO allow...
Instruction Manual - Page 92
...ÀRZRXW RIWKH¿UVWKRRSVHFWLRQ
4. Select a large design or individual design elements
and arrange them in the hoop area on the tool bar.
5. The design data is built into the hoop, aligning cross lines RIGDWDZLWKLQWKHJXLGHOLQHPDUNLQJVRIWKHKRRS
6HH ¿JXUHVDQG
There are to the machine for sewing.
Instruction Manual - Page 96
... input the A, B and C points. Use the same procedure to rehoop the fabric, send the data 2 design to the machine. Follow the same procedures for the data 3 and data 4.
94 Once point A is entered, the screen will show the following error message and give you to enter the information from hoop 1 have been HPEURLGHUHG FOLFN RQ ([LW...
Instruction Manual - Page 104
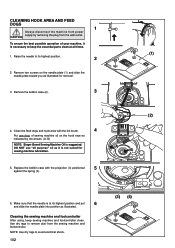
Cleaning the sewing machine and footcontroller
$IWHU XVLQJ NHHS VHZLQJ PDFKLQH DQG IRRWFRQWUROOHU FOHDQ Use dry rags to keep the essential ...sewing machine and footcontroller. 127(
8 VHGU\UDJVWRDYRLGHOHFWULFDOVKRFN
102
(3) (4) CLEANING HOOK AREA AND FEED DOGS
1
Always disconnect the machine from power
CAUTION supply by the arrows. (A, B)
NOTE: Singer Brand Sewing Machine...
Instruction Manual - Page 106
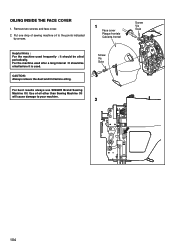
... results always use SINGER Brand Sewing Machine Oil. CAUTION: Always remove the dust and lint before it is used. OILING INSIDE THE FACE COVER
1. For the machine used frequently : It should be oiled periodically.
Screw Vis Guia
2
Screw Vis Guia
104 Remove two screws and face cover. 2. Put one drop of oil other than Sewing Machine Oil will cause...
Instruction Manual - Page 110
...UHPRYHLWIURPWKHVRFNHW DQGUHSODFHWKHVRFNHWFRYHU
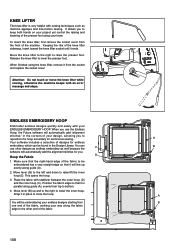
Attention: Do not touch or move the knee lifter while sewing, otherwise the machine beeps with an error message and stops. ENDLESS EMBROIDERY HOOP
(PEURLGHU HQGOHVV GHVLJQV TXLFNO\ DQG HDVLO\ ZLWK \RXU (1'/(66(0%52,'(5
KNEE LIFTER
7KHNQHHOLIWHULVYHU\KHOSIXOZLWKVHZLQJ...
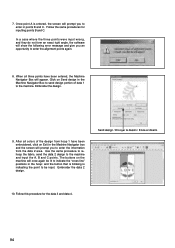
Instruction Manual - Page 112
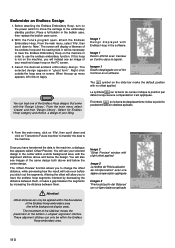
... called 'Offset Preview' With the Futura program open, attach the Endless Embroidery Hoop.
It will instead see an image of your machine's large hoop on the PC screen.
3. Imagen 1 Diseño desplegado con el Aro Continuo en el software. Select 'for Endless Hoop' category and choose a design of your liking. Embroider an Endless Design
1.
Image 1 Dessin affiché avec...
Instruction Manual - Page 114
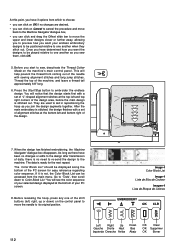
Before you start to embroider the endless GHVLJQ This will help prevent the thread from which to choose:
‡ \RXFDQFOLFN...the machine, and leave a thread tail approximately 6-8" long.
6. Press the Start/Stop button to sew, deactivate the Thread Cutter Mode on the machine's main control panel. At this point, you have determined how you want your endless embroidery designs to...
Instruction Manual - Page 116
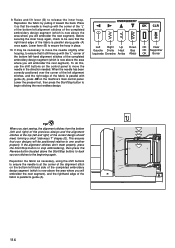
... the hoop in the direction needed.
If the alignment stitches don't meet , forming a small "side ways T" shapes (E). When the needle has been correctly positioned over the corner of the left alignment stitches, and the right edge of the fabric is parallel with the corner of the "L" of the bottom left and right) of the completed embroidery design...
Similar Questions

Trouble With Thread Breaking Often When Embroidering A Design.2.i Choose A Desig
When I choose a design for a small hoop I keep getting the window telling me the design is too large...
When I choose a design for a small hoop I keep getting the window telling me the design is too large...
(Posted by ksendles02 2 years ago)

Quilting With Embroidery Designs Futuraxl42
I want to quilter a quilt using different embroidery designs designed for this purpose. I broke thre...
I want to quilter a quilt using different embroidery designs designed for this purpose. I broke thre...
(Posted by joliecoquelicot 4 years ago)

I Get E7 Error Message On My Singer Model 7258 Sewing Machine. There Is No Refe
Error message E7 is up on my Singer Stylist model 7258 sewing machine. It is not working at all. I t...
Error message E7 is up on my Singer Stylist model 7258 sewing machine. It is not working at all. I t...
(Posted by ebellamybellamy9 5 years ago)

Sewing Machine Will Not Work Right.
I am trying to embroider on fleece. The machine goes along fine foe a couple of minutes and then it ...
I am trying to embroider on fleece. The machine goes along fine foe a couple of minutes and then it ...
(Posted by purplelily55 7 years ago)

Beeping From Singer Sewing Machine Stylist Ii 5625
My sewing machine will beep and stop sewing after three inches of sewing. I have taken it to be repa...
My sewing machine will beep and stop sewing after three inches of sewing. I have taken it to be repa...
(Posted by arusheria 9 years ago)