
Singer H74 Support Question
Singer H74 Support Question
Find answers below for this question about Singer H74.Need a Singer H74 manual? We have 2 online manuals for this item!
Question posted by tmssktty on September 26th, 2018
Alphabet
How do I sew a word using the alphabet modee?
Current Answers
Related Singer H74 Manual Pages
Instruction Manual 2 - Page 3

... area, such as described in . 2. Never operate this appliance is being used or where oxygen is used as using and before
cleaning. Use only the attachments recommended by a person responsible for examination, repair, electrical or mechanical adjustment.
4. This appliance is required around the sewing machine needle.
6. To unplug, grasp the plug, not the cord. 16. Children...
Instruction Manual 2 - Page 4
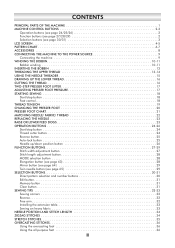
...machine 9 WINDING THE BOBBIN 10-11 Bobbin winding 10-11 INSERTING THE BOBBIN 12 THREADING THE UPPER THREAD 13-14 USING THE NEEDLE THREADER 15 DRAWING UP THE LOWER THREAD 16 CUTTING THE THREAD 16 TWO-STEP PRESSER FOOT LIFTER 17 ADJUSTING PRESSER FOOT PRESSURE 17 STARTING SEWING...adjustment button 27 Stitch length adjustment button 28 MODE selection button 28 Elongation button (see page ...
Instruction Manual 2 - Page 5
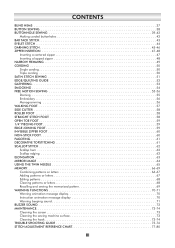
... DECORATIVE TOPSTITCHING 61 SCALLOP STITCH 62 Scallop hem 62 Scallop edging 62 ELONGATION 63 MIRROR IMAGE 64 USING THE TWIN NEEDLE 65 MEMORY 66-69 Combining patterns or letters 66-67 Adding patterns or letters... 72 MAINTENANCE 73-74 Cleaning the screen 73 Cleaning the sewing machine surface 73 Cleaning the hook 73-74 TROUBLE SHOOTING GUIDE 75-76 STITCH ADJUSTMENT REFERENCE CHART 77-...
Instruction Manual 2 - Page 8
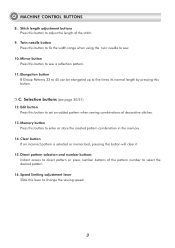
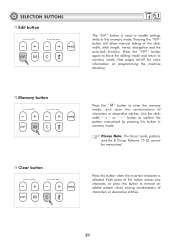
... direct pattern or press number buttons of the pattern number to set an added pattern when sewing combinations of the stitch.
9.
Clear button If an incorrect pattern is selected or memorized,...stitches.
13. Mirror button Press this button to sew.
10. MACHINE CONTROL BUTTONS
8. C. Edit button Press this button to fix the width range when using the twin needle to enter or store the ...
Instruction Manual 2 - Page 14
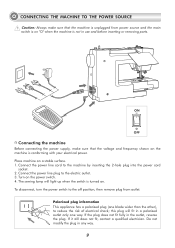
... the risk of electrical shock; Do not modify the plug in use and before inserting or removing parts. The sewing lamp will fit in the outlet, reverse the plug. CONNECTING THE MACHINE TO THE POWER SOURCE
Caution: Always make sure that the machine is unplugged from outlet.
Turn on a stable surface. 1.
Connect the power...
Instruction Manual 2 - Page 23
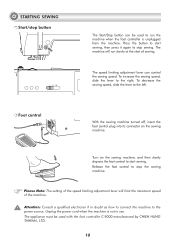
... power source. The speed limiting adjustment lever can be used to start of the machine. The machine will limit the maximum speed of sewing. Attention: Consult a qualified electrician if in use.
Foot control
With the sewing machine turned off, insert the foot control plug into its connector on the sewing machine, and then slowly depress the foot control to...
Instruction Manual 2 - Page 33

... pattern mode: Stitch selection using number buttons. MODE selection button...mode is first turned on the LCD screen.
Direct mode stitch selection. Changing the width or length of the stitches offers a greater variation of stitch patterns.
28
FUNCTION BUTTONS Stitch length adjustment buttons
When you select a stitch the machine will automatically set at Direct mode " " when the machine...
Instruction Manual 2 - Page 36
... Note: The Direct mode patterns and the B Group Patterns 17-32 cannot be memorized. Press the " " button again to leave the editing mode and return to modify settings while in memory mode. Press this button when the incorrect character is used to memory mode. (See pages 66-69 for more information on programming the machine Memory).
Instruction Manual 2 - Page 37
...
3 2
1
4
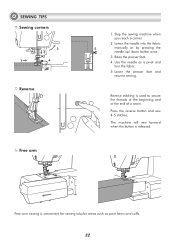
Reverse
Free arm
1. Stop the sewing machine when you reach a corner.
2. Reverse stitching is released. The machine will sew forward when the button is used to secure the threads at the beginning and at the end of a seam.
Lower the presser foot and resume sewing. Press the reverse button and sew 4-5 stitches. Lower the needle into the...
Instruction Manual 2 - Page 49
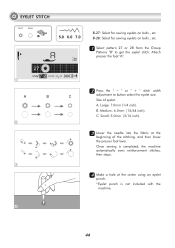
... 27 or 28 from the Group
Patterns "B" to button select the eyelet size.
Once sewing is not included with the machine.
4
44 Attach presser the foot "A".
1
22 Press the " – " ...inch).
2
33 Lower the needle into the fabric at the center using an eyelet
punch.
* Eyelet punch is completed, the machine automatically sews reinforcement stitches, then stops.
3
44 Make a hole at the
...
Instruction Manual 2 - Page 52
...the needle could hit the presser foot and break when sewing with an altered needle position or with any other pattern.
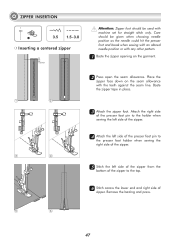
11 Baste the zipper opening on the seam allowance with machine set for straight stitch only. Remove the basting and...zipper. ZIPPER INSERTION
1 I
3.5 1.5~3.0
Inserting a centered zipper
2 inch
Attention: Zipper foot should be used with the teeth against the seam line.
Instruction Manual 2 - Page 58
....
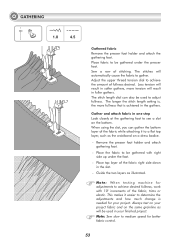
- Note: When testing machine for your finished project. GATHERING
1
1.0
4.5
Gathered fabric Remove the presser foot holder and attach the gathering foot. When using the slot, you can also be gathered under the foot.
- Place fabric to achieve desired fullness, work with right side up under the presser foot. Sew a row of the fabric...
Instruction Manual 2 - Page 60
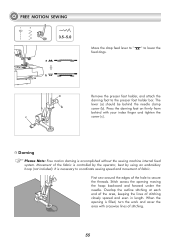
... backward and forward under the needle. Stitch across the opening is accomplished without the sewing machine internal feed system. Darning
Please Note: Free motion darning is filled, turn the work... behind with crosswise lines of the hole to coordinate sewing speed and movement of the fabric is controlled by the operator, best by using an embroidery hoop (not included). " to lower ...
Instruction Manual 2 - Page 62
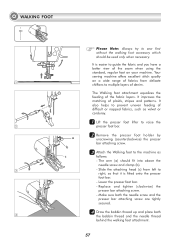
...unscrewing (counterclockwise) the presser
bar attaching screw.
33 Attach the Walking foot to the machine as velvet or corduroy.
11 Lift the presser foot lifter to
right, so that ... (a) should be used only when necessary. Lower the presser foot bar.
- It is fitted onto the presser
foot bar.
- Your
sewing machine offers excellent stitch quality
1
on your machine.
Make sure both...
Instruction Manual 2 - Page 64
...aligned with the foot's right edge. 2.
Hint: Use a marker that can see markings much more visible view of the foot.
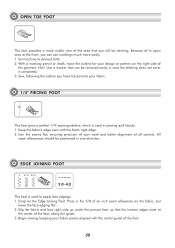
59 Sew, following the outline you can be removed easily in ...flat. 2. Press in case the stitching does not cover it completely. 3. Set machine to apply lace edgings. 1. Begin sewing, keeping your work and better alignment of the foot, along the guide. 3. EDGE...
Instruction Manual 2 - Page 70
...
points, making certain to insure
6
quality stitching.
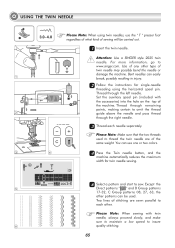
65 Please Note: Make sure that the two threads used . Please Note: When sewing with
the accessories) into the hole on the top of
the machine. Use of any other patterns can use the " T " presser foot regardless of what kind of stitching are of
twin needle may possibly...
Instruction Manual 2 - Page 71
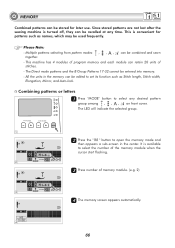
... the memory can be edited to set its function such as names, which may be used frequently.
Since stored patterns are not lost after the sewing machine is available
to select any time. Combining patterns or letters 11 Press "MODE" button to select the number of the memory module when the
M
cursor start flashing...
Instruction Manual 2 - Page 78
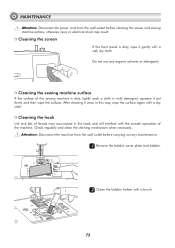
.... Do not use any maintenance.
11 Remove the bobbin cover plate and bobbin.
1
22 Clean the bobbin holder with a brush.
2
73
Cleaning the sewing machine surface
If the surface of the sewing machine is dirty, wipe...power cord from the wall outlet before cleaning the screen and sewing machine surface, otherwise injury or electrical shock may accumulate in the hook and will interfere with ...
Instruction Manual 2 - Page 80
... too thick for service, check the following items. If the problem still persists, contact Singer at www.singer.com
Problem
Cause
Correction
Reference
1.The machine is loose.
5.Use the screwdriver to sew.
Needle breaks 4.The wrong foot is attached.
4.Select the correct foot.
5.The needle clamp screw is not threaded correctly. 1.Rethread the...
Instruction Manual 2 - Page 81
... backwards
and forwards by hand and remove the
thread remnants.
6.The machine is not plugged in the hook. 2.The feed dogs are distorted
The machine jams
The machine is noisy
Uneven stitches, uneven feed
The sewing machine doesn't operate
1.The correct presser foot is not used.
1.Select the correct foot.
2.The needle thread tension is too...
Similar Questions

Why Won't My Machine Sew, Checked Bobbin And Retreaded. Has Power Just Will Not
the machine has power and threade correctly and bobbin is in right. It did freeze on me when sewing....
the machine has power and threade correctly and bobbin is in right. It did freeze on me when sewing....
(Posted by alewis41 7 years ago)

Will Singer H74 Sewing Machine Go Into Sewing Machine Table
(Posted by vogelgeos 10 years ago)


What Is The Meaning For Error Code E2 On Singer Stylist Model 7258
Trying wind a bobbin and after about 3 turns it stops and give an E2 error code. Why?
Trying wind a bobbin and after about 3 turns it stops and give an E2 error code. Why?
(Posted by Anonymous-123220 10 years ago)