Ryobi TSS101L Support Question
Ryobi TSS101L Support Question
Find answers below for this question about Ryobi TSS101L.Need a Ryobi TSS101L manual? We have 4 online manuals for this item!
Question posted by Math72285 on August 5th, 2020
Is There A Replacement For Ryobi Tss101l D Handle & Switch?
Part #s for above: 089100121610 089100121112 Have apparently discontinued. Does anyone have a fix?
Current Answers
Answer #1: Posted by INIMITABLE on August 5th, 2020 1:52 PM
INIMITABLE

Member since:
April 3rd, 2020 Points: 2,087,520

Member since:
April 3rd, 2020 Points: 2,087,520
Search for replacement parts here
I hope this is helpful? PLEASE "ACCEPT" and mark it "HELPFUL" to complement my little effort. Hope to bring you more detailed answers
-INIMITABLE
Related Ryobi TSS101L Manual Pages
English Manual - Page 2

... equipment packaged with the following conditions: 30-DAY EXCHANGE POLICY: During the first 30 days after date of purchase, you may either repair or replace any RYOBI® power tool which vary from state to state.
2 TABLE OF CONTENTS
Introduction...2 Warranty...2 General Safety Rules...3-4 Specific Safety Rules...4-5 Symbols...
English Manual - Page 3

... sanding spindle only.
NEVER LEAVE TOOL RUNNING UNATTENDED. When tool is tipped.
CHECK DAMAGED PARTS. Do not use power tools in use, before turning it on the tool while it is damaged should be properly repaired or replaced by removing starter keys.
DON'T FORCE THE TOOL. All visitors should be disconnected from work...
English Manual - Page 4

...saw from the rotating blade.
Inspect EXTENSION CORDS periodically and replace if damaged.
GROUND ALL TOOLS. Lock the miter table by an authorized service center.
USE...END OF A CLAMPED WORKPIECE. Have defective switches replaced by securely tightening the miter lock levers. Do not stack more than one piece at a time.
4 If tool is tight and not making a cut ....
English Manual - Page 5
... Release the switch trigger and allow familiarity...replaced before
moving workpiece or changing settings. b) Keep hands out of path of the saw blade to power supply. ALWAYS secure this miter saw is sufficient to a complete stop before resuming operation.
Always stay alert! Always place the workpiece to be cut .
ALWAYS carry the tool only by the carrying handle...
English Manual - Page 7

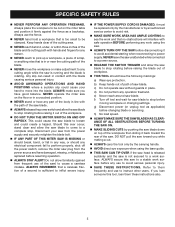
... with side shields and, when needed, a full face shield. Always use only identical replacement parts. WARNING:
Indicates a potentially hazardous situation, which can result in foreign objects being thrown... eye damage. Call Ryobi customer service for assistance.
SYMBOLS
The following signal words and meanings are intended to explain the levels of any power tool can result in death...
English Manual - Page 8
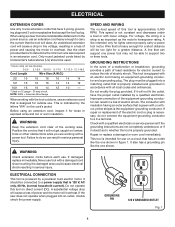
... the damaged area could cause electrical shock resulting in figure 1. For voltage, the wiring in a risk of least resistance for lights cannot properly carry a power tool motor.
If repair or replacement of the electric cord or plug is necessary, do so can result in a shop is as important as to whether the...
English Manual - Page 10

...
Cutting Capacity with Miter at 45°/Bevel 45°: Maximum nominal lumber sizes 2 x 8
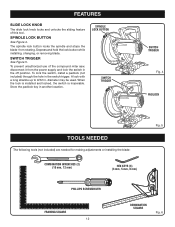
slide lock knob
Bevel Lock lever
upper blade guard
Bevel Scale
"D" HANDLE
Switch Trigger
Dust bag
slide bar
work shaft knob
work clamp
MITER FENCE
lower blade guard
"NO HANDS ZONE" BOUNDARY LINE
"NO HANDS ZONE" LABEL
throat...
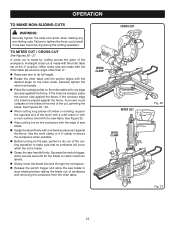
English Manual - Page 11

...and 45° on the tool and in this operator's manual as well as the saw housing and rotating it until it in .
Carrying Handle Saw Arm
Lock Pin
mITER LOCK HANDLE
Saw arm Locked in . ... have been provided at which the cut materials up to quickly stop blade rotation after the switch is larger providing additional support. It retracts over the upper blade guard as a knowledge of...
English Manual - Page 12
... a padlock (not included) through the hole in another location. When the lock is installed and locked, the switch is inoperable. Spindle Lock Button
Switch trigger
Switch Trigger
Fig. 4
Padlock
TOOLS NEEDED
The following tools (not included) are needed for making adjustments or installing the blade:
Combination Wrenches (2) (10 mm, 12 mm)
HEX KEYS (3) (3 mm, 5 mm...
English Manual - Page 14

...mounting to power supply until the parts are replaced. ASSEMBLY
UNPACKING
This product requires assembly. Carefully lift saw from the carton by the handle.
WARNING:
Do not connect to make sure ... call 1-800-525-2579 for interference between the blade and the miter fence. NOTE: This tool is noted, secure the workbench to a work surface. If shipping has influenced the settings, ...
English Manual - Page 22

..., clamp workpiece on one side of this tool. This situation could result in movement of the accessory blades available from the Ryobi dealer. Failure to heed this warning could ...cause an accident resulting in a crouched position. WARNING:
To avoid serious personal injury, always tighten the miter lock handle securely before ...
English Manual - Page 23
... speed. Slowly lower the blade into and through the workpiece. Release the switch trigger and allow the saw blade to tighten the knob could collapse on the workpiece with the... made with the miter table set at the 0° position. Squeeze the switch trigger.
Securely tighten the miter lock handle. Place the workpiece flat on the miter table with the
desired ...
English Manual - Page 24
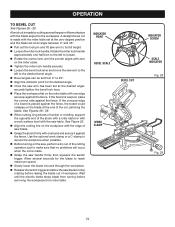
... the workpiece flat on the blade at an angle between 0° and 45°.
Pull out the lock pin and lift saw handle firmly then squeeze the switch trigger.
If the concave edge of a board is made with one edge securely against the fence, the board could collapse on the miter...
English Manual - Page 25

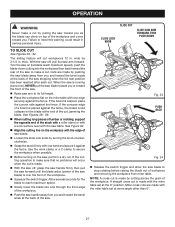
...of the cut in good material.
Pull out the lock pin and lift saw handle firmly then squeeze the switch trigger. Make a test cut , jamming the blade.
Allow several settings to 45°....level with one -half turn to the left to its full height.
Loosen the miter lock handle. See Figures 38 - 39.
When cutting long pieces of lumber or molding, support the ...
English Manual - Page 27
...bevel scale at the back of workpiece and removing the workpiece from miter table. When the saw handle away from you and toward you and toward the front of the cut is made by 3-1/2 ....
Align the cutting line on the blade at the back of the workpiece.
Squeeze the switch trigger. NOTE: A cross cut . Miter cross cuts are made .
With the saw off , pull...
English Manual - Page 36

Some examples of work with Laser
TSS100L
WARNING:
Some dust created by calling 1-800-525-2579.
• How to obtain Replacement Parts:
Replacement parts can be purchased online at 1-800-525-2579. RYOBI® is a registered trademark of our Authorized Service Centers.
• How to locate an Authorized Service Center:
Authorized Service Centers can...
Repair Sheet - Page 3

...PART
QTY. May Be Purchased Locally
Hd 1 Carry Handle Assembly 1 Upper Blade Guard 1 * Hex Nut (M8 ...1 Shaft A 1 Sleeve B 1 Torsion Spring A 1 Adjustable Knob, for Blade Guard 3 Replacement Lens (Indicator Cap 1 * Screw (M5 x 10 mm 2 Motor Assembly 1 * Screw ...mm Pan Hd 8 * Bolt (M8 x 30 mm Hex. RYOBI 10 in all correspondence regarding your MITER SAW or when ordering repair...
Repair Sheet - Page 4

...3 * Screw (M6 x 20 mm Hex Soc. RYOBI 10 in all correspondence regarding your MITER SAW or when...Power Cord 1 Bevel Lock Lever 1 Washer 1 Arm Support Bracket 1 Miter Handle Cap 1 Bevel Scale Label 1 Connection Shaft 1 * Screw (M6 x ... Plate 1 Dust Bag 1 No Hands Label 1 Torsion Spring B 1 Lower Blade Guard 1 Fix Plate (Lower Blade Guard 1 * Carriage Bolt (M5 x 14 mm 1 Blade Guard Plate...
Repair Sheet - Page 5

....2 x 13 mm 11 Adjustment Spring 1 * Screw (M3.2 x 8 mm 2 Adjustable Support Foot 1 Transformer 1 Handle Assembly 1 Laser Switch 1 Switch 1 * Lock Washer (M5 1 * Screw (M5 x 10 mm 1
KEY NO.
165 166 167 168 169 ... (Small 1 Hang Tag 1
* Standard Hardware Item - May Be Purchased Locally
RYOBI 10 in all correspondence regarding your MITER SAW or when ordering repair parts. MODEL NUMBER ...
Repair Sheet - Page 7
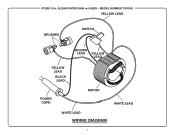
MODEL NUMBER TSS100L
YELLOW LEAD
BRUSHES
SWITCH
BROWN LEAD YELLOW LEAD
YELLOW LEAD
BLACK LEAD
POWER CORD
MOTOR
WHITE LEAD
WHITE LEAD
WIRING DIAGRAM
SLIDING MITER SAW w/LASER - RYOBI 10 in.
Similar Questions

Looking For Handle For Ryobi Tss101l (part Number 089100121610
(Posted by brownboxk16 1 year ago)

Machine Is Not Turning On When Inserting Key And Pushing Up Key Pops Out?
(Posted by estherflam 2 years ago)

Ryobi Tss101l Laser Not Working?
I have a brand new Ryobi TSS101L and I see no evidence of a laser working. I looked through the manu...
I have a brand new Ryobi TSS101L and I see no evidence of a laser working. I looked through the manu...
(Posted by linexyc 11 years ago)

Ryobi Tss101l Won't Start.
My 10" mitre saw is getting electricity to the switch and when I pull the trigger the current return...
My 10" mitre saw is getting electricity to the switch and when I pull the trigger the current return...
(Posted by dtwood1 11 years ago)

Replacement Parts
I recently purchased a Ryobi BT3000 10" Table saw w/stand. The miter gauge for it is missing; only...
I recently purchased a Ryobi BT3000 10" Table saw w/stand. The miter gauge for it is missing; only...
(Posted by mica4339 11 years ago)