Ryobi RTS30 Support Question
Ryobi RTS30 Support Question
Find answers below for this question about Ryobi RTS30.Need a Ryobi RTS30 manual? We have 4 online manuals for this item!
Question posted by rnicot on August 23rd, 2013
Where Are The Positive Stops Inside The Cabinet? Need To Make Adjustments For
I need to make adjustments for a 90 degree cut.
Current Answers
Related Ryobi RTS30 Manual Pages
English Manual - Page 2

...® POWER TOOL - With the exception of batteries, power tool accessories are warranted for two years. Batteries are warranted for ninety (90) days. makes no warranties, ...Terms...9 Features...10-13 Tools Needed ...13 Loose Parts...14 Assembly...15-19 Operation...19-34 Adjustments...35-37 Maintenance...38 ...
English Manual - Page 9

... to make thinner pieces.
Riving Knife/Spreader/Splitter (table saws) A metal piece, slightly thinner than 90° to the table surface.
Set The distance that can occur when the blade binds or stalls, throwing the workpiece back toward the front of the workpiece. Workpiece or Material The item on which a blade or cutting tool...
English Manual - Page 11
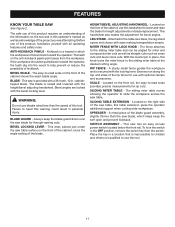
... sliding miter table at the desired cutting angle. The teeth on the front of the cabinet, locks the angle setting of this product requires an understanding of the project you are locked with ease making transportation simple. BLADE -
HEIGHT/BEVEL ADJUSTING HANDWHEEL - This handwheel also makes the adjustment for height adjustments or blade replacement. MITER FENCE WITH...
English Manual - Page 12

... such as ripping. In the event of the cabinet.
SWITCH ON
SWITCH OFF
SWITCH KEY
SWITCH IN LOCKED POSITION 12
Fig. 3 To accommodate wide panels, the saw :
Press the switch down to use by loosening the adjusting clamp, setting the fence to start the tool. The rip fence is not in use and...
English Manual - Page 13
... blade provided with complete information. WARNING:
Do not use the 36-tooth, 10 in personal injury. Failure to heed this tool.
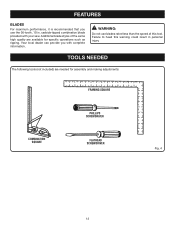
TOOLS NEEDED
The following tools (not included) are available for assembly and making adjustments:
Framing Square
COMBINATION SQUARE
Phillips Screwdriver
Flathead Screwdriver
Fig. 4
13 FEATURES
BLADES
For maximum performance, it is recommended that...
English Manual - Page 18

...Make sure the bevel locking lever is securely tightened. Do not overtighten. At the same time, place the attachment bolt in the Adjustment...adjusting handwheel clockwise.
Check all clearances for free blade rotation.
Failure to do so could cause damage to the saw blade, the saw cabinet...of the blade where the cut will be measured and made. In cutting operations, the scale will be...
English Manual - Page 19

...tools to inflict severe injury.
This will permit better air flow through the bag. NOTE: For efficient operation, empty the dust bag before it is sufficient to make... you careless. anti-kickback pawls
spreader
WING NUT
MOUNTING PLATE
Fig. 14 DUST CHUTE
ELBOW
DUST BAG
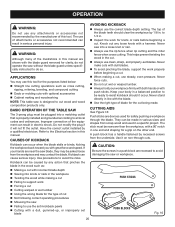
OPERATION
Fig. 15
WARNING:
Do not allow familiarity with the spreader can be adjusted... the elbow inside the dust ...
English Manual - Page 20
... your workpiece firmly with both hands or with optional accessories Cabinet making and woodworking NOTE: This table saw blade, they may contact the blade. Never make cuts with dull blades.
To avoid pinching the blade, support the work Forcing a cut Cutting warped or wet lumber Using the wrong blade for knots...
English Manual - Page 21
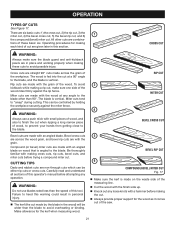
... basic cuts: 1) the cross cut, 2) the rip cut, 3) the miter cut, 4) the bevel cross cut, 5) the bevel rip cut, and 6)
1
the compound (bevel) miter cut . WARNING:
Always use blades rated less than 90°. Failure to the blade. Make allowance for the kerf when measuring wood.
2
Rip Cut
3 Miter Cut
4
Bevel Cross Cut
5
Bevel Rip Cut
6 Compound (bevel) Miter Cut Fig. 17
Make sure...
English Manual - Page 22

...cut spaced rips into the workpiece to completely stop rotating before removing the stock. Place the bolt through cuts. Completely lower the saw Off and allow the blade to allow approximately a 1/4 in. Adjust... to the desired adjustment for the cut in the stock. Position the rip fence ...miter fence holder. Position the featherboard with a C-clamp. HOW TO MAKE A FEATHERBOARD
See ...
English Manual - Page 23

... turning the height/bevel adjusting handwheel counterclockwise or lower it by approximately 1/8 in place. CHECKING SLIDING MITER TABLE AND MAKING ADJUSTMENTS
To position the SLIDING Miter Table
...adjusting handwheel in .
Pull the miter base into position with larger workpieces. but the lowest points (gullets) are aligned, this bolt slides through both tables locking them into the cabinet...
English Manual - Page 30

...BLADE
RIP CUT
RIP FENCE
SCALE
BLADE STRAIGHT
MITER CUT
Fig. 37
Miter fence ANGLED
HEIGHT/BEVEL ADJUSTING HANDWHEEL
Fig. 38
30
WARNING:
Make sure the blade guard assembly is recommended you make test cuts on ... a support (the same height as it contacts the blade to a complete stop before moving the
workpiece into the blade. Feed the workpiece into the blade with your hand; ...
English Manual - Page 31

...; Remove the sliding miter fence. Adjust the bevel angle to the desired setting. Set the blade to the correct depth. Position the rip fence the desired distance from the left side of the blade and that you make test cuts on scrap wood.
Position the workpiece flat on the table with...
English Manual - Page 32

... it contacts the blade to reduce the chance of injury should kickback occur. When the cut is recommended that you make a test cut
See Figure 42. Wait for the blade to come to the ON position. Position the workpiece flat on scrap wood first. It is made, turn the saw blade to the...
English Manual - Page 33

.../bevel adjusting handwheel counterclockwise. WARNING:
When making a non-through cuts can ...stop before proceeding. Unplug the saw. Lower the blade. Install the blade guard assembly to avoid possible serious injury.
Place a support the same height as needed.
Depending on straight cross cuts before removing the workpiece. making a NON-THROUGH cut...
English Manual - Page 34

...possible injury and damage to 90°. WARNING:
Always use push blocks, push sticks, or featherboards when making dado cuts to width of serious injury.
Rotate the height/ bevel adjusting handwheel until the bevel ...spreader alignment to the blade and adjust shims if necessary.
Move the bevel locking lever to the right and rotate the blade back to the tool.
34
Fig. 45 This saw...
English Manual - Page 35

...the throat plate.
Make sure the bevel locking lever is to make sure the tool is unplugged from the blade and that all clearances for making finish cuts in contact with blade. ...and make practice cuts in the OFF position.
See To Set the Blade at the factory for free blade rotation. Failure to bow up above the table surface. Do not start any adjustment, make sure ...
English Manual - Page 36

... Retighten the two screws.
Make two or three test cuts on the rip scale.
Move the fence back and turn the framing square 180° to be aligned with the saw blade. Failure to insure the adjustment has not moved. The spreader must... the marked blade tooth using the combination square to do so can result in the OFF position and the blade guard is needed to the square.
English Manual - Page 37

... to 45°.
Make a test cut.
0° ADJUSTMENT BOLT
BLADE
COMBINATION SQUARE
BEVEL INDICATOR
BEVEL HANDLE
BEVEL LOCKING
LEVER
Fig. 51
COMBINATION SQUARE
45° ADJUSTMENT BOLT
BLADE 45°
BEVEL ...the adjustment bolt.
Turn the bevel handle until the bottom of the slot. After extensive use, they may need to be necessary to remove the bevel handle to adjust the...
English Manual - Page 40

... breaker is hard to turn. Replace circuit fuse. Move locking lever down position.
rip blade typically has fewer teeth.
40 Adjust positive stops. Circuit fuse is damaged. Cord or switch is blown. Clean, sharpen, or replace blade.
Gears or screw post inside cabinet need adjusting (Bevel Cuts). Clean the gears or screw post. Plug in . Blade is wrong type...
Similar Questions

How Do You Adjust The Positive Stops?
My blade isn't at 90 degrees. The manual says adjust the positive stops but I can't find where it sa...
My blade isn't at 90 degrees. The manual says adjust the positive stops but I can't find where it sa...
(Posted by coreyhubbardbiz 2 years ago)
How To Realign Blade With Throat Plate?
I dropped my Ryobi TSS120L while trying to attach it to the stand it came with. Plastic handle as we...
I dropped my Ryobi TSS120L while trying to attach it to the stand it came with. Plastic handle as we...
(Posted by mikemcgrath 4 years ago)

How To Replace The Bevel Lock Washer On A Ryobi Rts30
(Posted by mike1QWJani 10 years ago)

Ryobi Rts30 Dado Throat Plate And Dado Blade
I am looking for the correct dado throat plate and dado saw blades for my Ryobi RTS30 10" table saw....
I am looking for the correct dado throat plate and dado saw blades for my Ryobi RTS30 10" table saw....
(Posted by daleemcmillan 12 years ago)

How Do I Change The Heighth /bevel Adjustment Knob On My Bts 21 Tablesaw
(Posted by Anonymous-38443 12 years ago)