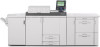
Ricoh Pro C900 Support Question
Ricoh Pro C900 Support Question
Find answers below for this question about Ricoh Pro C900.Need a Ricoh Pro C900 manual? We have 1 online manual for this item!
Question posted by greggover on March 26th, 2013
Web Cleaner Reset
I have replaced the web cleaner on the machine but I can't figure out how to reset it,
Current Answers
Related Ricoh Pro C900 Manual Pages
User Guide - Page 1
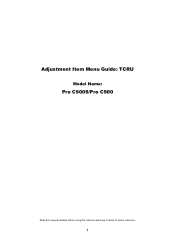
Adjustment Item Menu Guide: TCRU
Model Name:
Pro C900S/Pro C900
Read this manual carefully before using this machine and keep it handy for future reference.
1
User Guide - Page 9

Printer function/[fierydriven] 4. ./* key 5. Operation Switch 9. Enter key 6. Clear key 7. Counter 3. Number keys
56
8 CONTROL PANEL (Pro C900)
7 8
1
9
2
3
4
1. On indicator 8. User Tools 2.
User Guide - Page 10

User Tools 2. On indicator 7. Operation Switch 8. Number keys 9. Enter key 5. Clear key 6. Program
3
45
9 Counter 3. ./* key 4. CONTROL PANEL (Pro C900S)
6 7
1 8 9
2
1.
User Guide - Page 12
... can specify a wait time of the function specified in Function Priority if the machine is supplied with this setting, see General Settings Guide, which
is left idle ... If you select "On", you can specify how long the machine waits before switching the screen. SYSTEM AUTO RESET TIMER (TIMER SETTINGS) The System Reset setting automatically switches the screen to that of between 1 and 999...
User Guide - Page 14
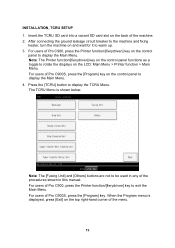
.../[fierydriven] key on the control panel functions as a toggle to display the Main Menu. For users of Pro C900, press the Printer function/[fierydriven] key on the top right-hand corner of the machine. 2. Press the [TCRU] button to warm up. 3. When the Program menu is shown below. INSTALLATION, TCRU SETUP 1. The TCRU Menu...
User Guide - Page 15
...] button is shown below.
Press the [Confirm] button to return to the previous display. 2. [Reset PM Counter] buttons There is a [Reset PM Counter] button for each button in the TCRU menu The function menu is pressed, the machine performs initialization for the selected unit and clears the counter for each unit. By pressing...
User Guide - Page 22
Note: The counter will be reset. 9. Press the [Reset PM Counter] button of the item that is reset, press the [Confirm] button.
21 When the counter is the corresponding color. 8.
If a confirmation message appears, press the [Continue] button. 7.
User Guide - Page 28
... THE TCRU DISPLAY".) 12. Note: The counter will be reset. 15. Press the [Reset PM Counter] button of the item that is reset, press the [Confirm] button.
27 Press the [Drum Cleaning Unit] button.
13.
Reconnect the ground leakage circuit breaker for the machine to warm up. 11. When the counter is the corresponding...
User Guide - Page 33
... Counter] button of the item that is reset, press the [Confirm] button.
32 Note: The counter will be reset. 16. 11. Open the TCRU Display. (See "OPENING THE TCRU DISPLAY".) 13. Press the [Drum Unit] button.
14. Turn the machine's main power switch to ON, close the left and right front covers, and...
User Guide - Page 36
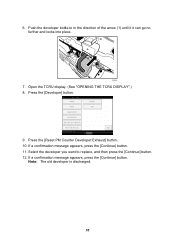
Push the developer bottle to replace, and then press the [Continue] button. 12. Press the [Developer] button.
9. If a confirmation message appears, press the [Continue] button. 11. Press the [Reset PM Counter Developer:Exhaust] button. 10.
Note: The old developer is discharged.
35 6. Open the TCRU display. (See "OPENING THE TCRU DISPLAY".) 8. If a confirmation...
User Guide - Page 40
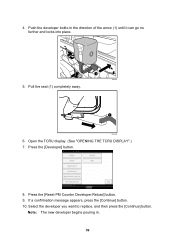
... begins pouring in the direction of the arrow (1) until it can go no further and locks into place.
1
RPG051
5. Select the developer you want to replace, and then press the [Continue] button. Pull the seal (1) completely away.
1
RPG050
6. Press the...
User Guide - Page 45
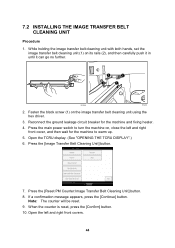
... Transfer Belt Cleaning Unit] button. 8. When the counter is reset, press the [Confirm] button. 10. Open the left and right front cover, and then wait for the machine and fixing heater.
4. Reconnect the ground leakage circuit breaker for the machine to turn the machine on, close the left and right front covers.
44 Open...
User Guide - Page 53
To change to warm up , press the Printer function/[fierydriven] key on
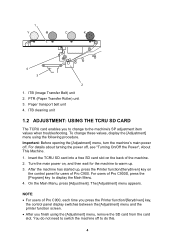
the control panel for the machine to the machine's SP adjustment item values when troubleshooting. Insert the TCRU SD card into a free SD card slot on , and then wait for users of Pro C900S, press the [Program] key to do not need to switch...
User Guide - Page 77
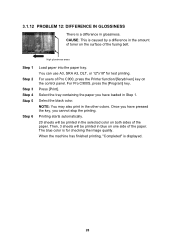
... toner on the surface of Pro C900, press the Printer function/[fierydriven] key on one side of the paper. The blue color is for test printing.
Press [Print]. For Pro C900S, press the [Program] key. NOTE: You may also print in glossiness. Once you cannot stop the printing. When the machine has finished printing, "Completed" is...
User Guide - Page 81

When the counter is reset, press the [Confirm] button. Press the [Reset PM Counter:Paper Transfer Roller Unit] button. 12.
11. Note: The counter will be reset. 13. If a confirmation message appears, press the [Continue] button. Copyright © 2008, 2009 EN USA G178-9504B
50
User Guide - Page 85
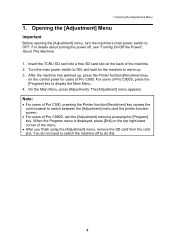
.../[fierydriven] key causes the control panel to switch between the [Adjustment] menu and the printer function screen.
• For users of Pro C900S, press the [Program] key to switch the machine off , see "Turning On/Off the Power", About This Machine.
1. You do not need to display the Main Menu. 4. Opening the [Adjustment] Menu
1. For...
User Guide - Page 92

... Upper Tray
009 A3/DLT LCT1 Lower Tray
010 A3/DLT LCT2 Upper Tray
011 A3/DLT LCT2 Lower Tray
Note:
Settings for Settings on Pro C900.
12 3.
User Guide - Page 98

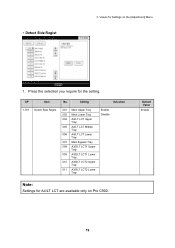
SP
Item
1-730 Detect Skew
No. Press the selection you require for Settings on Pro C900.
Values for the setting. Setting
Selection
001 Main Upper Tray
002 Main Lower Tray
004 A4/LT LCT Upper Tray
005 A4/LT LCT Middle ...
User Guide - Page 99
...
009 A3/DLT LCT1 Lower Tray
010 A3/DLT LCT2 Upper Tray
011 A3/DLT LCT2 Lower Tray
Enable Disable
Note:
Settings for Settings on Pro C900.
Default Value
Enable
19
Press the selection you require for the setting. SP
Item
No.
1 Detect Side Regist
3.
User Guide - Page 103

... Tray
Selection Enable Disable
Note:
Settings for A4/LT LCT are available only on the [Adjustment] Menu
1.
Press the selection you require for Settings on Pro C900.
Default Value Enable
23 Values for the setting.
Similar Questions


Ricoh Printers Pro 8110s Manual
How to print from a USB flash drive?
How to print from a USB flash drive?
(Posted by markgilmore301 9 years ago)

Ricoh Pro 907 Ex Oil Web Motor Not Functioning What I Do How Can Check It
(Posted by joshyyem 10 years ago)


Ricoh Pro C900s Need A Service Manual Or Please Help Me Out.
Hey... I am usinf ricoh pro c900s, and i facign soem problem last some of month on customer side. ...
Hey... I am usinf ricoh pro c900s, and i facign soem problem last some of month on customer side. ...
(Posted by lovelifework 11 years ago)