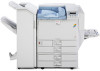
Ricoh Aficio SP C811DN Support Question
Ricoh Aficio SP C811DN Support Question
Find answers below for this question about Ricoh Aficio SP C811DN.Need a Ricoh Aficio SP C811DN manual? We have 2 online manuals for this item!
Question posted by divinwisdomcomputer on November 5th, 2015
How Do I Remove Pcu And Reset It On Ricoh Aficio Sp C811dn
i get this message 'turn main power off then set the pcu correctly. cyan. i ve turned the main power off and on again yet it is still displaying thesame message. pls how can i solve this problem
Current Answers
Answer #1: Posted by freginold on November 5th, 2015 10:36 AM
freginold

Member since:
December 20th, 2011 Points: 23,253,895

Member since:
December 20th, 2011 Points: 23,253,895
Hello, the PCUs are located just inside the front cover. Open the front cover, then open the long metal cover that runs along the inside front. (It pulls out, toward you.)
You will see the four PCUs facing you. If I remember correctly, cyan is the second from the right. (It will have a blue sticker on it.) I think you can just lift up the green handle and slide the PCU straight out, then slide it back in.
Once you close everything up, if the error persists, the cyan PCU may need to be replaced. If the PCU is not the problem, it will likely be the small port in the back of the machine that the PCU plugs into (looks a little like a phone jack).
Answer #2: Posted by TechSupport101 on November 5th, 2015 5:55 AM
TechSupport101

Member since:
May 24th, 2013 Points: 12,171,295
Member since:
May 24th, 2013 Points: 12,171,295
Hi. Reference to the Hardware Maintenance Manual here http://www.manualslib.com/manual/361311/Ricoh-Aficio-Sp-C811dn.html for help with accessing the part in question amongst others.
Answer #3: Posted by TechSupport101 on November 5th, 2015 5:54 AM
TechSupport101
Member since:
May 24th, 2013 Points: 12,171,295
Member since:
May 24th, 2013 Points: 12,171,295
Answer #4: Posted by BusterDoogen on November 5th, 2015 8:09 AM
BusterDoogen

Member since:
October 30th, 2011 Points: 28,565,397
Member since:
October 30th, 2011 Points: 28,565,397
Go to page 35 for the maintenance of the pcu procedures.
I hope this is helpful to you!
Please respond to my effort to provide you with the best possible solution by using the "Acceptable Solution" and/or the "Helpful" buttons when the answer has proven to be helpful. Please feel free to submit further info for your question, if a solution was not provided. I appreciate the opportunity to serve you!
Related Ricoh Aficio SP C811DN Manual Pages
Hardware Guide - Page 1
... before you use this machine and keep it handy for future reference. For safe and correct use, be sure to the Printer 2 Installing Options 3 Connecting the Printer Cables 4 Configuration 5 Paper and Other Media 6 Replacing Consumables 7 Cleaning the Printer 8 Adjusting the Printer 9 Troubleshooting 10 Removing Misfed Paper 11 Appendix
Read this manual carefully before using the machine.
Hardware Guide - Page 2
... NT® Workstation 4.0 Some illustrations in the United States and/or other countries. Apple, AppleTalk, EtherTalk, Macintosh, Mac OS and True Type are owned by Ricoh Company, Ltd. Novell, NetWare are registered trademarks of Microsoft Corporation in this manual might be slightly different from the machine. We disclaim any use of...
Hardware Guide - Page 5
... Installed...143 When the 2 Tray Finisher is Installed...194
3 Troubleshooting Error and Status Messages Appears on the Control Panel 171 Panel Tones...174 Printer Does Not Print...175 Checking the Port Connection...177 Printing Problems...178 Additional Troubleshooting...186 Removing Jammed Staples...188 When the Booklet Finisher is Installed...188 When the 2 Tray Finisher...
Hardware Guide - Page 6
...and Transporting the Printer...223 Moving the Printer...223 Consumables...226 Toner...226 Photo Conductor Unit...227 Waste Toner Bottle...227 Staple Cartridge...227 Intermediate Transfer Unit...228 Fusing Unit...228 Specifications...229 Mainframe...229 Options...231 INDEX...243
4 Removing Misfed Paper Removing Misfed Paper...197 Paper Misfeed Message (A)...198 Paper Misfeed Message (B)...200 Paper...
Hardware Guide - Page 9
... procedures such as installing options, replacing consumables, responding to error messages, and resolving jams. Software Guide Contains information about safe usage of..., as well as required. Manuals for This Printer
Refer to each manual as setting user and administrator authentication.
7 Also refer to... for removing the printer from its box, connecting it to prevent data tampering or ...
Hardware Guide - Page 13
...display, replace the waste toner bottle.
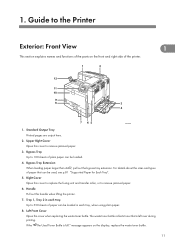
11 If the " The Used Toner Bottle is left over during printing. Right Cover Open this cover to remove jammed paper.
6. Handle Pull out this cover when replacing the waste toner bottle. Bypass Tray Up to the Printer...
Left Front Cover Open this handle when lifting the printer.
7. message appears on the front and right side of plain...
Hardware Guide - Page 17
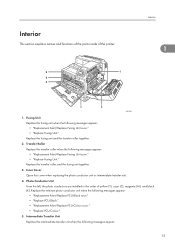
...the fusing unit when the following messages appear:
15 Replace the fusing unit ... cyan (C), magenta (M), and black (K). Intermediate Transfer Unit Replace the intermediate transfer unit when the following messages ...messages appear: • "Replacement Alert/Replace PCU:Black soon." • "Replace PCU:Black." • "Replacement Alert/Replace PCU:Colour soon." • "Replace PCU...
Hardware Guide - Page 19

... the bottom line of the display.
3. [Escape] Key Press this key to confirm settings, or setting values, or move the cursor in energy saver mode.
9. [Job Reset] Key When the printer is receiving data from a computer. The Data In indicator lights up when a printer error occurs. Power Indicator Remains lit while the power is data to be printed...
Hardware Guide - Page 25
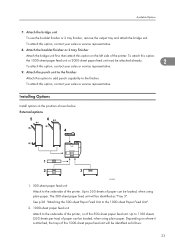
...attach this option to add punch capability to the underside of the printer, or of the printer.
External options
ATU086S
1. 500-sheet paper feed unit Attach to ... use the booklet finisher or 2 tray finisher, remove the output tray and attach the bridge unit.
To attach this option on where it is attached, the trays of the printer. Installing Options
Install options in the positions shown ...
Hardware Guide - Page 97
...static electricity
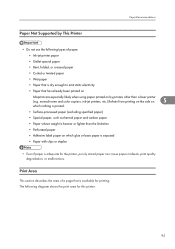
• Paper that is adequate for printing. Paper Recommendations
Paper Not Supported by printers other than the limitation
• Perforated paper
• Adhesive label paper on which glue... carbon paper
• Paper whose weight is heavier or lighter than a laser printer (e.g. The following types of a page that has already been printed on
Misprints are especially likely...
Hardware Guide - Page 153
... cloth. • You must disconnect the plug from the plug and outlet before reconnecting. Clean the printer periodically to this manual. Cleaning the Printer
Cautions When Cleaning
• To avoid hazardous electric shock or laser radiation exposure, do not remove any modifications to maintain fine printing. Accumulated dust and grime pose a fire hazard.
151
Hardware Guide - Page 174
... printer is resetting jobs.
If the message is waiting for the next data to a loopback error. Connect failed:IEEE802.11b / Turn power off and re-install the transfer unit.
If the problem persists, contact your sales or service representative.
Troubleshooting
Resetting Job...
The intermediate transfer unit may not be installed correctly.
The printer is still displayed after...
Hardware Guide - Page 180
... the paper tray are set correctly.
• The side guides of the bypass tray are set at the control panel match. For details, see p.220 "Duplex Print Always Misfeeds".
• Make sure that the top of the printer driver may be curled easily. Troubleshooting
Printing Problems
Toner smears appear on the display, replace the photo conductor...
Hardware Guide - Page 185
...color)", or "Toner is almost empty" /"(color)" message appears on the display panel, or the toner indicator on B5 paper, the back of the printer may be attached to coarse or coated paper.)
...When removing a jammed sheet, the inside of the next printed sheet may be dirtied.
appears, replace the photo conductor unit.
See p.113 "Replacing Toner".
• When the message "Replace PCU:Black...
Hardware Guide - Page 210
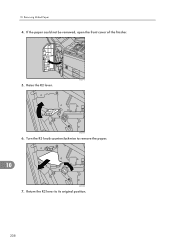
10. Raise the R2 lever.
Return the R2 lever to remove the paper.
10
ASZ192S
7. Turn the R3 knob counterclockwise to its original position.
208 If the paper could not be removed, open the front cover of the finisher.
5. ASZ271S
ASZ191S
6. Removing Misfed Paper
4.
Hardware Guide - Page 229

...consumables and not covered by warranty. Consumables
Photo Conductor Unit
Name Black Drum Unit SP C811 Color Drum Unit SP C811
Average printable number of pages *1 40,000 pages 40,000 pages
*1 ...not covered by warranty. However, if there is a problem, contact the store where they were purchased.
However, if there is a problem, contact the store where they were purchased.
•...
Hardware Guide - Page 246
... Positions of WARNING and CAUTION Labels 5 Power Cable 151 Power Connector 13 Power Indicator 17 Power Switch 12 Print Area 95 Print test sheet 167 Prt.Jobs 19
R
Reading the Display and Using Keys 20 Reading the LED Lamps 61 Rear View 13 Removing Jammed Staples 188 Removing Misfed Paper 197 Removing Punch Waste 194 Replace the Fusing...
Software Guide - Page 201
...• Displaying printer status or settings
• Checking the print job status or history
• Interrupting currently printing jobs
• Resetting the printer
• Managing the Address Book • Making printer settings
6
• Making e-mail notification settings
• Making network protocol settings
• Making security settings
Configuring the printer
To perform...
Software Guide - Page 266
... Configuring the Printer
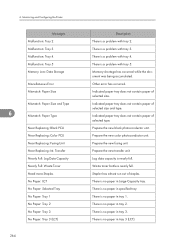
Messages Malfunction: Tray 2 Malfunction: Tray 3 Malfunction: Tray 4 Malfunction: Tray 5 Memory Low: Data Storage
Miscellaneous Error Mismatch: Paper Size
Mismatch: Paper Size and Type
6
Mismatch: Paper Type
Near Replacing: Black PCU Near Replacing: Color PCU Near Replacing: Fusing Unit Near Replacing: Int. There is no paper in tray 3. There is a problem with...
Software Guide - Page 323
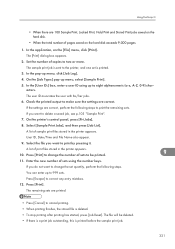
... the printer, and one set quantity, perform the following steps to change the set is deleted. • To stop printing after printing has started, press [Job Reset]. On the printer's control....
3.
A list of sets using up menu, select [Sample Print].
5.
If the settings are correct. Enter the new number of sample print files stored in the printer appears. 10.
Check the...
Similar Questions

How I Reset Ricoh Sp 4100n Printer ?
How i reset ricoh sp 4100n printer ?printer display message "sc322"
How i reset ricoh sp 4100n printer ?printer display message "sc322"
(Posted by saberabdallah81 4 years ago)


Service Call Sc 865 On Ricoh Aficio Sp C811dn...
i have prenter Ricoh C811DN and Service Call SC 865
i have prenter Ricoh C811DN and Service Call SC 865
(Posted by ashlover7 11 years ago)

My Ricoh Ap2610 Laser Printer Will Not Support My New Pc Using Windows 7.
does ricoh have any driver or other means to make my ap-2610 laser printer work with my Windows 7 ne...
does ricoh have any driver or other means to make my ap-2610 laser printer work with my Windows 7 ne...
(Posted by jclcpallc 12 years ago)

Aficio Sp C811dn Colour Photo Conductor Unit
hello, i am getting an on screen alert indicating that the colour photconductore unit is near repla...
hello, i am getting an on screen alert indicating that the colour photconductore unit is near repla...
(Posted by npayne 12 years ago)