
ProForm Xp 520 Razor Elliptical Support Question
ProForm Xp 520 Razor Elliptical Support Question
Find answers below for this question about ProForm Xp 520 Razor Elliptical.Need a ProForm Xp 520 Razor Elliptical manual? We have 1 online manual for this item!
Question posted by deanmiller21 on February 10th, 2014
Where Is Drive Belt Tension Screw On Xp520 Razor
The person who posted this question about this ProForm product did not include a detailed explanation. Please use the "Request More Information" button to the right if more details would help you to answer this question.
Current Answers
Answer #1: Posted by BusterDoogen on February 10th, 2014 10:53 AM
BusterDoogen

Member since:
October 30th, 2011 Points: 28,565,447

Member since:
October 30th, 2011 Points: 28,565,447
go to page 21 of this manual for belt tension adjustment.
I hope this is helpful to you!
Please respond to my effort to provide you with the best possible solution by using the "Acceptable Solution" and/or the "Helpful" buttons when the answer has proven to be helpful. Please feel free to submit further info for your question, if a solution was not provided. I appreciate the opportunity to serve you!
Related ProForm Xp 520 Razor Elliptical Manual Pages
User Manual - Page 1

ELLIPTICAL EXERCISER
User's Manual
Serial Number Decal
• Assembly • Operation • Maintenance • Part List and Drawing
CAUTION
Read all precautions and instructions in the space ...
User Manual - Page 2

TABLE OF CONTENTS
WARNING DECAL PLACEMENT 2 IMPORTANT PRECAUTIONS 3 BEFORE YOU BEGIN 4 ASSEMBLY 5 HOW TO USE THE ELLIPTICAL EXERCISER 12 MAINTENANCE AND TROUBLESHOOTING 21 EXERCISE GUIDELINES 22 PART LIST 24 EXPLODED DRAWING 26 ORDERING REPLACEMENT PARTS Back Cover 90 DAY FULL WARRANTY Back Cover
WARNING DECAL PLACEMENT
The warning decal ...
User Manual - Page 3
... that there is intended only as described in this manual.
3 The pulse sensor is enough clearance around your physician. Place your elliptical exerciser on your elliptical exerciser before using your back.
11. do not arch your elliptical exerciser. Your elliptical exerciser should not be used by or through the use it to ensure that all users of the...
User Manual - Page 4

The XP 520 RAZOR elliptical exerciser provides a wide array of features designed to make your benefit, read this ...If you have questions after reading this manual carefully before contacting us assist you for purchasing the revolutionary PROFORM® XP 520 RAZOR elliptical exerciser. The model number and the location of this manual.
To help us .
BEFORE YOU BEGIN
Thank you , ...
User Manual - Page 5

... Screw (84)-14 Flat Head
Screw (94)-4
M4 x 32mm Screw M6 x 16mm Button
(95)-2
Screw (80)-6
M6 x 38mm Button Bolt (76)-4
M10 x 20mm Button Screw (79)-4
M10 x 35mm Shoulder Screw (63)-2
M10 x 70mm Button Screw ...screwdriver
wrench
, and rubber mallet
.
, adjustable
As you assemble the elliptical exerciser, use the drawings below each drawing is completed. The number following the parentheses...
User Manual - Page 6

... it rests on page 5 before you begin
assembling the elliptical exerciser. While another person lifts the
rear of the Frame (1) with two M4 x 16mm Screws (84).
To make assembly easier, read the
1
information... the front of the Frame (1), attach the Right Frame
Cover with an M10 x 35mm Shoulder Screw (63). Identify the Right Frame Cover (49), which is marked with the rounded side in ...
User Manual - Page 7
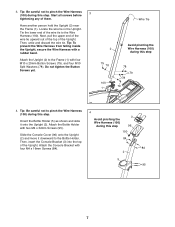
... into the top
of the wire tie to the Frame (1) with a rubber band. Start all screws before
tightening any of the Upright. Next, pull the upper end of the wire tie upward out... (100). Then, untie and discard the wire tie. Attach the Console Bracket with two M4 x 32mm Screws (95).
Wire Tie
Avoid pinching the
2
Wire Harness (100)
during this step
96
100
Slide the Console...
User Manual - Page 8
...: If the elliptical
exerciser has been exposed to room temperature
before inserting batteries into an outlet installed in accordance with four M4 x 16mm Flat Head Screws (94).
...console, and remove the battery
cover. plug the other electronic components may become
damaged. Batteries 4
Screws
6.
alkaline batteries are
recommended. To purchase a power supply, call your local Sears store. ...
User Manual - Page 9

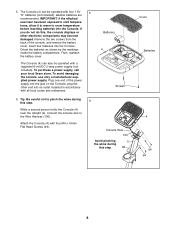
... Pivot Axle (16) into the Upright (2).
Identify the Left Upper Body Leg (6), which is marked with an M6 x 16mm Button Screw (80) and a Large Axle Cover (20). Slide the Console Cover (96) (see the drawing
7
in the same way.... with an "L" sticker. Attach the
Console Cover with four M4 x 16mm Screws
(84).
4
96 84
84
8. 7.
Slide a Wave Washer (88) onto each end of the Pivot Axle.
User Manual - Page 10
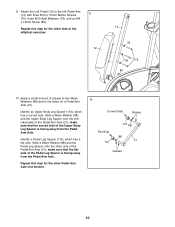
... to two Wave Washers (88) and to the left Pedal Arm (14) with three M10 x 70mm Button Screws
9
(75), three M10 Split Washers (78), and an M4
x 16mm Screw (84). Apply a small amount of the elliptical exerciser.
12
14 78
78
75
84
10.
make sure that the curved side of the Pedal Leg...
User Manual - Page 11

... Arm with an "R" sticker.
make sure that all parts of the elliptical exerciser before tightening the other side of the elliptical exerciser. make sure that the Nylon Locknuts are in the indicated locations. Tip: Tighten the two Button Screws on the front of the elliptical exerciser are in the Right Upper Body Arm are properly tightened. Make...
User Manual - Page 12

... can turn the crank arms in the lowest position. Note: The elliptical exerciser does not have a second person lift the base until the pedals ...EXERCISE ON THE ELLIPTICAL EXERCISER
To mount the elliptical exerciser, hold the upright, and place one foot against one of the elliptical exerciser, moving it to the floor. HOW TO USE THE ELLIPTICAL EXERCISER
HOW TO MOVE THE ELLIPTICAL EXERCISER...
User Manual - Page 13

... one of the holes in the crank arm. To change the incline of the ramp. HOW TO ADJUST THE STRIDE OF THE ELLIPTICAL EXERCISER
To adjust the stride of the elliptical exerciser, first pull one of the holes in the crank arm, and gently release the knob.
Ramp Pin
Ramp Handle
Adjustment Pin
Adjustment...
User Manual - Page 15
... remaining in revolutions per minute (rpm).
There are ten resistance levels. Note: When you select a workout, the display will show the distance (total revolutions) you exercise, indicators will be selected automatically. When you have selected a workout, reselect the manual mode by pressing the Resistance increase and decrease buttons repeatedly. The track...
User Manual - Page 16

... plas-
When your pulse is not shown, make sure that your heart rate is detected, a heartshaped symbol will begin to perform strength exercises. If your hands are finished exercising, the console will prompt you are positioned as described.
Press the Fan button repeatedly to select a fan speed or to squeeze the metal...
User Manual - Page 17

..., when the current segment ends, the pedals will appear in the upper display.
To continue the cross training workout, step onto the elliptical exerciser and start pedaling. The time will continue until the last segment ends.
When performing lunges, alternate legs with a slow, steady motion;
See step 6 on page ...
User Manual - Page 18

...calorie goal. Follow your heart rate if desired.
Important: The target rpm settings are finished exercising, the console will pause. Note: The same resistance level and/or target rpm setting may...center indicator is lit, maintain your pace.
See step 5 on page 15.
2. As you exercise, you are intended only to start the workout.
One resistance level and one -minute segments. ...
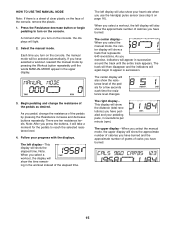
User Manual - Page 21
...
until the Magnet
84
(41) is at the highest setting, the Belt (46) may need to which screw should be adjusted.
HOW TO ADJUST THE REED SWITCH
If the console does...
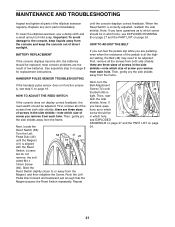
To clean the elliptical exerciser, use a damp cloth and a small amount of the elliptical exerciser regularly. there are pedaling, even when the resistance of screw you have ques- HOW TO ADJUST THE BELT
If you can...
User Manual - Page 24
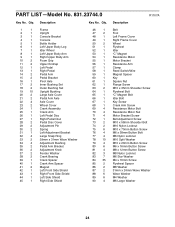
... Clamp Reed Switch/Wire Magnet Spacer Key Square Nut Flange Screw M10 x 35mm Shoulder Screw Flywheel Bolt "C" Magnet Bolt Idler Bolt Key Screw Crank Arm Screw Resistance Motor Bolt Resistance Motor Nut Motor Bracket Screw Belt Adjustment Screw M10 x 58mm Shoulder Bolt M10 Nylon Locknut M10 x 70mm Button Screw M6 x 38mm Button Bolt M6 Nylon Locknut M10 Split...
User Manual - Page 25

...
1
97
2
98
7
99
1
100 1
101 1
102 1
103 1
104 1
105 1
106 1
107 1
108 1
109 1
M4 x 48mm Screw M4 x 25mm Screw M4 x 35mm Screw M4 x 16mm Flat Head Screw M4 x 32mm Screw Console Cover M8 x 18mm Button Screw M5 x 12mm Screw M3 x 12mm Screw Wire Harness Extended Reed Switch Wire Right Adjustment Bracket Ramp Cover Ramp Top Ramp Handle Bottom...
Similar Questions

Pro Form 5.0 Es: Reduced Belt Tension As Far As Possible. Disengagement Of
pedal shaft greatly reduced. At least bike is more useble. However, what do you think causes the sha...
pedal shaft greatly reduced. At least bike is more useble. However, what do you think causes the sha...
(Posted by gmagic911 1 year ago)

Walking Belt Slips. Motor Shaft Keeps Turning, Front Rollerstops, Drive Belt Sto
ps. Walking belt was not lubed for a long time
ps. Walking belt was not lubed for a long time
(Posted by bpf90 3 years ago)

Belt Stops
I have a pro form 745CS. Sometimes when using it, the belt stops and just slips on the roller. How d...
I have a pro form 745CS. Sometimes when using it, the belt stops and just slips on the roller. How d...
(Posted by krexrode85 8 years ago)

Location To Change Battery On Proform Xp 520 Razor Eliptical
location to change battery on proform xp 520 razor eliptical
location to change battery on proform xp 520 razor eliptical
(Posted by bguild6 8 years ago)
How To Change The Drive Belt On A Proform Zlt 705
How do I change the drive belt on Proform model ZLT 705
How do I change the drive belt on Proform model ZLT 705
(Posted by mastephenson 8 years ago)