Optoma ML500 Support Question
Optoma ML500 Support Question
Find answers below for this question about Optoma ML500.Need a Optoma ML500 manual? We have 2 online manuals for this item!
Question posted by luciocabianca on August 17th, 2013
Upgrade Firmware And Media Menu Disappear And Usb/sdcard/mini Usb Does Not Work.
Hi,After upgrade a firmware version (C19 Jul 2 2012 - MCU C01 Multimedia.xx downloaded from optoma.uk), my ml500 projector do not show more the multimedia home screen and do not recognise USB, SDCARD and mini USB inputs. Appears that are without energy. The other functions (System menu) and inputs (HDMI, VGA) are working well. The problem is: I dont know how make downgrade the firmware without the multimedia home screen. There is another way to make it?.ThanksLucio
Current Answers
Answer #1: Posted by TommyKervz on August 17th, 2013 10:15 AM
TommyKervz

Member since:
January 10th, 2013 Points: 17,776,813

Member since:
January 10th, 2013 Points: 17,776,813
Greetings - Contact Optoma Technical Support nearest to your location for a more definate assistance on the issue.
http://www.helpowl.com/manuals/Casio/FXCG10/147727
http://www.helpowl.com/manuals/Casio/FXCG10/147727
Related Optoma ML500 Manual Pages
Quick Start Guide - Page 4

... (PC/Mac/iPad/iPhone 4) HDMI (PC/Mac/iPad/iPhone 4) HDMI (PC/Mac/iPad/iPhone 4) HDMI (PC/Mac/iPad/iPhone 4) HDMI (PC/Mac/iPad/iPhone 4)
PC
Mini DisplayPort to HDMI Adapter
Mac
Apple Digital AV Adapter
HDMI
iPad iPhone 4
HDMI cable sold separately o cabo HDMI é vendido separadamente HDMI HDMI-kabel sä...
User's Manual - Page 3

... on the rear of the projector. ()
2. Insert the plug at the other end of the power cord into a power outlet. () The LED lights red in mini USB
1. Speaker 2. SD Card Slot 15. Mini USB Port 22. Video Button 18. S-Video Button
Package Overview
1
2
3
Power On / Off
1
4
Power
Zoom
Hide
MENU
MEDIA
HDMI
VGA
S-Video
Video...
User's Manual - Page 5

... memory or the SD card.
1. Connect a laptop or PC using the supplied mini-USB to USB Type-A cable.
2. Copy the files to your computer display using the projector's mini USB port.
1 Connect a laptop or PC using the supplied mini-USB to USB Type-A cable.
2.
Press / / / to highlight
mini-USB > USB Display and press to enter data transfer mode. 4. Connect Computer for ceiling...
User's Manual - Page 6
... KB
143 KB 165 KB
mini-USB menu 6
Office Viewer menu
Setup menu
Video menu
Submenu Items
runner.avi
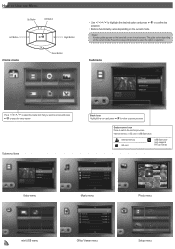
Travel ...Home menu
Right Button Down Button
•• Use / / / to highlight the desired option and press selection.
•• Buttons functionality varies depending on the current mode. The guide varies depending on the current mode. Data source icon Press to previous screen...
User's Manual - Page 7

...Home Menu
runner.avi
Travel runner.avi summer.avi unfair.avi
runner.avi
Travel runner.avi summer.avi unfair.avi
Change data source
runner.avi
Travel runner.avi summer.avi unfair.avi
Change data source
runner.avi
Travel runner.avi summer.avi unfair.avi
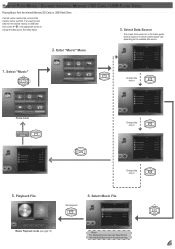
The displayed screen... Memory / SD Card / USB Flash Drive
Playing Videos from the Internal Memory, SD Card, or USB Flash Drive
If an SD ...
User's Manual - Page 8

Enter "Setup" Menu
3. To display the button guide, press any key. Select "Setup"
Media Playback Control Increase volume
Decrease volume
+
Pause
+
Play
+
Rewind
+
Fast...
4. Video Playback Mode
The button guide disappears when the keypad is not used for 3 seconds.
Select Setting
8 Highlight this icon and
press
to Play Videos - Enter "Video Setting" Menu
Home menu
5.
User's Manual - Page 9
... is inserted, the content of the memory card is read data from the internal memory or USB flash
drive, press
in which screens appear vary depending on the previous step.
9 Select "Music"
Change data source
Home menu
Return Home Menu
Love song.mp3 Goodbye.mp3
Love song.mp3 Goodbye.mp3
Change data source
Love song.mp3...
User's Manual - Page 10

... this icon and
press
to Play Music - Select "Music Setting"
Home menu
6. Enter "Music Setting" Menu How to exit
music playback mode. Media Playback Control Increase volume
Decrease volume
+
Pause
+
Play
+
Previous track
+
Next track
Music Settings 1. Enter "Setup" Menu
3. Playback Mode
The button guide disappears when the keypad is not used for 3 seconds. Select Option...
User's Manual - Page 11

... Drive
Viewing Photos from the internal memory or USB flash
drive, press
in which screens appear vary depending on the available data source.
1/2
2. Enter "Photo" Menu
1. Preview File
Change data source
1/2
Change data source
Start playback
4. Select "Photo"
Change data source
1/2
Home menu Return Home
Menu
1/2
5. How to
change the data source. If you want to read...
User's Manual - Page 12

... "Slideshow" Menu Select "Slideshow"
Home menu
6. Mode: Slideshow at Full Screen
During slideshow, photos are played continuously at a specified interval time while playing music stored in the internal memory "/mnt/disk/bgm" folder can be played as background. How to exit
slideshow mode. The button guide disappears when the keypad is "On" to enable this...
User's Manual - Page 13

...data from the internal memory or USB flash
drive, press
in which screens appear vary depending on the button guide, and the sequence in the appropriate screen to View Documents - See ...KB 165 KB
13 Enter "Office Viewer" Menu
.. Select "Office Viewer"
Change data source
.. travel.doc
128 KB 1,211 KB
143 KB 165 KB
Home menu
Return Home Menu
.. View File
Report
View mode (see...
User's Manual - Page 14

... Full screen view
Report
Advanced menu mode
Report
Media Playback Control Previous page Next page Return to file list
or Zoom in/out page
Enter advanced menu mode
Media Playback Control (Advanced Menu Mode)
Page up
Move to the left
Page down
Exit advanced menu mode
Move to View Documents - Select "System"
Home menu
6. View Mode
The button guide disappears...
User's Manual - Page 15

Enter "Information" Menu
5. Select "System"
Home menu
6. Enter "System" Menu
7. View Projector Information
SD card capacity Internal memory capacity
15 Select "Setup"
2. Select "Information"
4. View Projector Information 1. Enter "Setup" Menu
3.
User's Manual - Page 16

Enter "Setup" Menu
3. Enter "Reset" Menu
5. Select "Reset"
4. Wait to Complete
Yes Reboot the projector
Return to Home menu
16 Confirm Reset
Select item
No
8. Select "System"
Home menu
6. Enter "System" Menu
7. Reset the System
When the system is reset, all files are backed up before resetting.
1. Ensure all files stored in the internal memory will be ...
User's Manual - Page 17

... "System"
Home menu
6. Select "Upgrade"
4. Otherwise, this may take a while to complete
Reboot the projector 17 Insert the SD card into the SD card slot of the SD card. 4. Enter "Upgrade" Menu
5. Download the latest firmware from the OPTOMA website (www.optoma.com / www.optoma.eu /www.optoma.com.tw).
1. Follow the steps below.
1. Enter "System" Menu
7. Confirm Upgrade
Select...
User's Manual - Page 18

... Mode
1. Enter "mini-USB" Menu
4. Connect to exit USB display mode. From the Windows desktop, browse for the first time: 1. Enter "mini-USB" Menu
3. Enter "USB Display" Mode
Home menu
Press to PC
18
4. Select "Data Transfer"
Home menu
When data transfer completes, unplug the USB cable or press
to PC
Prepare DOUSB...
3.
Connect to exit PC mode.
6. Select "mini-USB"
5. View PC...
User's Manual - Page 19

... source.
Adjust Menu Settings for External Input Source: VGA / Composite AV / HDMI
Selecting Input Source
Once a video source device is connected and turned on, press to enter the menu
Menu Items
Menu Operation
Select main menu
Submenu Operation Move up
Move down Confirm selection
Enter current submenu Hide OSD menu
Adjust setting
Picture menu
Screen menu
Setting menu
Options menu 19
User's Manual - Page 20

External Input Setting
Picture Menu
1. Low / Middle / High
Color Space Auto / RGB / YUB
HDMI / VGA / COMPOSITE /
Input
S-Video / SD_CARD / USB_A / Mini USB_B
20 Enter Submenu
4. Select Submenu
Select item
3. Confirm Settings
Confirm selection / setting
Wall Color (White / Light Yellow / Light Blue / Pink / Dark Setting) Adjust setting
...
User's Manual - Page 21

...~40)
Adjust setting Adjust setting Adjust setting Adjust setting Adjust setting
Auto Cell Mount (Auto / Front Desktop / Front Inverted)
21 Enter Submenu
4. External Input Setting
Screen Menu
1. Adjust Settings
Adjust setting
2.
User's Manual - Page 25

Media File Support List: Image/Music
Image Image Type (Ext name) Sub Type
Encode Type YUV400
Max Pixels No Limit
YUV420
No Limit
Baseline
YUV422
No Limit
YUV440
No Limit
JPEG
YUV444
No Limit
JPG
YUV400
Progressive
YUV420 YUV422 YUV440
Width
Similar Questions

Optoma Ml500 Firmware Downgrade
I downloaded a firmware from a post here on the site on my old ML500. The firmware took away the med...
I downloaded a firmware from a post here on the site on my old ML500. The firmware took away the med...
(Posted by mikedmaseker 4 years ago)

?optoma Hd33 3d Not Detected ( 3d Format Off )
Hello Friends, one month ago my optoma HD33 do not detect 3D I dont change my Bluray player or any c...
Hello Friends, one month ago my optoma HD33 do not detect 3D I dont change my Bluray player or any c...
(Posted by maxileon 10 years ago)

Where Is Usb Display V1.0.1?
It isn't on my computer and I can't get my new ML500 to recognize my computer display. The manual sa...
It isn't on my computer and I can't get my new ML500 to recognize my computer display. The manual sa...
(Posted by sjblock 11 years ago)

Unlocking 4-digit Security Code W/o Remote Control On Optoma Hd66?
One of my employees "locked" the projector via the Security Menu, requiring the 4 digit security cod...
One of my employees "locked" the projector via the Security Menu, requiring the 4 digit security cod...
(Posted by glennbroce 11 years ago)