Get support for LiftMaster 8557

LiftMaster 8557 Support Question

LiftMaster 8557 Support Question

Find answers below for this question about LiftMaster 8557.
Need a LiftMaster 8557 manual? We have 2 online manuals for this item!
Question posted by ANTMANYPHK66 on July 15th, 2019

Error 12

How do you fix code 12

Current Answers

Answer #1: Posted by Troubleshooter101 on July 28th, 2019 7:59 AM
This answer was accepted by the poster of the original question.
Troubleshooter101

Member since:
September 30th, 2015

Points: 2,927,040
1,100
points
The steps we took to determine your issue:

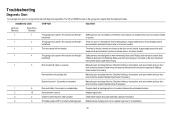
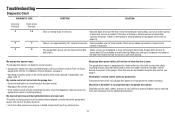
1. The error code is letting us know there is a sensor issue


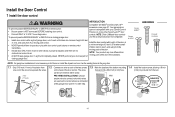
Remove the receiving sensor(green LED) from bracket. You can do so by taking off the wing nut.
Point the sensor away from the sending sensor, so that the LED light is completely off.
Once the LED light is off, wait 10 seconds.
Slowly rotate sensor back until it lights again. When you have a strong green light, put it back into the bracket and put the wing nut back on.

If door still doesn't close then we will need to isolate it further by the following:

Remove the sensors from the brackets.
Remove the wires from the wire nuts or cut the sensor wires 12" from the sensors.
Strip both ends of wires from each sensor and twist like colored wires together. Proceed with both sensors to the garage door opener motor unit.
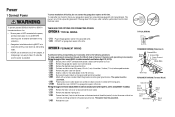
Remove existing wires from the white and grey terminals on the back of the operator.
Attach or insert white wires into the white terminal and black/white striped wires into the grey terminal.
Point the sensors at each other - if both sensor LED's turn on, there is an issue with your wiring. Replace the wires between the opener and the sensors. If the LED's DO NOT turn on, replace the sensors.


Thanks


Please respond to my effort to provide you with the best possible solution by using the "Acceptable Solution" and/or the "Helpful" buttons when the answer has proven to be helpful. Please feel free to submit further info for your question, if a solution was not provided. I appreciate the opportunity to serve you!
Troublshooter101

Related LiftMaster 8557 Manual Pages

8557 Manual - Page 1

... Backup • 8557 - 3/4 hp Belt Drive FOR RESIDENTIAL USE ONLY ■ Please read this manual and the enclosed safety materials carefully! ■ Fasten the manual near the garage door after installation. ■ The door WILL NOT CLOSE unless the Protector System® is connected and properly aligned. ■ Periodic checks of the garage door opener are required...
8557 Manual - Page 2

... tension. • Disable ALL locks and remove ALL ropes connected to garage door BEFORE installation and operating garage door opener to avoid entanglement. 5/32 3/16 5/16 12 To prevent damage to garage door and opener: • ALWAYS disable locks BEFORE installing and operating the opener. • ONLY operate garage door opener at 120 V, 60 Hz to the possibility of the header bracket...
8557 Manual - Page 3

... (4) Lock Washer 5/16" (4) Self-Threading Screw 1/4"-14 x 5/8" (2) Ring Fastener (3) Carriage Bolt 1/4"-20 x 1/2" (2) Wing Nut 1/4"-20 (2) Door Control Hardware Screw 6AB x 1" (2) Screw 6-32 x 1" (2) Drywall Anchors (2) Insulated Staples 3 Garage door opener CF K G D E J. Rail grease H L M Not Provided J Not Provided N O P I . Header bracket B. Emergency release rope and handle...
8557 Manual - Page 4

... 5/16"-18x1/2" Lock Nut Hex Screw #8x3/8" Hex Screw #8x3/8" (Packed with the previously removed bolts. To avoid SERIOUS damage to garage door opener, use ONLY those bolts/fasteners mounted in the garage door opener) Model 8557 (1) NOTE: ONLY use the bolts removed from the rail, belt, and styrofoam. 1.3 Model 8550: Fasten the rail with the sprocket...
8557 Manual - Page 6

... opener. Upon completion of garage door. 12. DO NOT enable the Timer-to avoid accidental release. 7. Mount the emergency release within sight of the garage door. • out of reach of children at least 6 feet (1.83 m) above floor. 6. To avoid SERIOUS PERSONAL INJURY or DEATH from ALL moving parts of SEVERE INJURY or DEATH: 1. NEVER connect garage door opener...
8557 Manual - Page 14

...; Install door control within sight of the door at the garage door opener in a...door control within sight of garage door, out of reach of children at a minimum height of 5 feet (1.5 m), and away from ALL moving parts of the wire and separate the wires. Screw 6ABx1" Screw 6-32x1" HARDWARE Drywall Anchors NOTE: For gang box installations it can be seen clearly, is not necessary to 12...
8557 Manual - Page 21

... cm) before April 12, 2013): 1.1B Be sure power is grounded. This plug will only fit into your garage door opener has a grounding type plug with ALL local electrical and building codes. • NEVER ...the top of the motor unit (according to local code): Wiring through a terminal block (8550 models manufactured after April 12, 2013 and all 8557 models): 1.1B Remove the motor unit cover screws ...
8557 Manual - Page 28

... operation feature. NEVER use handle to -Close functionality if operating either one-piece or swinging garage doors. ALWAYS KEEP GARAGE DOOR PROPERLY BALANCED (see page 2). The door could result in SEVERE INJURY or DEATH. 12. DO NOT enable the Timer-to pull garage door open or closed . SAVE THESE INSTRUCTIONS. 28 NO ONE SHOULD CROSS THE PATH OF THE...
8557 Manual - Page 31

..." to -Close feature off/on and set the time interval before door closes. Navigation Buttons CLOCK SETUP: Set the time, choose 12 or 24 hour clock and show /hide the temperature. TTC is to operate the garage door opener. LIGHT SETTINGS: Set duration for sectional doors ONLY): Set the Timer-to view the Features menu. TRANSMITTERS...
8557 Manual - Page 35

... set the travel module and at all staple points and connection points and replace wire or correct as needed . DIAGNOSTIC CODE Up Arrow Flash(es) Down Arrow Flash(es) 1 1 1 2 1 3 1 4 1 5 1 6 2 1-5 3 2 3 3 SYMPTOM SOLUTION The garage door opener will not close and the light bulbs flash. Inspect sensor wires for a disconnected or cut . Safety sensors are steady...
8557 Manual - Page 36

... is not binding or sticking attempt to page 24 ). Communication error to travel (refer to reprogram travel module. My garage door opener light(s) will still not activate the door check the diagnostic codes to be required. Troubleshooting DIAGNOSTIC CODE Up Arrow Flash(es) Down Arrow Flash(es) 4 1-4 4 5 4 6 SYMPTOM SOLUTION Door is binding or sticking contact a trained...
8557 Manual - Page 40

Repair Parts Garage Door Opener Parts - MODEL 8550 1 11 9 4 3 12b 12a 10 8 7 5 2 4 3 6 40 Description 1 Sprocket and Sprocket Cover ...Cord (Models manufactured before April 12, 2013) 11b Line Cord (Models manufactured after April 12, 2013) 12a Filter Board with Screws (Models manufactured before April 12, 2013) 12b Terminal Block (Models manufactured after April 12, 2013) Not Shown Wire ...
8557 Manual - Page 41

... 41C279 41A7562 30B652 41A5532 41A3150 041A7767 041D7742-5 041A7619-4 45ACT 41D216 041A7814 Contact Information Address repair parts order to your garage door opener while calling. If you have the model number of the garage door opener. Repair Parts Garage Door Opener Parts - MODEL 8557 4 5 1 2 3 15 14 7 6 10 9 12 11 8 13 6 7 114A4665 © 2013, The Chamberlain Group, Inc.
8557 Elite Series Users Guide Manual - Page 1

...® is connected and properly aligned. ■ Periodic checks of the garage door opener are required to ensure safe operation. ■ This garage door opener is to be used ONLY with sectional doors. ■ Attach enclosed warning labels to -Close feature if you are installing the garage door opener on label. www.liftmaster.com The Chamberlain Group, Inc. 845 Larch...
8557 Elite Series Users Guide Manual - Page 2

...system. The hazard may NOT reverse when required and could be enabled ONLY when operating a sectional door. 15. Install garage door opener ONLY on inside of SEVERE INJURY or DEATH: 1. IMPORTANT INSTALLATION INSTRUCTIONS WARNING To reduce the risk of garage door. 12. They could result in SEVERE INJURY or DEATH. 3. NOTE: For complete installation instructions visit www...
8557 Elite Series Users Guide Manual - Page 3

... reverse when required and could move unexpectedly. The door could result in SEVERE INJURY or DEATH. 12. SAVE THESE INSTRUCTIONS. 3 READ AND FOLLOW ALL WARNINGS AND INSTRUCTIONS. 2. NEVER use emergency release handle unless garage doorway is properly adjusted, and there are no obstructions to pull garage door open door falling rapidly and/or unexpectedly and increasing the...
8557 Elite Series Users Guide Manual - Page 6

...the button to the menus. Press to be heard) when the code has been programmed. Repeat the steps above for garage door opener light to stay on after operation, selectable range of 1-1/2 to ...and turn the entry light feature off /on the garage door opener. Press the navigation button below "MENU" to 4-1/2 minutes. Set the time, choose 12 or 24 hour clock and show /hide the ...
8557 Elite Series Users Guide Manual - Page 12

...adjustment or modifications of the FCC rules and IC RSS-210. Unplug the garage door opener. Insert replacement batteries positive side up (+). THERE ARE NO USER SERVICEABLE PARTS. This ...est conforme à la norme NMB-003 du Canada. 12 The garage door opener does not require additional lubrication. NOTE: The garage door opener may run slower if the battery is subject to the ...
8557 Elite Series Users Guide Manual - Page 13

... be cut wire. Check for binding or obstructions, such as a broken spring or door lock, correct as needed . Battery backup* charging circuit error, replace the logic board. *If applicable. 13 The garage door opener will flash the diagnostic codes. Opener hums for the door control are misaligned or were momentarily obstructed. The battery status LED* is programmed...
8557 Elite Series Users Guide Manual - Page 14

... Chart DIAGNOSTIC CODE Up arrow Flash(es) 4 Down arrow Flash(es) 1-4 4 5 4 6 SYMPTOM SOLUTION Door is binding or sticking contact a trained door systems technician. Opener runs approximately 6-8", stops and reverses. Communication error to page 10). Realign both sensors to ensure the garage door opener is working properly. My door will not activate the garage door: •...

Similar Questions

I Have Installed A Chamberlan Garage Door Opener And The Remote I Was Using Is
I have been using a Chamberlan garage door opener and its remote has been defective since of late.Pl...
(Posted by donweera42 7 months ago)
I Need A Replacement Lens Cover For Garage Door Opener Liftmaster Model #1355- 1
I need a replacement Lens Cover for a garage door opener Model # 1355M- 1/2 HP Liftmaste
(Posted by nskanson 1 year ago)
Garage Door Opens After Shutting.
My Lift master 8550 inside keypad is Inside wall pad is model #880LM. outside keypad Model # is 877M...
(Posted by BONNIECA92 2 years ago)
Error Code 12
Garage Door will not close due to the following display: Sensor Wiring Inter - Error Code 12
(Posted by boylepat 9 years ago)
Resetting The Key Code For Garage Door Opener
How do you reset the key code for the garage door opener?
(Posted by khiggins69 12 years ago)
Ask a New Question
Use the box below to post a new question about this LiftMaster product .
Points & Prizes
  • You can earn points for nearly everything you do on HelpOwl.com
  • You can trade in those points for gift cards at leading retailers such as Amazon.com and Walmart
  • It's that simple!
See How it Works
Create a Free Account

LiftMaster Manuals

Find free LiftMaster 8557 manuals and user guides available at ManualOwl.com. Try out our unique manual viewer allowing you to interact with manuals from directly within your browser!

LiftMaster Reviews

View thousands of LiftMaster user reviews and customer ratings available at ReviewOwl.com.

Contact Information

Complete LiftMaster customer service contact information including steps to reach representatives, hours of operation, customer support links and more from ContactHelp.com.

Scoreboard Ratings

See detailed LiftMaster customer service rankings, employee comments and much more from our sister site.