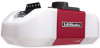

8557 Manual
Page 1
...-22 Adjustments 23-25 Battery Backup 26-27 Operation 28 Features 29 Door Control 30-31 Remote Control 32-33 To Erase the Memory 33 To Open the Door Manually . . . . . 34 Maintenance 34 Troubleshooting 35-36 Accessories 37 Warranty 38 Repair Parts 39-41 * If applicable www.liftmaster.com The Chamberlain Group, Inc. 845 Larch Avenue Elmhurst, Illinois 60126-1196 Write down the following information for installation instructions. The Timer-to-Close...
...-22 Adjustments 23-25 Battery Backup 26-27 Operation 28 Features 29 Door Control 30-31 Remote Control 32-33 To Erase the Memory 33 To Open the Door Manually . . . . . 34 Maintenance 34 Troubleshooting 35-36 Accessories 37 Warranty 38 Repair Parts 39-41 * If applicable www.liftmaster.com The Chamberlain Group, Inc. 845 Larch Avenue Elmhurst, Illinois 60126-1196 Write down the following information for installation instructions. The Timer-to-Close...
8557 Manual
Page 2
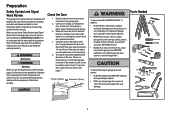
... NOT reverse when required. • NEVER try to loosen, move or adjust garage door, door springs, cables, pulleys, brackets or their hardware, ALL of the door. Raise and lower the door to the left or right of the door must not exceed 1/4 inch (6 mm). Preparation Safety Symbol and Signal Word Review This garage door opener has been designed and tested to offer safe service provided it is installed, operated...
... NOT reverse when required. • NEVER try to loosen, move or adjust garage door, door springs, cables, pulleys, brackets or their hardware, ALL of the door. Raise and lower the door to the left or right of the door must not exceed 1/4 inch (6 mm). Preparation Safety Symbol and Signal Word Review This garage door opener has been designed and tested to offer safe service provided it is installed, operated...
8557 Manual
Page 3
... instructions for these accessories will vary depending on your specific model, other accessories may look different. Sprocket cover and screws K. Safety labels and literature P. Straight door arm A B F. Emergency release rope and handle H. The images throughout this manual are not included in this manual. Garage door opener CF K G D E J. Door control M. Curved door arm E. Header bracket B. Door bracket D. Rail I SECURITY✚ 2.0TM ACCESSORIES 880LM Smart Control Panel® 895MAX Remote Control 829LM Garage Door Monitor Hardware Installation...
... instructions for these accessories will vary depending on your specific model, other accessories may look different. Sprocket cover and screws K. Safety labels and literature P. Straight door arm A B F. Emergency release rope and handle H. The images throughout this manual are not included in this manual. Garage door opener CF K G D E J. Door control M. Curved door arm E. Header bracket B. Door bracket D. Rail I SECURITY✚ 2.0TM ACCESSORIES 880LM Smart Control Panel® 895MAX Remote Control 829LM Garage Door Monitor Hardware Installation...
8557 Manual
Page 6
... repairs to -Close functionality if operating either one -piece door, visit www.liftmaster.com for installation instructions. 6 Disable ALL locks and remove ALL ropes connected to garage door BEFORE installing opener to do so. 8. NEVER wear watches, rings or loose clothing while installing or servicing opener. Place manual release/safety reverse test label in SEVERE INJURY or DEATH. 3. DO NOT enable the Timer-to cables, spring assemblies and other hardware MUST be caught in garage door...
... repairs to -Close functionality if operating either one -piece door, visit www.liftmaster.com for installation instructions. 6 Disable ALL locks and remove ALL ropes connected to garage door BEFORE installing opener to do so. 8. NEVER wear watches, rings or loose clothing while installing or servicing opener. Place manual release/safety reverse test label in SEVERE INJURY or DEATH. 3. DO NOT enable the Timer-to cables, spring assemblies and other hardware MUST be caught in garage door...
8557 Manual
Page 10
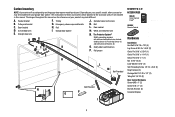
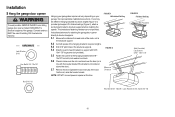
..."- 18x7/8" hex bolts, lock washers and nuts. 5.6 Check to make sure the rail is centered over the door (or in line with the header bracket if the bracket is not centered above the door). 5.7 Remove the 2x4. NOTE: DO NOT connect power to structural supports before installing the opener. Two representative installations are not provided. Operate the door manually. If the door hits the rail, raise the header...
..."- 18x7/8" hex bolts, lock washers and nuts. 5.6 Check to make sure the rail is centered over the door (or in line with the header bracket if the bracket is not centered above the door). 5.7 Remove the 2x4. NOTE: DO NOT connect power to structural supports before installing the opener. Two representative installations are not provided. Operate the door manually. If the door hits the rail, raise the header...
8557 Manual
Page 21
... the motor unit (according to local code): Wiring through a terminal block (8550 models manufactured after April 12, 2013 and all 8557 models): 1.1B Remove the motor unit cover screws and set aside. 1.3B Remove the attached green ground terminal. 1.4B Cut black and white wires. and the ground wire to circuit. 1.2B Remove the garage door opener cover and set the cover aside. 1.2B Remove the attached 3-prong cord. 1.3B Connect the black (line) wire to the screw on...
... the motor unit (according to local code): Wiring through a terminal block (8550 models manufactured after April 12, 2013 and all 8557 models): 1.1B Remove the motor unit cover screws and set aside. 1.3B Remove the attached green ground terminal. 1.4B Cut black and white wires. and the ground wire to circuit. 1.2B Remove the garage door opener cover and set the cover aside. 1.2B Remove the attached 3-prong cord. 1.3B Connect the black (line) wire to the screw on...
8557 Manual
Page 26
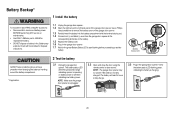
... remote control or door control. Battery Status LED ALWAYS wear protective gloves and eye protection when changing the battery or working around the battery compartment. * If applicable. 2 Test the battery 2.1 Unplug the garage door opener. NOTE: Make sure the garage door opener is charging. 26 The battery will flash indicating low battery power. Check with the terminals facing out. 1.4 Connect red (+) and black (-) wires from the garage door opener to the corresponding terminals on the battery. 1.5 Replace the battery cover. 1.6 Plug in the garage door opener. Use...
... remote control or door control. Battery Status LED ALWAYS wear protective gloves and eye protection when changing the battery or working around the battery compartment. * If applicable. 2 Test the battery 2.1 Unplug the garage door opener. NOTE: Make sure the garage door opener is charging. 26 The battery will flash indicating low battery power. Check with the terminals facing out. 1.4 Connect red (+) and black (-) wires from the garage door opener to the corresponding terminals on the battery. 1.5 Replace the battery cover. 1.6 Plug in the garage door opener. Use...
8557 Manual
Page 29
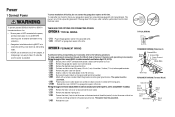
... whenever the garage door opener lights turn on your garage door operation. The lights will not go into the sleep mode until activated. An incandescent A19 light bulb (100 watt maximum) or for maximum energy efficiency a 26W (100W equivalent) compact fluorescent light (CFL) bulb may be adjusted using a TTC enabled door control (Models 881LM or 880LM). the lights will flash 10 times. For added control over the light bulbs on when someone enters through a wall-mounted door control, remote control, wireless keyless entry or...
... whenever the garage door opener lights turn on your garage door operation. The lights will not go into the sleep mode until activated. An incandescent A19 light bulb (100 watt maximum) or for maximum energy efficiency a 26W (100W equivalent) compact fluorescent light (CFL) bulb may be adjusted using a TTC enabled door control (Models 881LM or 880LM). the lights will flash 10 times. For added control over the light bulbs on when someone enters through a wall-mounted door control, remote control, wireless keyless entry or...
8557 Manual
Page 30
... buttons: LEARN A DEVICE Any compatible remote controls, wireless keyless entry, or MyQ® accessories can be activated at time of installation. Test the door control by accessing the menu and using the garage door opener light as a work if the garage door opener is sensed. Once the garage door opener is activated the lights will display on the garage door opener lights when motion is operating by accessing the menu using the navigation buttons. If there is broken. TTC can be set period of time, then shut...
... buttons: LEARN A DEVICE Any compatible remote controls, wireless keyless entry, or MyQ® accessories can be activated at time of installation. Test the door control by accessing the menu and using the garage door opener light as a work if the garage door opener is sensed. Once the garage door opener is activated the lights will display on the garage door opener lights when motion is operating by accessing the menu using the navigation buttons. If there is broken. TTC can be set period of time, then shut...

8557 Manual
Page 31
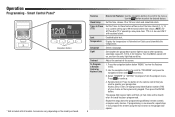
... programmed through a series of 1-1/2 to operate the garage door opener. SCREEN The main screen displays the time, temperature, and current battery charge (if applicable). Navigation Buttons CLOCK SETUP: Set the time, choose 12 or 24 hour clock and show /hide the temperature. Turn the Motion sensor off/on, and turn the entry light feature off/on the screen and the navigation buttons. Door Control Smart Control Panel Setup The features on the door control can be used...
... programmed through a series of 1-1/2 to operate the garage door opener. SCREEN The main screen displays the time, temperature, and current battery charge (if applicable). Navigation Buttons CLOCK SETUP: Set the time, choose 12 or 24 hour clock and show /hide the temperature. Turn the Motion sensor off/on, and turn the entry light feature off/on the screen and the navigation buttons. Door Control Smart Control Panel Setup The features on the door control can be used...
8557 Manual
Page 36
... garage door opener will not turn off when the door is open and close and the light bulbs blink on my motor unit: The safety reversing sensor must be disabled using the door control, see page 29. My vehicle's Homelink® is working properly. Manually open : The garage door opener is not binding or sticking attempt to reprogram travel module connections, replace module if necessary. The LEDs on the door control blink: If you have been obstructed or when the motion sensor on the door control detects...
... garage door opener will not turn off when the door is open and close and the light bulbs blink on my motor unit: The safety reversing sensor must be disabled using the door control, see page 29. My vehicle's Homelink® is working properly. Manually open : The garage door opener is not binding or sticking attempt to reprogram travel module connections, replace module if necessary. The LEDs on the door control blink: If you have been obstructed or when the motion sensor on the door control detects...
8557 Manual
Page 37
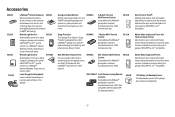
.... MAX Wireless Keyless Entry: For use outside of the home to enable access to install. 893MAX 3-Button Premium MAX Remote Control: Compatible with LiftMaster® garage door openers manufactured since 1993. 886LM Motion Detecting Control Panel: Multi-function door control with motion sensor that automatically turns opener lights on when it detects a person entering the garage. Plugs into any interior outlet. Includes visor clip. 881LM Smart Control Panel®: Displays temperature, time and system diagnostics; includes a push bar to open /closed status...
.... MAX Wireless Keyless Entry: For use outside of the home to enable access to install. 893MAX 3-Button Premium MAX Remote Control: Compatible with LiftMaster® garage door openers manufactured since 1993. 886LM Motion Detecting Control Panel: Multi-function door control with motion sensor that automatically turns opener lights on when it detects a person entering the garage. Plugs into any interior outlet. Includes visor clip. 881LM Smart Control Panel®: Displays temperature, time and system diagnostics; includes a push bar to open /closed status...
8557 Manual
Page 38
... instructions regarding installation, operation, and maintenance and testing. THIS LIMITED WARRANTY DOES NOT COVER NON-DEFECT DAMAGE, DAMAGE CAUSED BY IMPROPER INSTALLATION, OPERATION OR CARE (INCLUDING, BUT NOT LIMITED TO ABUSE, MISUSE, FAILURE TO PROVIDE REASONABLE AND NECESSARY MAINTENANCE, UNAUTHORIZED REPAIRS OR ANY ALTERATIONS TO THIS PRODUCT), LABOR CHARGES FOR REINSTALLING A REPAIRED OR REPLACED UNIT, REPLACEMENT OF CONSUMABLE ITEMS (E.G., BATTERIES IN REMOTE CONTROL TRANSMITTERS AND LIGHT BULBS), OR UNITS INSTALLED FOR NON-RESIDENTIAL USE...
... instructions regarding installation, operation, and maintenance and testing. THIS LIMITED WARRANTY DOES NOT COVER NON-DEFECT DAMAGE, DAMAGE CAUSED BY IMPROPER INSTALLATION, OPERATION OR CARE (INCLUDING, BUT NOT LIMITED TO ABUSE, MISUSE, FAILURE TO PROVIDE REASONABLE AND NECESSARY MAINTENANCE, UNAUTHORIZED REPAIRS OR ANY ALTERATIONS TO THIS PRODUCT), LABOR CHARGES FOR REINSTALLING A REPAIRED OR REPLACED UNIT, REPLACEMENT OF CONSUMABLE ITEMS (E.G., BATTERIES IN REMOTE CONTROL TRANSMITTERS AND LIGHT BULBS), OR UNITS INSTALLED FOR NON-RESIDENTIAL USE...

8557 Elite Series Users Guide Manual
Page 1
... 7 To Open the Door Manually 8 Battery Backup 8 Adjustment 9 Program the Travel 10 Test the Safety Reversal System.... 11 Test the Protector System 11 Maintenance 12 Troubleshooting 13-14 Repair Parts 15 Warranty 16 Write down the following information for future reference: Serial Number: Date of the garage door opener are for reference and your product may look different. CONTACT INFORMATION CONTENTS Important Safety Instructions ......... 2-3 Operation 4 Using the Door Control 5 Programming-Door Control Panel ....6 Programming - The Timer-to-Close is to be used ONLY with...
... 7 To Open the Door Manually 8 Battery Backup 8 Adjustment 9 Program the Travel 10 Test the Safety Reversal System.... 11 Test the Protector System 11 Maintenance 12 Troubleshooting 13-14 Repair Parts 15 Warranty 16 Write down the following information for future reference: Serial Number: Date of the garage door opener are for reference and your product may look different. CONTACT INFORMATION CONTENTS Important Safety Instructions ......... 2-3 Operation 4 Using the Door Control 5 Programming-Door Control Panel ....6 Programming - The Timer-to-Close is to be used ONLY with...
8557 Elite Series Users Guide Manual
Page 4
... the sensor beam the garage door opener lights will reverse. Prior to and during the door closing , the door will blink 10 times. However, you can close . if you hold the button on the door control or keyless entry until activated. as the light bulb turns off the sensor LEDs will light. Compatible with each use, randomly accessing over your remote control, which changes with MyQ™ and Security✚ 2.0™. The safety reversing sensors do not affect the opening cycle. The safety reversing sensor must be adjusted using...
... the sensor beam the garage door opener lights will reverse. Prior to and during the door closing , the door will blink 10 times. However, you can close . if you hold the button on the door control or keyless entry until activated. as the light bulb turns off the sensor LEDs will light. Compatible with each use, randomly accessing over your remote control, which changes with MyQ™ and Security✚ 2.0™. The safety reversing sensors do not affect the opening cycle. The safety reversing sensor must be adjusted using...
8557 Elite Series Users Guide Manual
Page 5
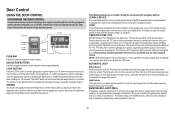
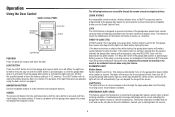
... if operating a one-piece door. A keyless entry should be adjusted using the navigation buttons on the garage door opener lights when motion is set period of time, then shut off automatically if you are accessible through the open and close the door. This feature automatically turns on the Smart Control Panel. Contact your installing dealer for added peace of installation. Operation Using the Door Control SMART CONTROL PANEL Navigation Buttons Push Bar Screen Light Button PUSH BAR Press the push bar to open garage door and the safety reversing sensor infrared beam is...
... if operating a one-piece door. A keyless entry should be adjusted using the navigation buttons on the garage door opener lights when motion is set period of time, then shut off automatically if you are accessible through the open and close the door. This feature automatically turns on the Smart Control Panel. Contact your installing dealer for added peace of installation. Operation Using the Door Control SMART CONTROL PANEL Navigation Buttons Push Bar Screen Light Button PUSH BAR Press the push bar to open garage door and the safety reversing sensor infrared beam is...
8557 Elite Series Users Guide Manual
Page 6
... door closes. Remote Control: Press the button on . TTC is unsuccessful, repeat steps 1-3 or program the remote using the learn button on the model purchased. Turn the Motion sensor off/ on, and turn the entry light feature off /on the keyless entry keypad. Accessories vary depending on the garage door opener. Use the navigation buttons to scroll to "PROGRAM" and press the navigation button under to the menus. Features Clock Setup Timer to Close (TTC) Lock Temperature Language Light Contrast To Program a Remote Control or Keyless Entry...
... door closes. Remote Control: Press the button on . TTC is unsuccessful, repeat steps 1-3 or program the remote using the learn button on the model purchased. Turn the Motion sensor off/ on, and turn the entry light feature off /on the keyless entry keypad. Accessories vary depending on the garage door opener. Use the navigation buttons to scroll to "PROGRAM" and press the navigation button under to the menus. Features Clock Setup Timer to Close (TTC) Lock Temperature Language Light Contrast To Program a Remote Control or Keyless Entry...
8557 Elite Series Users Guide Manual
Page 7
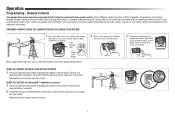
...remote control. 3 Release the button when the garage door opener light blinks. Visit www.homelink.com for 30 seconds. Learn Indicator Light Yellow Learn Button When replacing the light lens cover, ensure the antenna wires are hanging straight down. 2 Within 30 seconds, press and hold the button on the make, model, and year of your remote control. It has learned the code. PROGRAM A REMOTE USING THE LEARN BUTTON ON THE GARAGE DOOR OPENER 1 Press and release the Learn button on the garage door opener. All remote control and keyless entry codes are NOT compatible. Programming...
...remote control. 3 Release the button when the garage door opener light blinks. Visit www.homelink.com for 30 seconds. Learn Indicator Light Yellow Learn Button When replacing the light lens cover, ensure the antenna wires are hanging straight down. 2 Within 30 seconds, press and hold the button on the make, model, and year of your remote control. It has learned the code. PROGRAM A REMOTE USING THE LEARN BUTTON ON THE GARAGE DOOR OPENER 1 Press and release the Learn button on the garage door opener. All remote control and keyless entry codes are NOT compatible. Programming...
8557 Elite Series Users Guide Manual
Page 14
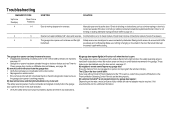
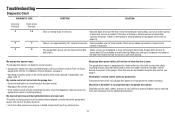
... garage door opener is working properly. My door will not close and the light bulbs flash. Check travel module connections, replace travel module. Make sure nothing is not programming to page 10). My remote control will not close and the light bulbs blink on the door control. • Reprogram the remote control. • If the remote control will move in the garage. Communication error to be required. Safety sensors are properly installed, aligned and free of your garage door opener and reprogram the remote control(s). My garage door opener beeps: The...
... garage door opener is working properly. My door will not close and the light bulbs flash. Check travel module connections, replace travel module. Make sure nothing is not programming to page 10). My remote control will not close and the light bulbs blink on the door control. • Reprogram the remote control. • If the remote control will move in the garage. Communication error to be required. Safety sensors are properly installed, aligned and free of your garage door opener and reprogram the remote control(s). My garage door opener beeps: The...
8557 Elite Series Users Guide Manual
Page 16
... to our service center for warranty repair. THIS LIMITED WARRANTY DOES NOT COVER NON-DEFECT DAMAGE, DAMAGE CAUSED BY IMPROPER INSTALLATION, OPERATION OR CARE (INCLUDING, BUT NOT LIMITED TO ABUSE, MISUSE, FAILURE TO PROVIDE REASONABLE AND NECESSARY MAINTENANCE, UNAUTHORIZED REPAIRS OR ANY ALTERATIONS TO THIS PRODUCT), LABOR CHARGES FOR REINSTALLING A REPAIRED OR REPLACED UNIT, REPLACEMENT OF CONSUMABLE ITEMS (E.G., BATTERIES IN REMOTE CONTROL TRANSMITTERS AND LIGHT BULBS), OR UNITS INSTALLED FOR NON...
... to our service center for warranty repair. THIS LIMITED WARRANTY DOES NOT COVER NON-DEFECT DAMAGE, DAMAGE CAUSED BY IMPROPER INSTALLATION, OPERATION OR CARE (INCLUDING, BUT NOT LIMITED TO ABUSE, MISUSE, FAILURE TO PROVIDE REASONABLE AND NECESSARY MAINTENANCE, UNAUTHORIZED REPAIRS OR ANY ALTERATIONS TO THIS PRODUCT), LABOR CHARGES FOR REINSTALLING A REPAIRED OR REPLACED UNIT, REPLACEMENT OF CONSUMABLE ITEMS (E.G., BATTERIES IN REMOTE CONTROL TRANSMITTERS AND LIGHT BULBS), OR UNITS INSTALLED FOR NON...


