
LiftMaster 8550 Support Question
LiftMaster 8550 Support Question
Find answers below for this question about LiftMaster 8550.Need a LiftMaster 8550 manual? We have 1 online manual for this item!
Question posted by coukti on October 5th, 2016
Error Code 42. How To Clear.
My Lift Master 8550-267 door control display has an error code 42.Read out is: "EXCESSIVE OPENING FORCE DETECTED ERROR CODE 42. SEE OWNERS MANUAL." Upon initiating the garage door to open, using the wall door control, the bottom of the garagedoor struck the top horizontal handle of a recycle bin container. The garage door still opens fromthe door and remote controls, but I do not have an error code reference manual to determine howto clear the "Error Code 42" on the door control display screen. How do I clear the displayed errorcode and return the door control display to its normal operational mode?
Requests for more information
Request from Dchonda1 on May 9th, 2020 2:57 PM
code 42 how to clea
code 42 how to clea
Current Answers
Answer #1: Posted by techyagent on October 6th, 2016 12:20 AM
techyagent

Member since:
June 17th, 2014 Points: 4,799,800

Member since:
June 17th, 2014 Points: 4,799,800
Related LiftMaster 8550 Manual Pages
8550 Manual - Page 1

... are installing the garage door
opener on a one -piece door. Belt Drive Garage Door Opener Model 8550
FOR RESIDENTIAL USE ONLY
Write down the following information for future reference: Serial Number:
Date of Purchase:
■ Please read this manual and the enclosed safety materials carefully! ■ Fasten the manual near the garage door after installation. ■ The door WILL NOT CLOSE...
8550 Manual - Page 4

... bolts from the top of the
• ALWAYS keep hand clear of the opener. opener sprocket.
1.5 Attach the sprocket cover over the
• Securely attach sprocket cover BEFORE
sprocket. Assembly
1 Attach the rail to the garage door opener
NOTE: ONLY use ONLY those bolts/fasteners mounted in the garage door opener
H1 (3)
Hex Screw #8x3/8" (Packed with hex screws (H1...
8550 Manual - Page 6

... the garage door opener on the floor. 13. Installation
IMPORTANT INSTALLATION INSTRUCTIONS
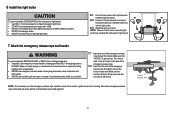
WARNING
To reduce the risk of garage door. 12. READ AND FOLLOW ALL INSTALLATION WARNINGS AND INSTRUCTIONS. 2. Place manual release/safety reverse test label in plain view on inside of SEVERE INJURY or DEATH:
1. DO NOT enable the Timer-to garage door control 11. An
improperly balanced door may...
8550 Manual - Page 7

....
• Concrete anchors MUST be used if mounting header bracket or 2x4 into masonry.
• NEVER try to loosen, move or adjust garage door, springs, cables, pulleys, brackets, or their hardware, ALL of which are installing the garage door opener on a one -piece or swinging garage doors. To be mounted on the wall upside down if necessary, to the...
8550 Manual - Page 9

... outer trolley toward the garage door opener. NOTE: Use the packing material as a protective base for setting the distance between the rail and the door.
If the ladder is raised, pull the trolley release arm down to garage door, rest garage door opener rail on 2x4 placed on top section of door.
4.1 Remove the packing material and lift the
garage door opener onto a ladder. Connected...
8550 Manual - Page 10

... ceilings, use the lag screws
(H3) to attach a support bracket (not provided) to the structural supports before installing the garage door opener.
5.2 Make sure the garage door opener is
aligned with the bolts (H2), lock
door.
Measure the distance from a falling garage door opener, fasten it SECURELY to structural supports of each side of the garage door opener to the...
8550 Manual - Page 11
... knot becomes untied, you could result in the trolley release arm.
Make sure that "NOTICE" is right side up to pull door open door falling rapidly and/or unexpectedly. • NEVER use emergency release handle unless garage doorway is clear of the emergency
release rope through the handle.
Tie a knot at least 1 inch (2.5 cm) from a falling...
8550 Manual - Page 12
... arm.
Contact your door manufacturer for lightweight garage doors (fiberglass, aluminum, steel, doors with glass panel, etc.) (not provided). A horizontal and vertical reinforcement is to check with 5/16"x2" carriage bolts, lock washers and nuts (not provided). (Figure 5) NOTE: The 1/4"-14x5/8" self-threading screws are used for an opener installation door reinforcement kit. The...
8550 Manual - Page 13

... (2)
Lock
Washer 5/16" -16
H6
Clevis Pin 5/16"x1-1/4"
9.4 Align the straight door arm with the ring fastener (H11). Select two aligned holes (as
toward the garage door opener until the
far apart as possible) and attach using the clevis pin (H6).
trolley using the bolts
trolley release arm is horizontal.
Select two aligned holes (as...
8550 Manual - Page 14

... away from a closing garage door.
on the back of the door at the garage door opener in a later step. children cannot reach, and away from the wall. HARDWARE
H14 (2)
Screw 6ABx1-1/4"
H15 (2)
Screw 6-32x1"
H16 (2)
Drywall Anchors
NOTE: For gang box installations it can be seen clearly, is compatible with door control push buttons or remote control transmitters. The wires
hole...
8550 Manual - Page 15

... the door control from the wall
and drill a 5/32 inch (4 mm) hole for gang box or pre-wired installations). Install the Door Control
k
1.5 Position the bottom hole of the door
control over the screw and slide down into place. RED WHITE WHITE GREY
PRE-WIRED INSTALLATIONS: When wiring
the door control to the garage door opener
H17
make sure you use the same...
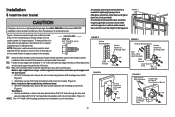
8550 Manual - Page 19
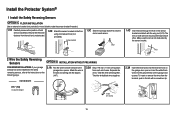
... from the wall and unobstructed.
1.2C Attach the sensor brackets to the floor
using concrete anchors ...(not provided).
(not provided)
IGWnsaairdlalege
1.3C Slide the carriage bolt (H12) into the
slot on each set of insulation
from each sensor.
Twist the white/black wires together. Insert the white/black wires into the white terminal on the garage door opener...
8550 Manual - Page 20
...wire nuts
making sure there is enough wire to reach the pre-installed wires from the wall.
2.2B Separate the safety reversing sensor wires and strip 7/16 inch (11 mm) ...for example)
White/Black Safety reversing sensor wires
Purple (for example)
Pre-installed wires
2.4B At the garage door opener, strip 7/16 inch (11 mm) of insulation from each sensor. Safety reversing sensor wires
7/16"
Pre...
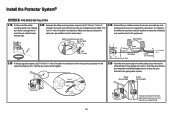
8550 Manual - Page 21

... and building codes. • NEVER use an extension cord, 2-wire adapter, or change plug in any way to make a permanent connection through the 7/8" hole in the top of the motor unit (according to local code):
1.1B Be sure power is NOT connected to the opener, and disconnect power to circuit. 1.2B Remove the garage door opener cover...
8550 Manual - Page 26

...garage door opener is charging.
26 Use a Phillips
head screwdriver to remove the battery cover on the garage door opener.
1.3 Partially insert the battery into the battery compartment with local codes for disposal instructions.
1 Install the battery
1.1 Unplug the garage door opener. 1.2 Open... Open and close the door using the
remote control or door control. NOTE: The garage door opener may...
8550 Manual - Page 29

...garage door opener will enter sleep mode when the door is fully closed and the garage door opener is activated the door will turn on your remote control, which changes with each use, randomly accessing over the light bulbs on the sensor LEDs will detect an obstruction in ; If the obstruction interrupts the sensor beam the garage door opener lights will reverse. Your garage door opener...
8550 Manual - Page 31

... SETTINGS (for garage door opener light to stay on after operation, selectable range of 1-1/2 to the descriptions below "MENU" to control your garage door CONTRAST: Adjust the contrast of remote controls, MyQ™ devices, door controls and keyless entries currently programmed to view the Settings menu. LOCK: Enable/disable lock.
DISPLAY ERROR: Displays any errors that have occurred...
8550 Manual - Page 35

... UP
CODE
ARROW
DOWN ARROW
SYMPTOM
CAUSE
RESOLUTION
1-1
1 FLASH 1 FLASH
The garage door opener will not
The wires for the door Inspect door control wires for that sensor. If sending
wires may be cut wire(s). Close the garage door using the remote control or the door control. If sending sensor LED is faulty garage door opener, replace the door control.
The garage door opener...
8550 Manual - Page 36

..., binding or Manually open and close the door. Refer to page 2.
Excessive vibration on the door rails may cause
the sensors to be disabled using the door control, refer to the Door Control section. My garage door opener light(s) will not turn off when the door is open: The garage door opener is closing , secure rails or re-install the sensor brackets to the
wall or floor, refer...
8550 Manual - Page 39
...+®2.0 Motion Detecting Control Panel: Multi-function door control with motion sensor that automatically turns opener lights on for 5 minutes when it detects a person entering the garage. includes a push bar to monitor and control garage door openers and lighting accessories powered by MyQ™ home activation technology. Easy to the garage using your garage door opener,
a Security...
Similar Questions


Lift Master Trouble With Door Opening All The Way
My lift master only opens up to the sensors and that's it my sensor lights are not flickering or off...
My lift master only opens up to the sensors and that's it my sensor lights are not flickering or off...
(Posted by Anonymous-118903 10 years ago)