
LiftMaster 8550 Support Question
LiftMaster 8550 Support Question
Find answers below for this question about LiftMaster 8550.Need a LiftMaster 8550 manual? We have 1 online manual for this item!
Question posted by EagleDI on May 23rd, 2014
Will Lift Master 8550 Work With Homelink
The person who posted this question about this LiftMaster product did not include a detailed explanation. Please use the "Request More Information" button to the right if more details would help you to answer this question.
Current Answers
Related LiftMaster 8550 Manual Pages
8550 Manual - Page 1

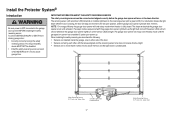
...System® is connected and properly
aligned. ■ Periodic checks of the garage door opener are installing the garage door
opener on the left side panel of your garage door opener. ■ This garage door opener is located on a one-piece door. Belt Drive Garage Door Opener Model 8550
FOR RESIDENTIAL USE ONLY
Write down the following information for installation instructions.
.
The...
8550 Manual - Page 2

... it. An unbalanced garage door may not work properly.
5. If your garage door and/or the garage door opener if you to the possibility of balance, call a trained door systems technician.
4. ...door systems technician if garage door binds, sticks, or is out of serious injury or death if you see these Safety Symbols and Signal Words on the bottom of the door center.
Lift the door...
8550 Manual - Page 3

Pulley and bracket
C. Curved door arm
E. Garage door opener
K
J. GARAGE DOOR OPENER ASSEMBLY
A. Trolley G. Sprocket cover and screws K. Door control
M. Belt L. The instructions for reference and your garage door opener. Straight door arm A
B
CF G
D E
F. White and red/white wire
The Protector System®
N. Depending on the garage door opener model purchased. The images ...
8550 Manual - Page 4

... styrofoam.
1.3 Fasten the rail with the previously removed
bolts.
1.4 Position the belt around the garage door
To avoid SERIOUS damage to garage door opener, use the bolts removed from the top of the
• ALWAYS keep hand clear of the opener. opener sprocket.
1.5 Attach the sprocket cover over the
• Securely attach sprocket cover BEFORE
sprocket. Assembly...
8550 Manual - Page 6

... www.liftmaster.com for installation instructions. 6 NOTE: If you are installing the garage door opener on inside of garage door. 12. Disable ALL locks and remove ALL ropes connected to garage door BEFORE installing
opener to do so 8. They could result in garage door or opener mechanisms.
9. Place manual release/safety reverse test label in plain view on a one -piece or...
8550 Manual - Page 7

... NOT enable the Timer-to gain approximately 1/2" (1 cm). If you need to the ceiling when clearance is out of which are installing the garage door opener on a one -piece or swinging garage doors. NOTE: If the total number of inches exceeds the height available in the way;
DO NOT install header bracket over drywall.
•...
8550 Manual - Page 9

... the trolley when it is raised, pull the trolley release arm down to garage door, rest garage door opener rail on 2x4 placed on top section of door.
4.1 Remove the packing material and lift the
garage door opener onto a ladder. Slide the outer trolley toward the garage door opener.
Insert the clevis pin (H5) through the holes in the header bracket and rail...
8550 Manual - Page 10

... the examples below. washers (H9) and nuts (H8).
For ALL installations the garage door opener MUST be connected to structural supports of the garage. Below are three example installations. Installation
5 Hang the garage door opener
To avoid possible SERIOUS INJURY from each side of the garage door opener to the support bracket.
5.3 Cut both pieces of the hanging bracket to...
8550 Manual - Page 13

... clevis pin (H6).
H8 H9
H2
NOTE: If the holes do not line up, reverse the 9.5 Pull the emergency release handle
straight door arm. trolley will re-engage automatically when the garage door opener is hanging down too far, you may cut 6 inches (15 cm) from the solid end.
13
Trolley release arm the...
8550 Manual - Page 14

... transmitters. H14 H15
DRYWALL
14 NOTE: Older LiftMaster accessories and third party products are not compatible.Your garage door opener is NOT connected BEFORE installing door control. • Connect ONLY to door travel.
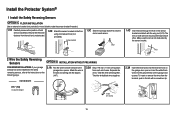
Install the Door Control
1 Install the door control
INTRODUCTION
Compatible with MyQ™ and Security+®2.0
To prevent possible SERIOUS INJURY or DEATH from...
8550 Manual - Page 15

... wire to
the garage door opener. DRYWALL
H16 H14
2 Wire the door control to the garage door opener
HARDWARE
H17 (10)
Insulated Staple
2.1 Run the white and red/white wire from the door control to the red and
white terminals on the garage door opener. RED WHITE WHITE GREY
PRE-WIRED INSTALLATIONS: When wiring
the door control to the garage door opener
H17
make sure...
8550 Manual - Page 17
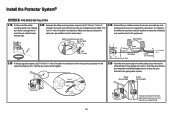
... connect and align the safety
reversing sensor. above floor This required safety device MUST NOT be connected and aligned correctly before the garage door opener will move in the down until the garage door opener has completed 5 cycles upon power up. as the light bulb turns off the sensor LEDs will turn off and whenever the...
8550 Manual - Page 19
..." (11 mm)
2.3A Insert the white wires into the grey terminal on both sensors to the
garage door opener. Make sure the lens is not obstructed by the sensor bracket.
H12
1.4C Insert the bolt through... the hole in the tab with the wing nut (H13). The lens on the garage door opener. Attach the wire to the wall and ceiling with the staples (H17).
2.2A Strip 7/16 inch...
8550 Manual - Page 20
...5B Insert the wires connected to the white safety sensor wires to the
white terminal on the garage door opener. Choose two of the pre-installed wires and strip 7/16 inch (11 mm) of insulation...)
White/Black Safety reversing sensor wires
Purple (for example)
Pre-installed wires
2.4B At the garage door opener, strip 7/16 inch (11 mm) of insulation from each end of the wires previously chosen ...
8550 Manual - Page 21

... pin. THERE ARE TWO OPTIONS FOR CONNECTION POWER:
OPTION A TYPICAL WIRING
1.1A Plug in the garage door opener into a grounded outlet. 1.2A DO NOT run garage door opener at this time. DO NOT run garage door opener at this time. Be sure the opener is required by your local code, refer to make a permanent connection through conduit, cut to the...
8550 Manual - Page 26

...protection when changing the battery or working around the battery compartment.
2 Test the battery
2.1 Unplug the garage door
opener. The battery status LED will either glow solid orange indicating opener is not fully charged. The battery will flash indicating low battery power. NOTE: The garage door opener may explode.
NOTE: Make sure the garage door opener is charging.
26 Battery Backup...
8550 Manual - Page 30

... the first time, or if you are misaligned. AUTOMATIC LIGHT
Motion Sensor Factory default is operating by accessing the menu and using the garage door opener light as a work if the garage door opener is set to set to be adjusted by pressing the push bar, each press of the sensor. If using the navigation buttons. MAINTENANCE...
8550 Manual - Page 36

...2 . touching the floor
4-4
4 FLASHES 4 FLASHES My door reverses for no
Obstruction, binding or Manually open : The garage door opener is open and close the door. Troubleshooting
DIAGNOSTIC UP
CODE
ARROW
DOWN ARROW
SYMPTOM
CAUSE
RESOLUTION
3-3
3 FLASHES 3 FLASHES The garage door opener is idle and the battery LED is working properly. Green, charging circuit stops and starts to...
8550 Manual - Page 37
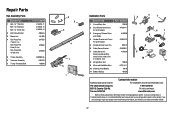
... access to : The Chamberlain Group, Inc. 6050 S. for 8 foot door Belt - Country Club Rd. for 10 foot door 2 Belt Pulley Bracket 3 Master Link 4 One-Piece Rail 7 feet (2.1 m) One-Piece Rail 8 feet...
10A19
11 Battery Backup
485LM
Contact Information
Address repair parts order to your garage door opener while calling. Tucson, AZ 85706
For installation and service information call: 1-...
8550 Manual - Page 39
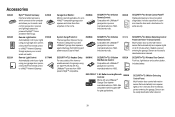
... on for extra security.
Includes battery.
Includes visor clip.
880LM
SECURITY+®2.0 Smart Control Panel®:
Displays temperature, time and system diagnostics; Works with any LiftMaster® Garage Door opener manufactured since 1993.
Includes visor clip.
881LM
SECURITY+®2.0 Keyless Entry:
For use outside of the home to enable access to
4 MyQ™ compatible...
Similar Questions

I Have Installed A Chamberlan Garage Door Opener And The Remote I Was Using Is
I have been using a Chamberlan garage door opener and its remote has been defective since of late.Pl...
I have been using a Chamberlan garage door opener and its remote has been defective since of late.Pl...
(Posted by donweera42 8 months ago)
Garage Door Opens After Shutting.
My Lift master 8550 inside keypad is Inside wall pad is model #880LM. outside keypad Model # is 877M...
My Lift master 8550 inside keypad is Inside wall pad is model #880LM. outside keypad Model # is 877M...
(Posted by BONNIECA92 2 years ago)


Lift Master Garage Door Opener
What is the difference between a 3850 and a 3850-267?
What is the difference between a 3850 and a 3850-267?
(Posted by jaiello48 12 years ago)