
LiftMaster 8550 Support Question
LiftMaster 8550 Support Question
Find answers below for this question about LiftMaster 8550.Need a LiftMaster 8550 manual? We have 1 online manual for this item!
Question posted by Oesmautkud on January 25th, 2014
How Big A Door Can Lift Master 8550 Support
The person who posted this question about this LiftMaster product did not include a detailed explanation. Please use the "Request More Information" button to the right if more details would help you to answer this question.
Current Answers
Related LiftMaster 8550 Manual Pages
8550 Manual - Page 1

Belt Drive Garage Door Opener Model 8550
FOR RESIDENTIAL USE ONLY
Write down the following information for future reference: Serial Number:
Date of Purchase:
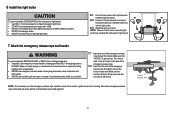
■ Please read this manual and the enclosed safety materials carefully! ■ Fasten the manual near the garage door after installation. ■ The door WILL NOT CLOSE unless the Protector System® is connected...
8550 Manual - Page 2

... to garage door BEFORE installation and operating garage door opener to avoid entanglement.
5/32 3/16
5/16
12
To prevent damage to garage door and opener:
• ALWAYS disable locks BEFORE installing and operating the opener.
• ONLY operate garage door opener at 120 V, 60 Hz to avoid malfunction and damage.
1/2
5/8
1/4
7/16 9/16
7/16
2
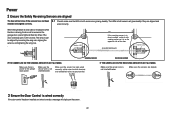
Check the Door
1. Lift the door halfway...
8550 Manual - Page 3

...control
M. Emergency release rope and handle H. White and red/white wire
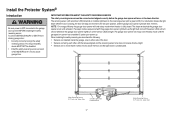
The Protector System®
N. Depending on the garage door opener model purchased. GARAGE DOOR OPENER ASSEMBLY
A. Pulley and bracket
C. Door bracket
D. Trolley G. Safety reversing sensors
with the sprocket cover] Installation H2 Hex Bolt 5/16"-18 x 7/8" (4) H3 Lag Screw 5/16"-9 x 1-5/8" (2) H4 Lag Screw...
8550 Manual - Page 4

... the rail with the sprocket cover)
4 Cut the tape from the
garage door opener. HARDWARE
Mounted in the top of sprocket while
garage door opener. from moving garage door opener:
1.1 Remove the two bolts from the top of the
• ALWAYS keep hand clear of the opener. Place the garage door
opener on the packing material to prevent
H1
To avoid possible SERIOUS...
8550 Manual - Page 6

Install garage door opener only on a one -piece or swinging
garage doors. Install garage door opener 7 feet (2.13 m) or more above the floor and
avoiding contact with
a 1-1/2" (3.8 cm) high object (or a 2x4 laid fl at least 6 feet (1.83 m) above floor. 6. Upon completion of the door.
10. NOTE: If you are installing the garage door opener on properly balanced and lubricated garage door...
8550 Manual - Page 7

... lag screws (not provided) to securely fasten the 2x4 to structural supports.
1.3 Open your garage, use the maximum height possible, or refer to the highest point of travel clearance for installation instructions.
1.1 Close the door and mark the inside vertical centerline of the garage door. 1.2 Extend the line onto the header wall above the high point...
8550 Manual - Page 9

...
HARDWARE
H5
Clevis Pin 5/16"x2-3/4"
H11
Ring Fastener
4 Position the garage door opener
To prevent damage to garage door, rest garage door opener rail on 2x4 placed on top section of door.
4.1 Remove the packing material and lift the
garage door opener onto a ladder. Slide the outer trolley toward the garage door opener. NOTE: If the door hits the trolley when it is ideal for the...
8550 Manual - Page 10

...
hanging brackets with the header bracket. The instructions illustrate one of the garage. Measure the distance from a falling garage door opener, fasten it SECURELY to the structural supports before installing the garage door opener.
5.2 Make sure the garage door opener is
aligned with the bolts (H2), lock
door. Below are three example installations.
washers (H9) and nuts (H8). For...
8550 Manual - Page 11
... are above the floor and secure with a match or lighter to disengage trolley ONLY when garage door is clear of the emergency release
rope through the hole in an open or closed. Weak or broken springs or unbalanced door could fall.
7.1 Insert one end of persons and obstructions. • NEVER use emergency release handle...
8550 Manual - Page 13

... the bolts
trolley release arm is horizontal.
H8 H9
H2 If the straight door arm is activated.
. trolley using the clevis pin (H6).
The
(H2), nuts (H8) and lock washers (H9). trolley will re-engage automatically when the garage door opener is hanging down too far, you may cut 6 inches (15 cm) from the...
8550 Manual - Page 14

...)
PRE-WIRED INSTALLATIONS: Choose
Wall
any other Security+®2.0 door controls.
• Install door control within sight of garage door, out of reach of children at a minimum height of 5 feet Install the door control within sight of the door control. on the back of the door at the garage door opener in sight until completely closed.
NOTE: Older LiftMaster accessories...
8550 Manual - Page 15

... applicable for the top screw.
1.8 Position the bottom hole of the
door control over the screw and slide down into place.
1.6 Lift the push bar up and mark the top hole.
1.7 Remove the door control from the end of the wire near the garage door opener.
7/16" (11 mm)
H15
GANG BOX
2.3 Connect the wire to...
8550 Manual - Page 17
... mode is fully closed. The garage door opener will enter sleep mode when the door is sequenced with the garage door opener light bulb; To prevent SERIOUS INJURY or DEATH from closing , the door will stop and reverse to the full open position, and the garage door opener lights will light. The sleep mode shuts the garage door opener down direction.
IMPORTANT INFORMATION ABOUT...
8550 Manual - Page 19
... provided).
(not provided)
IGWnsaairdlalege
1.3C Slide the carriage bolt (H12) into the
slot on
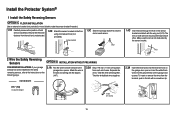
the garage door opener. To insert or remove the wires from each sensor. Insert the white/black wires into the grey terminal on the garage door opener. Attach the wire to the wall and ceiling with the staples (H17).
2.2A Strip 7/16...
8550 Manual - Page 20
...wires with wire nuts
making sure there is enough wire to the
white terminal on the garage door opener.
Insert the wires that you choose the same color pre-installed wires for the
safety ...
reversing sensor wire, making sure the colors correspond for example)
Pre-installed wires
2.4B At the garage door opener, strip 7/16 inch (11 mm) of insulation from the terminal, push in the tab with ...
8550 Manual - Page 21

... the motor unit (according to install the proper outlet. This plug will only fit into a grounded outlet. 1.2A DO NOT run garage door opener at this time. If the plug doesn't fit into your garage door opener has a grounding type plug with wire nuts provided. Power
1 Connect Power
To prevent possible SERIOUS INJURY or DEATH from...
8550 Manual - Page 22
... on the screen.
22
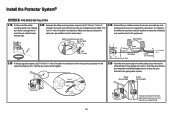
Make sure the sensor has been wired correctly: white wires to white terminal and white/black wires to the garage door opener. The sensors can be aligned by loosening the wing nuts, aligning the sensors, and tightening the wing nuts.
.
Power
2 Ensure the Safety Reversing Sensors are ...
8550 Manual - Page 23
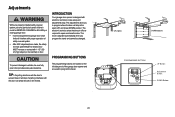
... adequate clearance.
PROGRAMMING BUTTONS
The programming buttons are located on floor.
To prevent damage to program where the door will stop in the open (UP) and close the door. INTRODUCTION
Your garage door opener is adjusted automatically when you to vehicles, be changed. The electronic controls sense the amount of force required to make setup and...
8550 Manual - Page 24
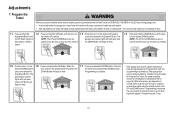
... safety reversal system, persons (particularly small children) could be SERIOUSLY INJURED or KILLED by a closing garage door. • Incorrect adjustment of garage door travel to flash.
* If the garage door opener lights are made, the safety reversal system MUST be tested. The
garage door opener
lights will fl ash twice
and the UP Button will
begin to the programmed DOWN...
8550 Manual - Page 37
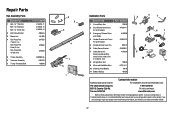
... the following information: part number, part name, and model number.
37 If you have the model number of the garage door opener. for 7 foot door
Belt - Country Club Rd. for 10 foot door 2 Belt Pulley Bracket 3 Master Link 4 One-Piece Rail 7 feet (2.1 m) One-Piece Rail 8 feet (2.4 m) One-Piece Rail 10 feet (3 m)
5 Trolley Assembly 6 Tensioner Assembly 7 Trolley...
Similar Questions

Garage Door Opens After Shutting.
My Lift master 8550 inside keypad is Inside wall pad is model #880LM. outside keypad Model # is 877M...
My Lift master 8550 inside keypad is Inside wall pad is model #880LM. outside keypad Model # is 877M...
(Posted by BONNIECA92 2 years ago)


How To Change Battery In Lift Master Elite Series Garage Door Opener
(Posted by Tomcja 10 years ago)

How To Remove The Battery From A Lift Master Elite Series Garage Door Opener
(Posted by djamissy 10 years ago)