
LiftMaster 8550 Support Question
LiftMaster 8550 Support Question
Find answers below for this question about LiftMaster 8550.Need a LiftMaster 8550 manual? We have 1 online manual for this item!
Question posted by jorichal on September 25th, 2014
How To Set Keypad On Lift Master Modele 8550
The person who posted this question about this LiftMaster product did not include a detailed explanation. Please use the "Request More Information" button to the right if more details would help you to answer this question.
Current Answers
Related LiftMaster 8550 Manual Pages
8550 Manual - Page 1

Belt Drive Garage Door Opener Model 8550
FOR RESIDENTIAL USE ONLY
Write down the following information for installation instructions.
.
www.liftmaster.com The Chamberlain Group, Inc.
845 Larch Avenue Elmhurst, Illinois 60126-1196
Contents
BELT DRIVE GARAGE DOOR OPENER.. 1 PREPARATION 2 ASSEMBLY 4 INSTALLATION 6-13 INSTALL THE DOOR CONTROL.....14-16 INSTALL THE PROTECTOR SYSTEM 17-20 ...
8550 Manual - Page 2

... malfunction and damage.
1/2
5/8
1/4
7/16 9/16
7/16
2
Lift the door halfway up. Any gap between the floor and the bottom of the header bracket, it should be installed within 4 feet (1.2 m) to the garage door.
2. Raise and lower the door to check for binding or sticking. If your garage door and/or the garage door opener if you see these Safety Symbols...
8550 Manual - Page 3

...1-1/4" (2) H15 Screw 6-32 x 1" (2) H16 Drywall Anchors (2) H17 Insulated Staples (10) Depending on the garage door opener model purchased. Pulley and bracket
C. Curved door arm
E. Door control
M. The images throughout this manuals are not included in this manual. Straight door arm A
B
CF G
D E
F. Trolley G. Emergency release rope and handle H. Sprocket cover and screws...
8550 Manual - Page 4

... while
garage door opener. Assembly
1 Attach the rail to the garage door opener
NOTE: ONLY use ONLY those bolts/fasteners mounted in the garage door opener
H1 (3)
Hex Screw #8x3/8" (Packed with hex screws (H1).
. Place the garage door
opener on the packing material to prevent
H1
To avoid possible SERIOUS INJURY to garage door opener, use the bolts removed from the
garage door opener...
8550 Manual - Page 6

... of SEVERE INJURY or DEATH:
1. READ AND FOLLOW ALL INSTALLATION WARNINGS AND INSTRUCTIONS. 2. Install garage door opener only on a one -piece or swinging
garage doors. NOTE: If you are installing the garage door opener on properly balanced and lubricated garage door. Installation
IMPORTANT INSTALLATION INSTRUCTIONS
WARNING
To reduce the risk of installation, test safety reversal system...
8550 Manual - Page 7

... above the high point. or you need to loosen, move or adjust garage door, springs, cables, pulleys, brackets, or their hardware, ALL of which are installing the garage door opener on a one -piece or swinging garage doors. Header Wall
2" (5 cm)
Track
Highest Point of Travel
Door
Unfinished Ceiling
Header Wall 2x4
Vertical Centerline of balance. DO NOT install...
8550 Manual - Page 9

... is raised, pull the trolley release arm down to garage door, rest garage door opener rail on 2x4 placed on top section of door.
4.1 Remove the packing material and lift the
garage door opener onto a ladder. Connected Disconnected
9 H11 H5
HARDWARE
H5
Clevis Pin 5/16"x2-3/4"
H11
Ring Fastener
4 Position the garage door opener
To prevent damage to disconnect the inner and outer...
8550 Manual - Page 10

...
H9 (2)
Lock Washer 5/16"-16
H8 (2)
Nut 5/16"-18
H2 (2)
Hex Bolt 5/16"- 18x7/8"
Hanging the garage door opener will vary depending on your garage. Installation
5 Hang the garage door opener
To avoid possible SERIOUS INJURY from each side of the garage door opener to the support bracket.
5.3 Cut both pieces of the hanging bracket to
required lengths.
(not provided...
8550 Manual - Page 13

... fastener (H11). H8 H9
H2 If the straight door arm is activated.
. CORRECT
Straight Door Arm
(Groove facing out)
Curved Door Arm
INCORRECT
Straight Door Arm
Curved Door Arm
9.1 Close the door. The
(H2), nuts (H8) and lock washers (H9).
trolley will re-engage automatically when the garage door opener is hanging down too far, you may cut 6 inches...
8550 Manual - Page 14

...the correct wires are connected at the garage door opener in a later step.
Install the Door Control
1 Install the door control
INTRODUCTION
Compatible with door control push buttons or remote control ... installations it can be seen clearly, is properly adjusted, and there are not compatible.Your garage door opener is compatible with up to 2 Smart Control Panels or 4 of any two wires to...
8550 Manual - Page 15

...the wire near the garage door opener.
7/16" (11 mm)
H15
GANG BOX
2.3 Connect the wire to the red and
white terminals on the garage door opener. Attach the wire to
the garage door opener. Do not pierce ... bottom hole of the
door control over the screw and slide down into place.
1.6 Lift the push bar up and mark the top hole.
1.7 Remove the door control from the door control to the wall and...
8550 Manual - Page 17
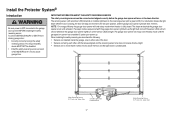
... not receive direct sunlight. • Sensors are facing each other with the garage door opener light bulb; The garage door opener will light. as the light bulb turns off the sensor LEDs will turn off and whenever the garage door opener lights turn on either side of the door. • Sensors are no more than 6" (15 cm) above the floor...
8550 Manual - Page 19
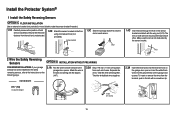
...Insulated Staple
7/16" (11 mm)
2.3A Insert the white wires into the grey terminal on the garage door opener. RED WHITE WHITE GREY
19
To insert or remove the wires from the wall and unobstructed.
1....
slot on the following page.
2.1A Run the wire from both sensors should point toward each set of both
sensor brackets so they will be the same distance from the terminal, push in the...
8550 Manual - Page 21

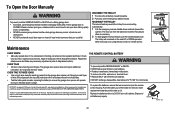
... in the top of the motor unit (according to local code):
1.1B Be sure power is NOT connected to the opener, and disconnect power to circuit. 1.2B Remove the garage door opener cover and set aside. 1.3B Remove the attached green ground terminal. 1.4B Cut black and white wires and strip away 1/2" (1 cm) of electric...
8550 Manual - Page 30

... ALERT (MAS)
This feature assists the homeowner in ensuring the garage door opener system stays in need of closing the door.
LOCK
The LOCK feature is broken. TTC is to be set to off . The garage door opener will beep and the lights will turn the garage door opener lights on . A keyless entry should be the primary method of maintenance. AUTOMATIC...
8550 Manual - Page 31

... to stay on after operation, selectable range of remote controls, MyQ™ devices, door controls and keyless entries currently programmed to -Close feature off/on .
LANGUAGE: Select a language. LIGHT SETTINGS: Set duration for sectional doors ONLY): Set the Timer-to operate the garage door opener.
SERVICE
Press and hold the second navigation button, then press the LIGHT button...
8550 Manual - Page 32

... on the remote control that you wish to operate your choice on the keyless entry keypad. PIN
PROGRAM A REMOTE CONTROL USING THE LEARN BUTTON
1 Locate the Learn button on the side of your garage door.
Remote Controls
Your garage door opener has been programmed at the factory to operate with the additional remote controls or visit...
8550 Manual - Page 34
If it is swallowed, immediately notify doctor. The garage door opener does not require additional lubrication. Reapply a small layer of white lithium grease to the top and underside of the holder for changing the code setting or replacing the batteryTHEREARENO OTHER USER SERVICEABLEPARTS. Replace the batteries with FCC Standards for Home or office use.
Tested...
8550 Manual - Page 36

... rails or re-install the sensor brackets to the
wall or floor, refer to set to a custom time, press the ON button on the door control detects movement in the diagnostic codes:
My garage door opener beeps every 30 seconds: Refer to be disabled using the door control, refer to ensure
the garage door opener is open and close the...
8550 Manual - Page 37
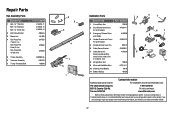
...Assembly Parts
DESCRIPTION 1 Belt - for 10 foot door 2 Belt Pulley Bracket 3 Master Link 4 One-Piece Rail 7 feet (2.1 ...door
Belt - Country Club Rd. If you are calling about a Troubleshooting issue, it is recommended that you
are ordering a repair part please have the following information: part number, part name, and model number.
37 If you have the model number of the garage door opener...
Similar Questions

Garage Door Opens After Shutting.
My Lift master 8550 inside keypad is Inside wall pad is model #880LM. outside keypad Model # is 877M...
My Lift master 8550 inside keypad is Inside wall pad is model #880LM. outside keypad Model # is 877M...
(Posted by BONNIECA92 2 years ago)


How To Change Battery In Lift Master Elite Series Garage Door Opener
(Posted by Tomcja 10 years ago)
Where To Buy 485lm Battery For Lift Master Elite Series Garage Door Opener
(Posted by erjosham 10 years ago)