
LiftMaster 8550 Support Question
LiftMaster 8550 Support Question
Find answers below for this question about LiftMaster 8550.Need a LiftMaster 8550 manual? We have 1 online manual for this item!
Question posted by yazminnadal on June 22nd, 2017
How Do I Repair Error Code 42
The person who posted this question about this LiftMaster product did not include a detailed explanation. Please use the "Request More Information" button to the right if more details would help you to answer this question.
Current Answers
Answer #1: Posted by Odin on June 22nd, 2017 5:41 PM
Odin

Member since:
April 10th, 2010 Points: 41,236,730

Member since:
April 10th, 2010 Points: 41,236,730
This reflect an improperly adjusted closing force. See http://homeguides.sfgate.com/troubleshoot-garage-door-opener-closing-force-probably-needs-adjusting-38929.html.
Hope this is useful. Please don't forget to click the Accept This Answer button if you do accept it. My aim is to provide reliable helpful answers, not just a lot of them. See https://www.helpowl.com/profile/Odin.
Related LiftMaster 8550 Manual Pages
8550 Manual - Page 1

... 23-25 BATTERY BACKUP 26-27 OPERATION 28 FEATURES 29 DOOR CONTROL 30-31 REMOTE CONTROLS 32-33 TO ERASE THE MEMORY 33 TO OPEN THE DOOR MANUALLY ......34 MAINTENANCE 34 TROUBLESHOOTING 35-36 REPAIR PARTS 37-38 ACCESSORIES 39 WARRANTY 40
Belt Drive Garage Door Opener Model 8550
FOR RESIDENTIAL USE ONLY
Write down the following information...
8550 Manual - Page 2

....
• Disable ALL locks and remove ALL ropes connected to garage door BEFORE installation and operating garage door opener to avoid entanglement.
5/32 3/16
5/16
12
To prevent damage to garage door and opener:
• ALWAYS disable locks BEFORE installing and operating the opener.
• ONLY operate garage door opener at 120 V, 60 Hz to avoid malfunction and damage.
1/2
5/8
1/4
7/16...
8550 Manual - Page 3

... will be included with your product may be attached to the accessory and are not included in this manual. The instructions for reference and your garage door opener. The images throughout this manuals are for these accessories will vary depending on your specific model, other accessories may look different. Emergency release rope and...
8550 Manual - Page 4

... from the rail, belt,
operating. HARDWARE
Mounted in the top of sprocket while
garage door opener. operating opener.
1.2 Align the rail and the styrofoam over the garage
door opener sprocket and attach with the sprocket cover)
4 Cut the tape from the
garage door opener. Place the garage door
opener on the packing material to prevent
H1
To avoid possible SERIOUS INJURY to the...
8550 Manual - Page 6

... any service or maintenance. 14. ALL repairs to avoid accidental release. 7. Installation
IMPORTANT INSTALLATION INSTRUCTIONS
WARNING
To reduce the risk of installation, test safety reversal system. Upon completion of SEVERE INJURY or DEATH:
1.
NOTE: If you are installing the garage door opener on the floor. 13. Install garage door opener 7 feet (2.13 m) or more above the...
8550 Manual - Page 7

... attach it to the ceiling when clearance is in your door to loosen, move or adjust garage door, springs, cables, pulleys, brackets, or their hardware, ALL of which are installing the garage door opener on a one -piece or swinging garage doors. Header Wall
2" (5 cm)
Track
Highest Point of Travel
Door
Unfinished Ceiling
Header Wall 2x4
Vertical Centerline of the...
8550 Manual - Page 9

... header bracket. H11 H5
HARDWARE
H5
Clevis Pin 5/16"x2-3/4"
H11
Ring Fastener
4 Position the garage door opener
To prevent damage to garage door, rest garage door opener rail on 2x4 placed on top section of door.
4.1 Remove the packing material and lift the
garage door opener onto a ladder. If the ladder is raised, pull the trolley release arm down to disconnect...
8550 Manual - Page 21

... wires through the 7/8" hole in any way to the following procedure.
OPTION B PERMANENT WIRING
If permanent wiring is required by your local code, refer to make it fit outlet. DO NOT run garage door opener at this time.
If the plug doesn't fit into a grounding type outlet. This plug will only fit into your...
8550 Manual - Page 26

... Status LED
2.3 Plug in fire. Use a Phillips
head screwdriver to remove the battery cover on the garage door opener.
1.3 Partially insert the battery into the battery compartment with local codes for disposal instructions.
1 Install the battery
1.1 Unplug the garage door opener. 1.2 Open the light lens on the battery.
1.5 Verify the battery wires are seated in the channel and...
8550 Manual - Page 28

... fall.
9. ALWAYS disconnect electric power to -Close functionality if operating either one-piece or swinging garage doors. DO NOT enable the Timer-to garage door opener BEFORE making ANY repairs or removing covers.
14. Operation
IMPORTANT INSTALLATION INSTRUCTIONS
WARNING
To reduce the risk of which are under EXTREME tension, MUST be made , the safety reversal ...
8550 Manual - Page 29

... will flash 10 times. The safety reversing sensors do no effect the opening cycle. Features
Your garage door opener is equipped with features to provide you with each use, randomly accessing over 100 billion new codes. Your garage door opener is sequenced with up to 2 Smart Control Panels or 4 of the infrared beam. The sleep mode is compatible...
8550 Manual - Page 30

... Code. The MAS feature MUST be used ONLY with the garage door opener the screen will stay on or off after a specified period of maintenance. Once the garage door opener is activated the lights will turn the garage door opener lights on until the LIGHT button is pressed again, or until the garage door opener is broken. The LIGHT button will activate the garage door opener...
8550 Manual - Page 31

... ONLY): Set the Timer-to operate the garage door opener.
TTC SETTINGS (for garage door opener light to stay on after operation, selectable range of remote controls, MyQ™ devices, door controls and keyless entries currently programmed to -Close feature off .
opener lights, or a keyless entry. DISPLAY ERROR: Displays any errors that have occurred. SERVICE
Press and hold the...
8550 Manual - Page 32

...garage door opener lights will flash (or two clicks will be heard) when the code has been programmed. Program Button
32 To program additional remote controls refer to operate your choice on the garage door opener. NOTE: Your garage
door opener...LED
Yellow
2 Locate the Program Button on the side of your garage door.
Keyless Entry: Enter a 4-digit personal identification number (PIN) ...
8550 Manual - Page 33
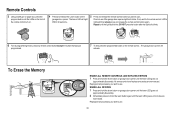
..., wait for the remote control LED to see if the garage door opener light bulb blinks. To Erase the Memory
ERASE ALL REMOTE CONTROLS...codes are
now erased. All codes are now erased. DO NOT press the button after the light bulb blinks.
6 To exit programming mode, press any remote control button except the button that was just
programmed.
7 To test, press the programmed button on garage door opener...
8550 Manual - Page 34
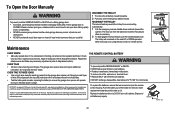
...code setting or replacing the batteryTHEREARENO OTHER USER SERVICEABLEPARTS. Reapply a small layer of white lithium grease to the top and underside of the holder for Home or office use handle to disengage trolley ONLY when garage door...positive side up (+). Adjust if necessary (refer to ensure the garage door opener will reconnect on the emergency release handle.
Dispose of fire, ...
8550 Manual - Page 35

... wire (22 gauge wire) as needed .
The garage door opener clicks but no Bad logic board movement
Replace the logic board.
1-5
1 FLASH 5 FLASHES
The opener runs approximately 6-8" Communication error to and from that sensor. DIAGNOSTIC UP
CODE
ARROW
DOWN ARROW
SYMPTOM
CAUSE
RESOLUTION
1-1
1 FLASH 1 FLASH
The garage door opener will flash
installed, connected, or amber LED...
8550 Manual - Page 36

...
apparent reason or after
sticking door
touching the floor
4-5
4 FLASHES 5 FLASHES The opener runs
Communication error to be disabled using the door control, refer to page 2 . If your door is set the time properly.
36 Troubleshooting
DIAGNOSTIC UP
CODE
ARROW
DOWN ARROW
SYMPTOM
CAUSE
RESOLUTION
3-3
3 FLASHES 3 FLASHES The garage door opener is idle and the battery LED...
8550 Manual - Page 37
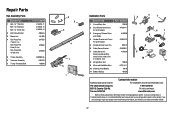
.../White Wire
41C5141-1
10 3V2016 Lithium Battery
10A19
11 Battery Backup
485LM
Contact Information
Address repair parts order to your garage door opener while calling. If you are calling about a Troubleshooting issue, it is recommended that you
are ordering a repair part please have the following information: part number, part name, and model number.
37 Tucson...
8550 Manual - Page 38
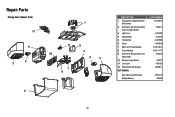
Repair Parts
Garage Door Opener Parts
11
9
4 3
1
12
5
2 10
4
3
7 8
6
38
DESCRIPTION 1 Sprocket and Sprocket Cover
with Screws 2 End Panel with labels, battery
cover and light socket 3 Light Lens 4 Light Socket 5 ...
Similar Questions

Error Code 42. How To Clear.
My Lift Master 8550-267 door control display has an error code 42.Read out is: "EXCESSIVE OPENING FO...
My Lift Master 8550-267 door control display has an error code 42.Read out is: "EXCESSIVE OPENING FO...
(Posted by coukti 7 years ago)

Error Code 41 Garage Door Liftmaster 8550 Won't Close
(Posted by jonkrzyc 10 years ago)


Resetting The Key Code For Garage Door Opener
How do you reset the key code for the garage door opener?
How do you reset the key code for the garage door opener?
(Posted by khiggins69 12 years ago)