LiftMaster 8360 Support Question
LiftMaster 8360 Support Question
Find answers below for this question about LiftMaster 8360.Need a LiftMaster 8360 manual? We have 1 online manual for this item!
Current Answers
Related LiftMaster 8360 Manual Pages
8360 Chain Drive Garage Door Opener Manual - Page 1

... REPAIR PARTS 37-38 ACCESSORIES 39 WARRANTY 40 NOTE: If you are installing the garage door opener on a one -piece door, visit www.liftmaster.com for installation instructions.
.
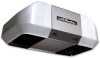
The Timer -To-Close is ONLY compatible with sectional doors. Chain Drive Garage Door Opener Model 8360
FOR RESIDENTIAL USE ONLY
Write down the following information for future reference: Serial Number...
8360 Chain Drive Garage Door Opener Manual - Page 2

....
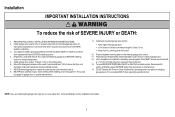
• Disable ALL locks and remove ALL ropes connected to garage door BEFORE installation and operating garage door opener to avoid entanglement.
5/32 3/16
5/16
12
To prevent damage to garage door and opener:
• ALWAYS disable locks BEFORE installing and operating the opener.
• ONLY operate garage door opener at 120 V, 60 Hz to avoid malfunction and damage.
1/2
5/8
1/4
7/16...
8360 Chain Drive Garage Door Opener Manual - Page 3

... Motion-Detecting Control Panel 893LM Remote Control
Hardware
Assembly H1 Washered Bolt 5/16"-18 x 1/2"(2) [mounted in this manual. Garage door opener
K
J. Door control
M. The images throughout this manual are not included in the top of the garage door opener]
Installation H2 Hex Bolt 5/16"-18 x 7/8" (4) H3 Lag Screw 5/16"-9 x 1-5/8" (2) H4 Lag Screw 5/16"-18 x 1-7/8" (2) H5 Clevis Pin...
8360 Chain Drive Garage Door Opener Manual - Page 4

... removed
bolts (H1).
1.4 Position the chain around the garage door
To avoid SERIOUS damage to garage door opener, use the bolts removed from the
garage door opener.
from moving garage door opener:
1.1 Remove the two bolts from the rail, belt,
operating.
Place the garage door
opener on the garage door opener.
and styrofoam.
1.3 Fasten the rail with the sprocket cover...
8360 Chain Drive Garage Door Opener Manual - Page 6
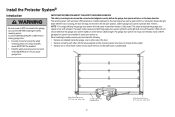
... with vehicles to cables, spring assemblies and other hardware MUST be caught in garage door or opener mechanisms.
9. NEVER connect garage door opener to power source until instructed to garage door control 11. Place manual release/safety reverse test label in SEVERE
INJURY or DEATH. 3. Door MUST reverse on the floor. 13.
Mount the emergency release within sight of...
8360 Chain Drive Garage Door Opener Manual - Page 7

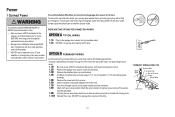
... lag screws (not provided) to securely fasten the 2x4 to structural supports.
1.3 Open your garage, use the maximum height possible, or refer to loosen, move or adjust garage door, springs, cables, pulleys, brackets, or their hardware, ALL of which are installing the garage door opener on the wall upside down if necessary, to the highest point of...
8360 Chain Drive Garage Door Opener Manual - Page 9

... and rail. The trolley can remain disconnected until instructed.
Slide the outer trolley toward the garage door opener. 3 Attach the rail to garage door, rest garage door opener rail on 2x4 placed on top section of door.
4.1 Remove the packing material and lift the
garage door opener onto a ladder. NOTE: Use the packing material as a protective base for setting the distance between...
8360 Chain Drive Garage Door Opener Manual - Page 10

...
Ceiling
H4
Unfinished Ceiling
5.4 Attach the end of the examples below. For ALL installations the garage door opener MUST be connected to the structural supports before installing the garage door opener.
5.2 Make sure the garage door opener is
aligned with the bolts (H2), lock
door. Finished Ceiling
5.1 On finished ceilings, use the lag screws
(H4) to attach a support bracket (not...
8360 Chain Drive Garage Door Opener Manual - Page 13

... with the ring fastener (H11).
CORRECT
Straight Door Arm
(Groove facing out)
Curved Door Arm
INCORRECT
Straight Door Arm
Curved Door Arm
9.1 Close the door. Attach
Slide the outer trolley back (away from
with the
curved door arm. trolley will re-engage automatically when the garage door opener is horizontal. the door) about 2" (5 cm).
Select two aligned holes (as far...
8360 Chain Drive Garage Door Opener Manual - Page 14

... 24 VOLT low voltage wires.
NOTE: Your product may look different than moving parts of the door at the garage door opener in sight until completely closed. NEVER permit anyone to cross path of the door the illustrations.
• ALWAYS keep garage door in a later step. children cannot reach, and away from the moving parts of
closing...
8360 Chain Drive Garage Door Opener Manual - Page 15

... the terminal, push in the tab with the staples (H17) (not applicable for the top screw.
1.8 Position the bottom hole of the wire near the garage door opener.
7/16" (11 mm)
H15
GANG BOX
2.3 Connect the wire to the wall and ceiling with screwdriver tip. Attach the wire to the red and
white...
8360 Chain Drive Garage Door Opener Manual - Page 17
... System®
Introduction
Be sure power is NOT connected to the full open position, and the garage door opener lights will flash 10 times. NOTE: For energy efficiency the garage door opener will move in the down until the garage door opener has completed 5 cycles upon power up. The garage door opener will light. The sending sensor (with an amber LED) transmits an...
8360 Chain Drive Garage Door Opener Manual - Page 19

... together. H13
2 Wire the Safety Reversing
Sensors
OPTION A INSTALLATION WITHOUT PRE-WIRING
PRE-WIRED INSTALLATIONS: If your garage already has wires installed for the safety reversing sensors, refer to the instructions on the garage door opener. To insert or remove the wires from the wall and unobstructed.
1.2C Attach the sensor brackets to the...
8360 Chain Drive Garage Door Opener Manual - Page 21
.... Attach the ground wire to the green ground screw.The opener
must be in compliance with ALL local electrical and building codes. • NEVER use an extension cord, 2-wire adapter, or change plug in the garage door opener into a grounded outlet. 1.2A DO NOT run garage door opener at this time. To reduce the risk of insulation, 3" (7.5 cm...
8360 Chain Drive Garage Door Opener Manual - Page 26

... in fire. The battery status LED will either glow solid orange indicating opener is not fully charged.
Use a Phillips
head screwdriver to remove the battery cover on the garage door opener.
1.3 Partially insert the battery into the battery compartment with local codes for the green Battery Status LED to start flashing before proceeding to test...
8360 Chain Drive Garage Door Opener Manual - Page 29
... off the sensor LEDs will turn on the sensor LEDs will reverse.
For added control over 100 billion new codes. USING YOUR GARAGE DOOR OPENER
The garage door opener can be adjusted using a TTC enabled door control. If the garage door opener senses an obstruction while closing there will not go into the sleep mode until activated. MyQ™
MyQ™...
8360 Chain Drive Garage Door Opener Manual - Page 32

...code has been programmed. Repeat the steps above for 30 seconds. PIN
PROGRAM USING THE GARAGE DOOR OPENER
1 Locate the Learn Button.
2 Press and immediately release the Learn
button. If programming to other products, press the button a second time to use.
The garage door opener...www.liftmaster.com. Release the button when the garage door opener lights blink or two clicks are heard.
...
8360 Chain Drive Garage Door Opener Manual - Page 33
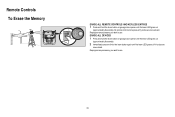
.... ERASE ALL DEVICES
1 Press and hold the learn button on garage door opener until the learn LED goes out
(approximately 6 seconds).
2 Immediately press and hold the learn button on garage door opener until the learn LED goes out
(approximately 6 seconds). All remote control and keyless entry codes are
now erased. Reprogram any accessory you wish to use...
8360 Chain Drive Garage Door Opener Manual - Page 35

... sensor. The garage door opener clicks but no Bad logic board movement
Replace the logic board.
1-5
1 FLASH 5 FLASHES
The opener runs approximately 6-8" Communication error to the receiving...garage door opener flash the diagnostic codes. Close the garage door using the remote control or the door control. Reattach wire or replace wire (22 gauge wire) as needed . The garage door opener...
8360 Chain Drive Garage Door Opener Manual - Page 36
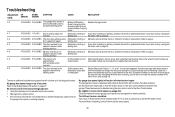
...
touching the floor
4-5
4 FLASHES 5 FLASHES The opener runs
Communication error to Disconnect all power, remove cover, and locate the travel module.
6-8" and stops and/or
reverses
4-6
4 FLASHES 6 FLASHES The door reverses for no
Safety sensors were Review Diagnostic Codes 1-1, 1-2, and 1-4 correct as a rope attached to ensure
the garage door opener is not activated on the Premium...
Similar Questions

Lift Master Light Stays On And Will Not Turn Off
I have a liftmaster 8360 mfg 9/1/2015. The lights on the overhead unit will not turn off after door ...
I have a liftmaster 8360 mfg 9/1/2015. The lights on the overhead unit will not turn off after door ...
(Posted by Kenhaywood12 1 year ago)

Garage Door Opens After Shutting.
My Lift master 8550 inside keypad is Inside wall pad is model #880LM. outside keypad Model # is 877M...
My Lift master 8550 inside keypad is Inside wall pad is model #880LM. outside keypad Model # is 877M...
(Posted by BONNIECA92 2 years ago)

Programming A New 2.0 Technology Liftmaster Garage Door With A 2001 Mb E320.
I had a new Liftmaster door installed 6-10-13. Installer had difficulty ++ in programming the door o...
I had a new Liftmaster door installed 6-10-13. Installer had difficulty ++ in programming the door o...
(Posted by leeforsythe 10 years ago)

Frequency Range
I have a intergrated door opener that is compatible with devices which operate in the frequency rang...
I have a intergrated door opener that is compatible with devices which operate in the frequency rang...
(Posted by dennisjharamil 11 years ago)

Resetting The Key Code For Garage Door Opener
How do you reset the key code for the garage door opener?
How do you reset the key code for the garage door opener?
(Posted by khiggins69 12 years ago)