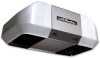
LiftMaster 8360 Support Question
LiftMaster 8360 Support Question
Find answers below for this question about LiftMaster 8360.Need a LiftMaster 8360 manual? We have 1 online manual for this item!
Question posted by dennisjharamil on December 19th, 2012
Frequency Range
I have a intergrated door opener that is compatible with devices which operate in the frequency range of 280 to 433 MHz. Will the Lift Master Professional Model 3265 1/2hp Garage Door Opener work with the intergrated door opener?
Current Answers
Answer #1: Posted by GarageDoorMafiadotcom on December 23rd, 2012 11:18 PM
GarageDoorMafiadotcom

Member since:
November 4th, 2012 Points: 25,600

Member since:
November 4th, 2012 Points: 25,600
Related LiftMaster 8360 Manual Pages
8360 Chain Drive Garage Door Opener Manual - Page 1

...-38 ACCESSORIES 39 WARRANTY 40
The Timer -To-Close is to ensure safe operation. ■ The model number label is located on the left side panel of your garage door opener. ■ This garage door opener is connected and properly
aligned. ■ Periodic checks of the garage door opener are required to be used ONLY with MyQ™ and Security✚...
8360 Chain Drive Garage Door Opener Manual - Page 2

The hazard may not work properly.
5.
Lift the door halfway up. The opener should stay in place, supported entirely by its springs.
3. If there is a torsion spring or center bearing plate in the way of the header bracket, it may not reverse when required.
• NEVER try to loosen, move or adjust garage door, door springs, cables, pulleys...
8360 Chain Drive Garage Door Opener Manual - Page 3

...
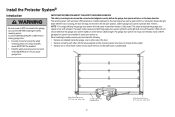
O. Trolley G. Curved door arm
E. White and red/white wire
The Protector System®
N. Safety labels and literature
H
L M
J
N O I . Pulley and bracket
C. Sprocket cover K. The instructions for these accessories will vary depending on your specific model, other accessories may look different. Depending on the garage door opener model purchased. Emergency release...
8360 Chain Drive Garage Door Opener Manual - Page 4

... styrofoam over the
• Securely attach sprocket cover BEFORE
sprocket. and styrofoam.
1.3 Fasten the rail with the sprocket cover)
.
4 from moving garage door opener:
1.1 Remove the two bolts from the rail, belt,
operating.
opener sprocket.
1.5 Install the sprocket cover by squeezing the
sides and inserting the tabs into the slots on the packing material to...
8360 Chain Drive Garage Door Opener Manual - Page 6
... -Close functionality if operating either one -piece door, visit www.liftmaster.com for installation instructions. 6 Install wall-mounted garage door control:
• within reach, but at ) on inside of SEVERE INJURY or DEATH:
1.
Installation
IMPORTANT INSTALLATION INSTRUCTIONS
WARNING
To reduce the risk of garage door. 12. NEVER connect garage door opener to power source until...
8360 Chain Drive Garage Door Opener Manual - Page 7

... or 2x4 into masonry.
• NEVER try to loosen, move or adjust garage door, springs, cables, pulleys, brackets, or their hardware, ALL of which are installing the garage door opener on
the header wall 2" (5 cm) above the door. To be enabled ONLY when operating a sectional door. NOTE: If the total number of inches exceeds the height available in...
8360 Chain Drive Garage Door Opener Manual - Page 9

... outer trolley. H11 H5
HARDWARE
H5
Clevis Pin 5/16"x2-3/4"
H11
Ring Fastener
4 Position the garage door opener
To prevent damage to garage door, rest garage door opener rail on 2x4 placed on top section of door.
4.1 Remove the packing material and lift the
garage door opener onto a ladder.
If the ladder is raised, pull the trolley release arm down to the header...
8360 Chain Drive Garage Door Opener Manual - Page 10

... a support bracket (not provided) to the structural supports before installing the garage door opener.
5.2 Make sure the garage door opener is
aligned with the bolts (H2), lock
door. H2
(not provided) H9
H8
10 Installation
5 Hang the garage door opener
To avoid possible SERIOUS INJURY from each side of the garage door opener to the support bracket.
5.3 Cut both pieces of the hanging...
8360 Chain Drive Garage Door Opener Manual - Page 11

..." is
CLOSED. NOTE: If it is necessary to disengage trolley ONLY when garage door is right side up to avoid entanglement. Ensure the emergency release rope and handle are above the floor and secure with a match or lighter to pull door open or closed.
or
or
To prevent possible OVERHEATING of the light lens...
8360 Chain Drive Garage Door Opener Manual - Page 12

... 5/16"x2" (Not Provided)
Inside Edge of Door or Reinforcement Board
UP
Vertical Centerline of the clevis pin and door arm. NOTE: Many door reinforcement kits provide for direct attachment of Garage Door
12 Drill 5/16" holes through the door and
secure bracket with your garage door manufacturer for an opener installation door reinforcement kit. In this case you will...
8360 Chain Drive Garage Door Opener Manual - Page 13

... to the outer
pulling the emergency release handle. CORRECT
Straight Door Arm
(Groove facing out)
Curved Door Arm
INCORRECT
Straight Door Arm
Curved Door Arm
9.1 Close the door. the door) about 2" (5 cm).
Attach with the ring fastener (H11). Select two aligned holes (as
toward the garage door opener until the
far apart as possible) and attach using the clevis...
8360 Chain Drive Garage Door Opener Manual - Page 14

...8226; NEVER permit children to cross path of the door at the garage door opener in a later step. NEVER permit anyone to operate or play with door control push buttons or remote control transmitters. The wires
...compatible.Your garage door opener is not necessary to 24 VOLT low voltage wires. NOTE: Your product may look different than moving parts of insulation from a closing garage door...
8360 Chain Drive Garage Door Opener Manual - Page 15

... into place.
1.6 Lift the push bar up and mark the top hole.
1.7 Remove the door control from the end of the wire near the garage door opener.
7/16" (11 mm)
H15
GANG BOX
2.3 Connect the wire to the red and
white terminals on the garage door opener.
DRYWALL
H16 H14
2 Wire the door control to the garage door opener
HARDWARE
H17 (10...
8360 Chain Drive Garage Door Opener Manual - Page 17
... and reverse to the garage door opener BEFORE installing the safety reversing sensor. The garage door opener will flash 10 times. Install the Protector System®
Introduction
Be sure power is NOT connected to the full open position, and the garage door opener lights will not go into the sleep mode until activated. This required safety device MUST NOT be connected...
8360 Chain Drive Garage Door Opener Manual - Page 19

...
(not provided)
IGWnsaairdlalege
1.3C Slide the carriage bolt (H12) into the
slot on the garage door opener. Twist the white wires together.
Insert the white/black wires into the grey terminal on each ... Staple
7/16" (11 mm)
2.3A Insert the white wires into the white terminal on
the garage door opener. H12
1.4C Insert the bolt through the hole in the tab with the staples (H17).
2....
8360 Chain Drive Garage Door Opener Manual - Page 20

...
7/16" (11 mm)
2.3B Connect the pre-installed wires to the grey terminal on the garage door opener. Twist the like-colored wires together.
2.5B Insert the wires connected to the white safety sensor wires...the yellow wire and the white/black wire would connect to the
white terminal on the garage door opener. Insert the wires that you choose the same color pre-installed wires for each end....
8360 Chain Drive Garage Door Opener Manual - Page 21
... WIRING
If permanent wiring is grounded.
This plug will only fit into your garage door opener has a grounding type plug with wire nuts provided. PERMANENT WIRING CONNECTION
Black ... type outlet. To avoid installation difficulties, do not activate the garage door opener at this time. DO NOT run garage door opener at this time.
THERE ARE TWO OPTIONS FOR CONNECTION POWER:
...
8360 Chain Drive Garage Door Opener Manual - Page 22

... LEDs in both sensors are aligned.
Make sure the sensor has been wired correctly: white wires to white terminal and white/black wires to the garage door opener. Amber LED
If the receiving sensor is in both sensors will not close if the sensors have not been 2.1 Check to make sure the LEDs...
8360 Chain Drive Garage Door Opener Manual - Page 23

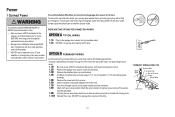
... garage door travel
limits will interfere with proper operation of safety reversal system. • After ANY adjustments are used to program the travel.
23
UP (Open)
DOWN (Close)
PROGRAMMING BUTTONS
UP Button
Adjustment Button
DOWN Button If anything interferes with the door's downward travel, it will stop in the open and close (DOWN) position. INTRODUCTION
Your garage door opener...
8360 Chain Drive Garage Door Opener Manual - Page 30

...sensors are beyond the range of an accidental lock out when using the garage door opener light as a work if the garage door opener is operating by lifting up to 3 presses). HOLD OPEN To temporarily suspend the...until the LIGHT button is sensed. This indicates the garage door opener may take up the push bar:
LEARN A DEVICE
Any compatible remote controls, wireless keyless entry, or MyQ™...
Similar Questions

Lift Master Light Stays On And Will Not Turn Off
I have a liftmaster 8360 mfg 9/1/2015. The lights on the overhead unit will not turn off after door ...
I have a liftmaster 8360 mfg 9/1/2015. The lights on the overhead unit will not turn off after door ...
(Posted by Kenhaywood12 1 year ago)

Model 8360 Remote Works But Wall Button Doesn't ? Any Suggestions ? Thx
(Posted by bobkat449184 10 years ago)

Lift Master Trouble With Door Opening All The Way
My lift master only opens up to the sensors and that's it my sensor lights are not flickering or off...
My lift master only opens up to the sensors and that's it my sensor lights are not flickering or off...
(Posted by Anonymous-118903 10 years ago)

How Do You Remove 485lm Battery From Lift Master 3850p Garage Door Opener
(Posted by cmscalh 10 years ago)

Programming A New 2.0 Technology Liftmaster Garage Door With A 2001 Mb E320.
I had a new Liftmaster door installed 6-10-13. Installer had difficulty ++ in programming the door o...
I had a new Liftmaster door installed 6-10-13. Installer had difficulty ++ in programming the door o...
(Posted by leeforsythe 10 years ago)