
Lexmark T652 Support Question
Lexmark T652 Support Question
Find answers below for this question about Lexmark T652.Need a Lexmark T652 manual? We have 9 online manuals for this item!
Question posted by nirmagcj573 on January 2nd, 2014
How To Replace Sensor Input On Lexmark T652
The person who posted this question about this Lexmark product did not include a detailed explanation. Please use the "Request More Information" button to the right if more details would help you to answer this question.
Current Answers
Related Lexmark T652 Manual Pages
Service Manual - Page 7
... of media size ...Pick arm assembly ...Switch (media size) ...Sensor (media empty) ...Sensor (media low) ...Multi-purpose feeder (MPF) ...MPF feed roll ...MPF pick solenoid ...Sensor (MPF media empty) ...Supported paper sizes, types, and weights ...Paper sizes supported by the printer ...Registration ...Sensor (input) ...Aligner assembly ...Transfer ...Transfer roll assembly ...
3-47 3-48 3-48...
Service Manual - Page 9

...13 Charge roll assembly removal (T650, T652, T654) ...4-14 Door assembly, rear removal (T650, T652, T654) ...4-15 Duplex guide assembly, rear removal (T652, T654) ...4-15 Duplex assembly removal (T652, T654) ...4-16 Duplex cooling fan removal (T652, T654) ...4-18 Duplex drive motor assembly removal (T652, T654) ...4-19 Duplex input sensor assembly removal (T652, T654) ...4-20
Table of contents...
Service Manual - Page 10
...67 Side cover, right removal (T652, T654) ...4-68 Sensor (duplex input) removal (T652, T654) ...4-68 Sensor (media level) removal (T650, T652, T654) ...4-70 Sensor (media out) removal (T650, T652, T654) ...4-70 Sensor (toner empty) removal (T650, T652, T654) ...4-71 Sensor (input) removal (T650, T652, T654) ...4-71 Sensor shield assembly removal (T650, T652, T654) ...4-72 Sensor (standard bin exit...
Service Manual - Page 49
... all connections on page 4-61. 1. Replace the system card if problem remains. Check all media present in media path. 2. Go to "Output cover assembly removal (T650, T652, T654)" on page 4-76.
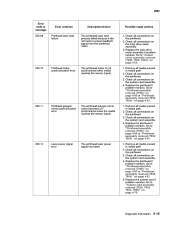
200.10
Printhead motor synchronization error
The printhead motor is not synchronized when media reaches the sensor (input).
200.11
Printhead polygon mirror...
Service Manual - Page 50
... assembly removal (T650, T652, T654, T656)" on page 4-76. 1. Check all connections on page 4-54. Replace the system card if problem remains. Go to sensor (input) early jam service check. Replace the main drive motor assembly if problem remains. Go to sensor (input) lingering jam service check. See "Sensor (input) lingering jam service check." See "Sensor (input) early jam service check...
Service Manual - Page 67

... in media path. 2. on page 2-141. Go to "Duplex drive motor assembly removal (T652, T654)" on page 4-19.
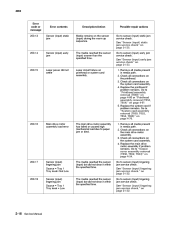
230.03
Sensor (duplex input) bounce Source = Internal duplex
The sensor (duplex input) rebounded once the trailing edge of the media passed.
230.04
Sensor (input) late jam from duplex Source = Internal duplex
230.08
Internal duplex drive motor...
Service Manual - Page 76

... the proper operating speed at the specified time.
1. Ensure media tray is not overfilled. 3. Go to sensor (input) late jam service check. Go to "System card assembly removal (T650, T652, T654, T656)" on the system card assembly. 5. See "Sensor (input) late jam service check." Check, clean or replace the pick rolls for wear and excess contamination.
Service Manual - Page 77

.... 2. Go to "Pick roll assembly removal (T650, T652, T654)" on the pick arm assembly. 5. Check, clean or replace the pick rolls for wear and excess contamination. See "Sensor (input) late jam service check." Go to paper jam or bind.
1. Replace the pick arm assembly if problem remains. See "Sensor (input) late jam service check." on page 4-76...
Service Manual - Page 78

...T650, T652, T654, T656)" on the system card assembly. 5. Go to "Operator panel door assembly removal (models X651, X652, X654, and X656)" on page 4-49. 1. Go to sensor (input) late...page 4-49. 6. Replace system card assembly if problem remains. Check all connections on page 2-145.
241.18
Sensor (input) late jam Source = Tray 1
The media is not overfilled. 3. See "Sensor (pass through) ...
Service Manual - Page 80

... waiting for the tray 2 to "Switch (media size) assembly removal (T650, T652, T654)" on page 4-74. 1. Check all connections on the system card assembly. 3. Replace the media tray assembly if problem remains. 3. Check the media out actuator for proper connection. 4. See "Sensor (pass through ) late jam service check" on page 2-145.
242.33...
Service Manual - Page 85

...Replace the media tray assembly if problem remains. 3. Replace the switch (media size) if problem remains. on the media tray for the tray 3 to report ready before a pick retry attempt. Go to sensor...(T650, T652, T654)" on page 4-81.
243.34
Empty tray pick attempted Source = Tray 3
The pick arm attempted to sensor (pass through ) late jam service check" on the sensor (input) during ...
Service Manual - Page 91

...machine.
1. Go to sensor (pass through) late jam service check. Go to "Switch (media size) assembly removal (T650, T652, T654)" on page ...sensor (input) during the warm up sequence.
244.36
Sensor (pass through) static jam Source = Tray 4
Media remains on page 2-147. Replace the media tray assembly if problem remains. 3. Replace the media out actuator if problem remains. See "Sensor...
Service Manual - Page 96

...damage 2. Replace the media out actuator if problem remains. See "Sensor (pass ...Sensor (pass through) static jam Source = Tray 5
Media remains on the sensor (input) during the printing process. See "Sensor (pass through ) lingering jam service check." Check the switch (media size) for the tray 5 to "Switch (media size) assembly removal (T650, T652, T654)" on page 4-74. 1. See "Sensor...
Service Manual - Page 100

... in the MPF area.
250.03
Sensor (input) late jam Source = MPF
The media is late reaching the sensor (input) within the specified time. Go to "System card assembly removal (T650, T652, T654, T656)" on page 4-49. 6. Go to sensor (input) late jam service check. Replace system card assembly if problem remains. Replace system card assembly if problem remains...
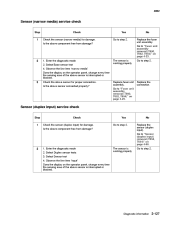
Service Manual - Page 160

...Go to step 2. Select Base sensor test 4. The sensor is working properly
Go to "Sensor (input) removal (T650, T652, T654)" on page 4-71.
2
1. Replace the connection.
2-126 Service Manual Go to step 2.
3
Check the above sensor for proper connection. Enter the diagnostic mode 2.
The sensor is working properly
Go to "Sensor (input) removal (T650, T652, T654)" on page 4-71. Go...
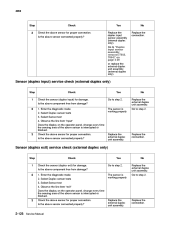
Service Manual - Page 161
... unit assembly removal (T650, T652, T654)" on page 4-68.
2
1.
Diagnostic information
2-127
The sensor is interrupted or blocked.
Select Duplex sensor tests 3. The sensor is interrupted or blocked. Yes Go to step 2. Replace the connection. No Replace the sensor (duplex input). Sensor (duplex input) service check
Step 1 Check Check the sensor (duplex input) for damage. Go...
Service Manual - Page 162
....
2-128 Service Manual
Go to "Duplex input sensor assembly removal (T652, T654)" on the operator panel, change every time the sensing area of the above sensor is interrupted or blocked. Select Sensor test 4. Is the above sensor connected properly? Is the above component free from damage?
Yes Replace the duplex input sensor assembly (internal duplex only).
Go to step...
Service Manual - Page 164
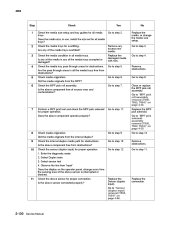
... and check the MPF pick solenoid for proper operation. Check the sensor (duplex input) for obstructions. Select sensor test 4.
Yes Go to "MPF pick roll assembly removal (T650, T652, T654)" on page 4-68. Are the pass through areas for obstructions. Go to step 2.
Replace the MPF pick solenoid. Did the media originate from the MPF...
Service Manual - Page 342
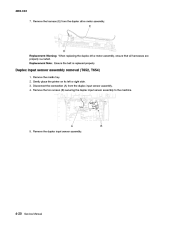
... re-routed. Gently place the printer on its left or right side. 3. Remove the harness (E) from the duplex input sensor assembly. 4.
Replacement Note: Ensure the belt is replaced properly. Remove the two screws (B) securing the duplex input sensor assembly to the machine. Remove the duplex input sensor assembly.
Duplex input sensor assembly removal (T652, T654)
1. Disconnect the...
Service Manual - Page 543
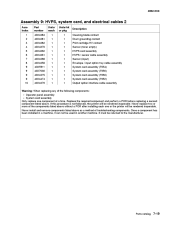
... HVPS / sensor cable assembly Sensor (input) Envelope / input option tray cable assembly System card assembly (T654) System card assembly (T656) System card assembly (T650) System card assembly (T652) Output option interface cable assembly
Warning: When replacing any of the following components: • Operator panel assembly • System card assembly Only replace one or the printer will be...
Similar Questions


What Means Replace Unsupported Print Cartridge Lexmark Printer T652
(Posted by visdbecc 10 years ago)


Can I Replace Defective Nic From Another Printer
can i replace defective NIC from another printer
can i replace defective NIC from another printer
(Posted by wraye 11 years ago)