
Lexmark T652 Support Question
Lexmark T652 Support Question
Find answers below for this question about Lexmark T652.Need a Lexmark T652 manual? We have 9 online manuals for this item!
Question posted by supabill on January 20th, 2014
Cant Print From Tray 1 On A Lexmark T652 Printer
The person who posted this question about this Lexmark product did not include a detailed explanation. Please use the "Request More Information" button to the right if more details would help you to answer this question.
Current Answers
Related Lexmark T652 Manual Pages
Clearing Jams Guide - Page 1

... firmly after loading paper. To resolve any exposed adhesive when the flap is in the tray. • Do not remove trays while the printer is printing. • Do not load trays, the multipurpose feeder, or the envelope
feeder while the printer is printing. Jam numbers 200-203, 230 231-239 241-245 250 260 271-279 280...
Troubleshooting Guide - Page 2
... settings page and compare the settings for the paper size loaded in each tray to be linked.
• Move the paper guides to print
These are possible solutions. MAKE SURE THE PRINTER HAS SUFFICIENT MEMORY
Free up additional printer memory by eliminating the number and size of fonts, the number and complexity of images...
Troubleshooting Guide - Page 3
...feeder, or go to www.lexmark.com/publications to view the envelope feeder instruction sheet. Paper trays
These are possible solutions. Reinstall the paper tray.
Envelope feeder
These are possible... between the option and the printer. 4 Connect the power cord to the 2000-sheet tray.
• Make sure the printer is installed
These are printing from the printer control panel.
Try one or...
Troubleshooting Guide - Page 5
... are possible solutions.
Try one or more of the following :
CHECK THE PAPER GUIDES
Move the guides in the tray: 1 From the printer control panel, check the Paper Type setting
from the Paper menu. 2 Before sending the job to print, specify the correct size
setting: • For Windows users, specify the size from...
Troubleshooting Guide - Page 6
... panel, change these settings from the Quality menu. • For Windows users, change these settings from Print Properties. • For Macintosh users, change these settings from a fresh package. • Store paper in the tray: 1 From the printer control panel, check the Paper Type setting
from the Paper menu. 2 Before sending the job to...
Troubleshooting Guide - Page 7
... every: • 88.0 mm (3.46 in.) • 95.2 mm (3.75 in .). THE PRINT CARTRIDGE MAY BE DEFECTIVE
Replace the print cartridge.
CHECK THE PAPER TYPE SETTING
Make sure the paper type setting matches the paper loaded in the tray: 1 From the printer control panel, check the Paper Type setting
from the Paper menu. 2 Before...
Troubleshooting Guide - Page 9
... countries/regions, visit the Lexmark Web site at www.lexmark.com.
9 Try one or more of the printer. CHECK THE PAPER TEXTURE SETTING
From the printer control panel Paper menu, make sure the Paper Texture setting matches the paper loaded in the tray: 1 From the printer control panel, check the Paper Type setting
from the Print dialog.
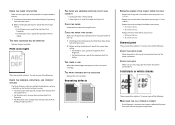
User's Guide - Page 39
... to make them available for print jobs.
For Windows users
1 Click , or click Start and then click Run. 2 In the Start Search or Run box, type control printers. 3 Press Enter, or click OK. Additional printer setup
39 Updating available options in the printer driver to the Lexmark Web site at www.lexmark.com. 2 From the Drivers...
User's Guide - Page 82
...-279 280-282 283
Area Printer Optional external duplex unit Paper trays Multipurpose feeder Envelope feeder Optional ...output bins StapleSmart II Finisher Staple cartridge
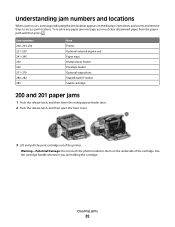
200 and 201 paper jams
1 Push the release latch, and then lower the multipurpose feeder door. 2 Push the release latch, and then open the front cover.
3 Lift and pull the print...
User's Guide - Page 149
... outlet. 3 Install the envelope feeder. 4 Connect the power cord to a properly grounded outlet. 5 Restart the printer.
• Cancel the current job. Install a MICR cartridge to download valid engine code for the printer.
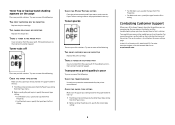
Understanding printer messages
149 Install Tray
Try one or more information, visit the Lexmark Web site at www.lexmark.com, or contact customer support.
User's Guide - Page 157
... following :
• Wait for an End-of the following :
• Replace the print cartridge. • Press to clear the message and continue printing. Understanding printer messages
157 Tray Empty
Load paper in the specified tray to clear the message.
USB/USB
The printer is using a USB cable connection. Unsupported USB hub, please remove
Remove the unrecognized...
User's Guide - Page 178
... wrong paper
CHECK THE PAPER TYPE SETTING
Make sure the paper type setting matches the paper loaded in the tray:
1 From the printer control panel, check the Paper Type setting from the Paper menu. 2 Before sending the job to print, specify the correct type setting:
• For Windows users, specify the type from...
User's Guide - Page 180
..., see the hardware setup documentation that the paper tray is turned on our Web site at www.lexmark.com/publications.
MAKE SURE THE LIST OF OPTIONS IN THE PRINTER DRIVER IS UP TO DATE
From the computer you are printing from, verify that came with the paper tray, or see the latest comprehensive User's Guide...
User's Guide - Page 184

... THE GUIDES
Move the width and length guides in the tray:
1 From the printer control panel, check the Paper Size setting from the Paper menu. 2 Before sending the job to print, specify the correct size setting:
• For Windows users, specify the size from Print Properties. • For Macintosh users, specify the size from...
User's Guide - Page 185
... the paper loaded in the tray to print, specify the correct type setting:
• For Windows users, specify the type from Print Properties. • For Macintosh users, specify the type from the Print dialog.
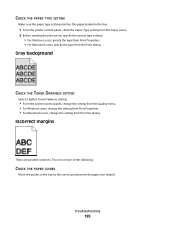
Gray background
CHECK THE TONER DARKNESS SETTING
Select a lighter Toner Darkness setting:
• From the printer control panel, change the setting...
User's Guide - Page 194
...For other countries/regions, visit the Lexmark Web site at www.lexmark.com. Contacting Customer Support
When you are experiencing, the message on the inside top front cover of the printer. The serial number is also listed ... the paper type setting matches the paper loaded in the tray:
1 From the printer control panel, check the Paper Type setting from the Paper menu. 2 Before sending the ...
User's Guide - Page 215
...
Lexmark ...tray linking 64 tray unlinking 64 trays linking 63 unlinking 63 troubleshooting checking an unresponsive
printer 175 contacting Customer
Support 194 solving basic printer
problems 175 troubleshooting, display
display is blank 175 display shows only
diamonds 175 troubleshooting, paper feed
message remains after jam is cleared 183
page that jammed does not reprint 183
troubleshooting, print...
Service Manual - Page 37

... if the paper stop is in the tray. It may take the printer 10-20 seconds to determine if the print cartridge is defective. Ensure the print cartridge ID connector assembly is installed. It may take the printer 10-20 seconds to "Print cartridge ID connector assembly removal (T650, T652, T654)" on . Turn the power off; Invalid...
Service Manual - Page 207
... Check printer installation placement. Yes Go to "Transfer roll assembly removal (T650, T652, T654...tray assembly into the media tray assembly and ensure all guides are set correctly. Remove obstructions.
4
Check the transfer roll assembly for irregularities.
Does the error continue?
Diagnostic information
2-173 No Problem solved.
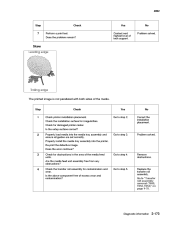
7
Skew
Leading edge
Trailing edge
The printed...
Service Manual - Page 208

... proper adjustment.
Properly load media in the printer. Does the error continue? Re-print the defective image.
4062
Step
Check Check the aligner assembly for missing printer foot.
Does the problem remain? Problem solved. Is the setup surface normal?
Properly install the media tray assembly in the media tray assembly. Go to step 6.
Contact next...
Similar Questions

How To Fix Black Print Marks On Lexmark Printer E260d
(Posted by merospike 9 years ago)


34 Short Paper Error When Printing Envelopes Lexmark T652
(Posted by horacLat 10 years ago)
