KitchenAid KGSS907S Support Question
KitchenAid KGSS907S Support Question
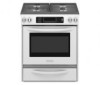
Find answers below for this question about KitchenAid KGSS907S - 30" Slide-In Gas Range.Need a KitchenAid KGSS907S manual? We have 2 online manuals for this item!
Question posted by mrgwd1 on February 19th, 2022
Spark Module Replacement
How do you remove & replace the spark module on model KGSS907SSSOO ?
Current Answers
Answer #1: Posted by Technoprince123 on February 19th, 2022 7:40 AM
Technoprince123

Member since:
February 8th, 2021 Points: 1,205,190

Member since:
February 8th, 2021 Points: 1,205,190
Please response if this answer is acceptable and solw your problem thanks
Answer #2: Posted by SonuKumar on February 19th, 2022 7:39 AM
SonuKumar

Member since:
May 9th, 2021 Points: 16,604,590
Member since:
May 9th, 2021 Points: 16,604,590
1800-807-6777
https://www.youtube.com/watch?v=Y3_gDd-N4nY
https://www.youtube.com/watch?v=Y3_gDd-N4nY&t=69
https://www.youtube.com/watch?v=Y3_gDd-N4nY&t=101
https://www.youtube.com/watch?v=Y3_gDd-N4nY&t=157
https://www.youtube.com/watch?v=Y3_gDd-N4nY&t=199
How do I change the spark module?
Image result for KitchenAid KGSS907S Spark Module Replacement
Instructions
Shut off power and gas. Unplug the power cord from the wall outlet and then close the gas supply shut-off valve.
Remove the burner heads. ...
Remove the main top. ...
Remove the spark module. ...
Install the new spark module. ...
Reinstall the main top. ...
Reinstall the burner heads. ...
Reconnect the gas and power.
Please respond to my effort to provide you with the best possible solution by using the "Acceptable Solution" and/or the "Helpful" buttons when the answer has proven to be helpful.
Regards,
Sonu
Your search handyman for all e-support needs!!
Related KitchenAid KGSS907S Manual Pages
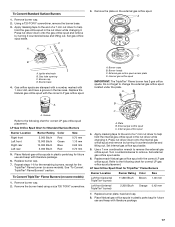
Use and Care Guide - Page 7
... Settings (on some models) during the Self-...a TripleTier® LP Gas Conversion Kit and a kit for standard ranges. All surface burners will...range is pressed completely down on the grate. s Fry poultry or meat.
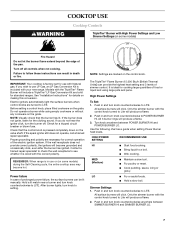
High Power Settings
To Set: 1. HIGH POWER SETTING
RECOMMENDED USE
HI
s Start food cooking. Push in use or (on the control knob. Power failure In case of the pan. If the spark...
Use and Care Guide - Page 17

...and 260°C).
4. Broil
This range has both a gas burner and an electric halo element... sides and roasting pans with an alternative method such as 30 percent, especially for CENTER
BROIL. When the actual oven temperature... and Bakeware" section.
s After broiling, remove the pan from the bottom (1) to enhance broiling performance on some models)
In a convection oven, the fan-circulated...
Use and Care Guide - Page 23
... to order. When replacing knobs, make sure the oven and cooktop are cool and the control knobs are off . Damage may occur. OVEN CAVITY
Do not use steel wool, abrasive cleansers or oven cleaner. Food spills should be cleaned when oven cools.
Remove racks or they will help them slide. s Solution of ¹...
Use and Care Guide - Page 24
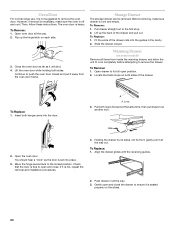
... cavity. 2.
Gently open and close the drawer to remove the oven door. To Replace: 1. Oven Door
For normal range use, it is not suggested to ensure it is seated properly on the slides.
24 Then, follow these instructions. To Remove: 1. If it is heavy.
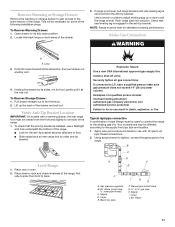
Warming Drawer
(on some models)
Remove all the way. 2. Open oven door all...
Use and Care Guide - Page 25
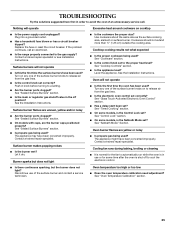
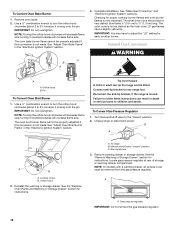
Replace the fuse or reset the circuit breaker. Contact a trained repair specialist or see Installation Instructions. Push in knob before turning to the proper heat level? See "Sealed Surface Burners" section.
Let it dry. Burner sparks but does not light
s Is there continuous sparking...improperly.
s Is propane gas being used ? See "Control Lock" section. s On models with caps, are uneven...
Use and Care Guide - Page 28
...DAMAGES. Contact your complete model number and serial number.
Repairs when your major appliance, to replace or repair
house fuses ...You can be repaired in the home.
7. KITCHENAID® GAS RANGE WARRANTY
ONE YEAR LIMITED WARRANTY
For one year from the ... this information on the model and serial number label located on the product. The removal and reinstallation of your ...
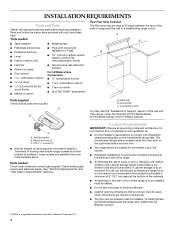
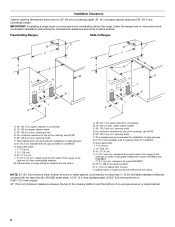
Installation Instructions - Page 2

...Remove Warming or Storage Drawer 11 Verify Anti-Tip Bracket Location 11 Level Range 11 Make Gas Connection 11 Electronic Ignition System 13 Replace Oven Racks and Warming or Storage Drawer 15 Complete Installation 15
GAS CONVERSIONS 16 LP Gas Conversion 16 Natural Gas...232;re 29 Raccordement à la canalisation de gaz 30 Système d'allumage électronique 31 Réinstallation...
Installation Instructions - Page 4
....
■ Do not seal the range to fill a gap between the rear of flooring may be installed. Check existing gas supply and electrical supply. The model/serial rating plate is located inside the...174;TORX is the installer's responsibility to subfloor. Thickness of the slide-in range and the wall in the wall or floor where range is to be provided, the risk can be reduced by reaching ...
Installation Instructions - Page 5
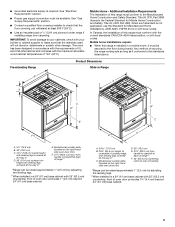
...allowable wood cabinet temperatures of securing the range is required. Freestanding Range
Product Dimensions Slide-in Range
B A
A
F
C
D*
B*
C E
D
F**
E**
A. 5³⁄₄" (14.6 cm)
B. 30" (76.2 cm)
C. 41³...your cabinets, check with 25" (63.5 cm) countertop; Model/serial number plate (located on the right-hand side oven door trim)
D. 30" (76.2 cm)
E. 27¼" (69.2 cm)...
Installation Instructions - Page 6
Freestanding Ranges
Slide-In Ranges
M N
M
O
A. 18" (45.7 cm) upper cabinet to the
side wall or other combustible material for model KGSK901 M. 22 58.3 cm) opening width
D. Grounded outlet I . 7" (17.8 cm) J. 1¹⁄₂" (3.8 cm) K. 4¹⁄₂" (11.4 cm) L. 5" (12.7 cm) min. clearance for models KGSS907 and KGRS807. 2" (5.1 cm) min. G. 6" (15.2 cm) ...
Installation Instructions - Page 8
...must be level for Slide-in Ranges Only)
The cooktop sides of the slide-in -line connection to the range.
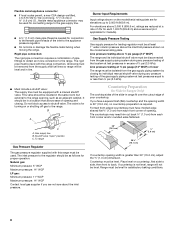
Countertop Preparation
(...range
Gas Pressure Regulator
The gas pressure regulator supplied with a manual shutoff valve. Burner Input Requirements
Input ratings shown on the model... and/or rounded edge flattened.
30" (76.2 cm)
³⁄₈" (1.0 cm)
30 ¾" (78.1 cm)
If...
Installation Instructions - Page 9

...bottom firmly to the floor. Measure for Proper Height
C A
D
A. Cooktop surface D. Range side frame
3.
Freestanding Ranges:
1. Measure the distance of the countertop to move and install range. Measure from inside oven.
2. Measure at locations marked A, B, C, D.
9
Distance from the top of the range cooktop trim to remove. Your leveling height will be the difference between the...
Installation Instructions - Page 11
..., authorized gas company personnel, and authorized service personnel. Lift up or down until rear leveling leg is engaged in the anti-tip bracket.
To check that rear leveling leg is removed from the front and slightly to side; Level Range
1. Place rack in death, explosion, or fire. then front to floor. ■ Slide range back...
Installation Instructions - Page 13

...; Check that the range is the proper size.
Do not use an extension cord. When the cooktop control knob is the proper size. 3. TripleTier® Flame Burner To start the inner burner. A
B
A. Low flame B. blade screwdriver to start simmer burner: Push in the gas line. Simmer burner regulation B. Replace the control knob. 4.
If...
Installation Instructions - Page 15

... from whom you purchased your tools.
3. Turn on the slides. If the range is plugged into the guides in all packaging materials.
4. Replace warming drawer or storage drawer. To Replace Storage Drawer: 1. Fit the ends of your range.
15 Replace Oven Racks and Warming or Storage Drawer
Replace oven racks in the Use and Care Guide.
8. If...
Installation Instructions - Page 16
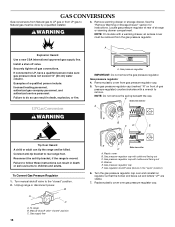
... hollow end faces out and letters "LP" are visible.
7. Unplug range or disconnect power. To range B.
Gas pressure regulator 4. Turn manual shutoff valve to LP, have a qualified person make sure gas pressure does not exceed 14" (36 cm) water column. Gas pressure regulator cap with a wrench to remove. Replace plastic cover over and reinstall on front of...
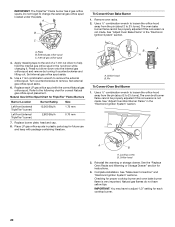
Installation Instructions - Page 17
... the TripleTier® Flame burner (on some models)
1.
Burner cap D. Do not forget to remove. Groove
Refer to help
hold the internal gas orifice spud in the hex area. Plate B. Turn counterclockwise to change the external gas orifice spud located under the plate. Replace burner plate, head and cap.
8. Gas orifice spuds are stamped with a number...
Installation Instructions - Page 18
... the range and be removed from the gas pressure regulator. Complete installation. Orifice hood B. NOTE: Turning the orifice hood clockwise will decrease flame size; See the "Replace Oven Racks...models with a warming drawer, an access cover must be killed. To Convert Oven Bake Burner
1. The oven bake burner flame cannot be properly adjusted if this conversion is moved. Natural Gas...
Installation Instructions - Page 19

... the remaining burners, except for future use and keep with a number on some models)
1. Gas tube opening C. Remove plastic cover from gas pressure regulator cap. 5. Washer E. Replace the LP gas orifice spud with solid end facing out D. Natural Gas Orifice Spud Chart for the correct Natural gas orifice spud placement. See "To Convert TripleTier® Flame Burners" section...
Installation Instructions - Page 20
...; burner)
Left front (internal TripleTier® burner)
12,200 Btu/h 2,800 Btu/h
1.70 mm 0.70 mm
7.
A B
A. Checking for instructions.
3. External gas orfice spud C. Natural gas flames do not have to remove.
See the "Replace Oven Racks and Warming or Storage Drawer" section for proper cooktop burner and oven bake burner flame is not made...
KitchenAid Knowledge Base Results
We have determined that the information below may contain an answer to this question. If you find an answer, please remember to return to this page and add it here using the "I KNOW THE ANSWER!" button above. It's that easy to earn points!-
General cleaning tips for my electric or gas range
... and empty before replacing it . Always follow the product label instructions. Use glass cleaner, a mild liquid cleaner and a nonabrasive scrubbing pad. Gently clean around the model and serial number plate because scrubbing may occur. Do not soak knobs. Damage may remove numbers. Apply glass cleaner to slide. Scrub using a ... -
Tips for using the Self-Cleaning feature - Ranges and built-in ovens
... bend the gasket. Do not block the oven vent(s) during self-cleaning to slide, apply vegetable oil on the outer edge on the door frame. in oven for... to the owner's manual for your model number. Air must be set or turned on some models): Remove plastic items from the oven. To prepare the oven for my electric or gas range Setting the Self-Clean cycle FAQs Knowledgebase search ... -
Cleaning ceramic glass cooktop - Electric Ranges and Cooktops
...savings. Here Using the ceramic glass cooktop General cleaning tips for my electric or gas range Product Literature (Use & Care, Parts Lists, etc) FAQs Knowledgebase search tips Tips for.... Always follow the recommended instructions on today's order, enter Promo Code F9A75Q4 in removing stubborn stains. Do not use can be sure to order cleaning products and receive 10%...
Similar Questions

How To Test Control Module
(Posted by tqshannon 2 years ago)

Gas Range # Kgss907: Oven Fan Sometimes Cycles On & Off When Using Stove Top?
KitchenAid: Gas Range Model # KGSS907: Issue ~ Oven fan sometimes cycles on & off when using sto...
KitchenAid: Gas Range Model # KGSS907: Issue ~ Oven fan sometimes cycles on & off when using sto...
(Posted by sfmanley 9 years ago)

Wok Insert Compromise Range Top?
Not able to find KGRS807SSS on display in any store within 150 miles. Must rely on online product de...
Not able to find KGRS807SSS on display in any store within 150 miles. Must rely on online product de...
(Posted by bluefoxinn 11 years ago)
Kitchen Aid Gas Range Model Kgra806 I Need Control Panel
i need control panel for my gas range Kitchen Aid moder KGRA806
i need control panel for my gas range Kitchen Aid moder KGRA806
(Posted by black2stars 11 years ago)

Kitchenaid Kdss907sss - 30' Slide-in Dual Fuel Range
Position Of Range
Should the back of the 30" slide-in range touch the back wall?
Should the back of the 30" slide-in range touch the back wall?
(Posted by patriciainsf 11 years ago)