KitchenAid KESA907PSS Support Question
KitchenAid KESA907PSS Support Question
Find answers below for this question about KitchenAid KESA907PSS - ARCHITECT Series: 30'' Slide-In Electric Range.Need a KitchenAid KESA907PSS manual? We have 3 online manuals for this item!
Question posted by yefousti on June 4th, 2012
Right Front Element Not Working And His Light Is Blinking
whats the problem !
Current Answers
Related KitchenAid KESA907PSS Manual Pages
Use and Care Guide - Page 1
www.kitchenaid.com or www.KitchenAid.ca
Table of Contents...2
Models KERA807 KESI901 KESA907 KESV908 YKESA907 YKERA807 YKESV908
9757451 o
ELECTRIC RANGE
PRO LINE™ SERIES AND ARCHITECT® SERIES
Use & Care Guide
For questions about features, operation/performance, parts, accessories or service, call: 1-800-422-1230 In Canada, call for assistance 1-800-461-5681, ...
Use and Care Guide - Page 2
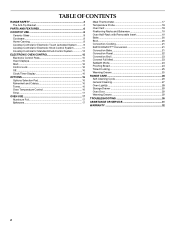
TABLE OF CONTENTS
RANGE SAFETY 3 The Anti-Tip Bracket 3
PARTS AND FEATURES 6
COOKTOP USE 8 Ceramic Glass 8 Cookware 9 Home Canning 9 Cooktop Controls ...23 Convect Full Meal 23 Sabbath Mode 24 Proofing Bread 24 Timed Cooking 25 Warming Drawer 25
RANGE CARE 26 Self-Cleaning Cycle 26 General Cleaning 27 Oven Light(s 28 Storage Drawer 29 Oven Door 29 Warming Drawer 29
TROUBLESHOOTING...
Use and Care Guide - Page 6

... (Model KESI901)
A
B
C
D
E
F
G
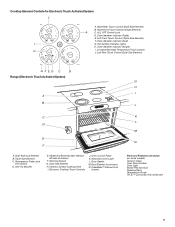
F. Oven Control Panel F. Left Rear Cooktop Element Control
J
K
I
A. Right Front Cooktop Element Control
K. Right Rear Cooktop Element Control
6 Left Rear Cooktop Element Control (Dual-Size Element)
E. The range you have purchased may not match those of the items listed. Pro Line™ Series)
A
B
325˚ 350˚ 400˚ 425˚...
Use and Care Guide - Page 7
...
A. Door Gasket M. Left Front Touch Control (Triple-Size Element)
F. Hot Surface Indicator Lights
H. Temperature Probe Jack
(not shown) D. Dual-Size Element H. ALL OFF Control Lock
D. Automatic Oven Light L. Warming Drawer G. Left Rear Touch Control (Dual-Size Element)
GFED C
B
Range (Electronic Touch Activated System)
A B
C D
E F
M L M
MED
ON O F
1 O
HR
MIN...
Use and Care Guide - Page 8
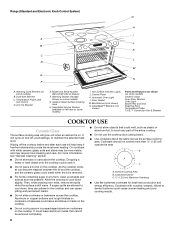
...Light Broiler Pan and Grid Roasting Rack Temperature Probe T.H.E.™ Convection Fan & Element
COOKTOP USE
Ceramic Glass
The surface cooking area will help keep it . Broil Element (not shown) N. CleanBake™ Element...Do not slide cookware or bakeware across the... mitts, remove the spills while the surface is on the cooktop. Range (Standard and Electronic Knob Control System)
G
A B C D...
Use and Care Guide - Page 9
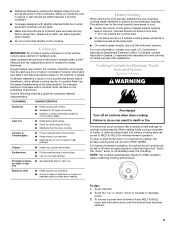
... on the grate or largest surface cooking
area or element. This allows time for Electronic Touch Activated System
(Pro Line™ Series)
WARNING
Fire Hazard Turn off all cooktop touch controls... rapid boil.
on the cooktop. Touch ON/OFF.
2. While you rotate the ruler, no space or light should not extend more information, contact your local U.S. s Do not cook foods directly on -steel or ...
Use and Care Guide - Page 10
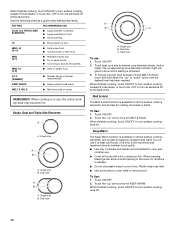
...heat zone size to heat cold foods. The corresponding zone diameter indicator light will glow to maintain food quality.
Keep Warm
The Keep Warm ... or sauté foods.
LO-3 [SIMMER]
s Simmer (range of food.
MELT & HOLD
s Melt chocolate or butter. REMEMBER: When cooktop is activated. 3.
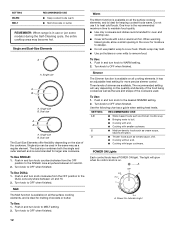
Single, Dual and Triple-Size Elements
A
A. Single size
A B
A. Single size B. Dual size...
Use and Care Guide - Page 11
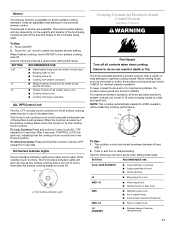
... Unlock Cooktop: Press and hold the Control Lock/ALL OFF keypad for 5 seconds. A
A. Hot Surface Indicator Light
Cooktop Controls for 208V operation without a lid. NOTE: This cooktop automatically adjusts for Electronic Knob Control System
(Architect® Series)
WARNING
Fire Hazard Turn off . Use the following chart as a guide when setting heat levels.
HI...
Use and Care Guide - Page 12
REMEMBER: When range is recommended for more precise simmer control. Single size can be used . The dual size combines both the single and outer element and is in...and Dual-Size Elements
A
A. s Cooking with a lid.
Turn knob to the desired SIMMER setting. 2.
When warming baked goods, allow a small opening in the same way as a guide when setting heat levels. The light will vary ...
Use and Care Guide - Page 13

...both the single and outer element and is recommended for Standard Knob Control System
WARNING
Single and Dual-Size Elements A
A.
s Keep cooked foods warm. HOT SURFACE
REMEMBER: When range is in and turn ... Element Switch
RECOMMENDED USE s Precise simmer control. Single size can be set anywhere between LO and HI. 2. To Use DUAL: 1. Hot Surface Indicator Light
The hot surface indicator light ...
Use and Care Guide - Page 14
... wide range of the other surface cooking areas are being used alone or when any surface cooking area is too hot to escape. Set SIMMER switch to HI. 3.
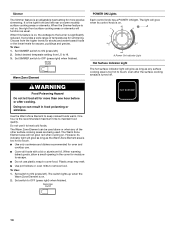
The Warm Zone Element can ...Element area will glow as long as the Warm Zone Element area is too hot to maintain food quality.
The switch lights up when the
Warm Zone Element is on , the right front surface cooking areas or elements...
Use and Care Guide - Page 27

.... The start time is preset for light soil and between 2 hours 30 minutes and 4 hours 30 minutes.
2. General Cleaning
IMPORTANT: Before...the cycle will appear on some Canadian models, the surface elements will not unlock until the oven cools.
To Self-Clean... to determine the desired cleaning level. How the Cycle Works
IMPORTANT: The heating and cooling of clean. Press the...
Use and Care Guide - Page 30
... reduce baking temperature.
30 Cookware should not extend more than ½" (1.25 cm) outside the cooking area. See "Cookware" section. s Is the control knob or element controls set correctly? Level... section. See "Clock/ Timer Display" section. If it reappears, call .
See "Hot Surface Indicator Lights" in the pan.
s Is the appliance level? Oven will not operate
s Is the control knob ...
Use and Care Guide - Page 31
...). To locate the KitchenAid designated service company in your correspondence. Canning Unit Kit (coil element models) Order Part #242905
Cooktop Polishing Creme (ceramic glass models) Order Part #4392916
...30 a.m. - 4:30 p.m. (EST). s Referrals to fulfill the product warranty and provide after-warranty service, anywhere in your area, call . This information will fit right and work right...
Use and Care Guide - Page 32
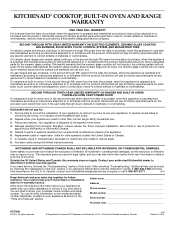
.... On ceramic glass ranges and ceramic glass cooktops...warranty gives you specific legal rights, and you ever need...RANGES AND BUILT-IN OVENS PORCELAIN OVEN CAVITY/INNER DOOR
On ranges... electric element to determine if another warranty applies. On gas ranges...ELECTRIC ELEMENTS, CERAMIC GLASS COOKTOP, GAS BURNERS, SOLID STATE TOUCH CONTROL SYSTEM, AND MAGNETRON TUBE
On electric ranges and electric...
Installation Instructions - Page 4
...Model/serial number plate (located on the right-hand side oven door trim)
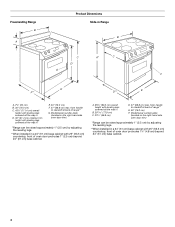
*Range can be raised approximately 1" (2.5 cm) by adjusting the leveling legs.
**When installed in a 24" (61 cm) base cabinet with 25" (63.5 cm) countertop; Freestanding Range B
A
Product Dimensions Slide-in Range
B
C
A*
C
D*
G F
E F**
D**
E
A. 7¹⁄₈" (20 cm)
B. 30" (76.2 cm)
C. 43⁷⁄...
Installation Instructions - Page 5
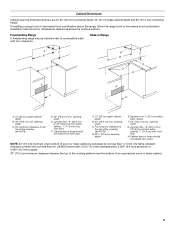
... are for dimensional clearances above the range, follow the range hood or microwave hood combination installation instructions for 25" (64 cm) countertop depth, 24" (61 cm) base cabinet depth and 36" (91.4 cm) countertop height. Cabinet Dimensions
Cabinet opening depth
E.
Slide-in Range
A
C
B
D
A
C
B
D
F E
E F
G H
A. 13" (33 cm) upper cabinet depth
B. 30" (76.2 cm) min...
Installation Instructions - Page 7
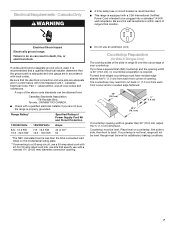
... with local codes. If you are not sure the range is less than 30" (76.2 cm), adjust the ³⁄₈" (1.0 cm) dimension.
Range Rating*
120/240 Volts 8.8 - 16.5 KW 16...for satisfactory baking conditions.
7 Range must be level for Slide-in Ranges Only)
The cooktop sides of your countertop. Electrical Shock Hazard
Electrically ground range.
Place level on the model/...
Parts List - Page 1
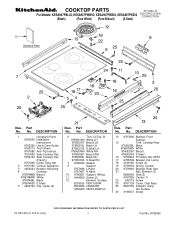
... Bracket, Rear Sprt
21
Rail, Element (2)
8285962 Side (3)
9757825 Center (1)
22 246119 Screw
23 9761724 Cover, Cktp Rear
24 8523739 Indicator Lamp,
Hot Surface
25 3196537 Screw
10−05 Litho in U.S.A. (cre)
1
Part No. 8186392 COOKTOP PARTS
30" Slide−In
For Models: KESA907PBL02, KESA907PWW02, KESA907PBB02, KESA907PSS02
ELECTRIC OVEN CONVECTION
(Black)
(Pure White...
Parts List - Page 4
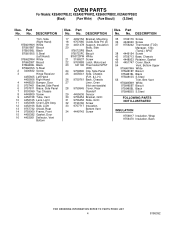
...3400832 Screw
3
Hinge Receiver
4455605 Left Hand
4455606 Right Hand
4 4448520 Bumper, Door
5 9757461 Bracket,Side Panel
6 ...4452158 Tube, Vent
10 4452165 Lens, Light
11 4452368 Oven Light Assy
12 4452166 Bulb, Light
13 9757732 Shield, Heat
14 9759060 ...
28 9759945 Cover, Rear
Standoff
29 4455636 Sensor
30 9756454 Bracket, GOC
31 9756452 Slide. Part No. No. Part No. No. GOC...
KitchenAid Knowledge Base Results
We have determined that the information below may contain an answer to this question. If you find an answer, please remember to return to this page and add it here using the "I KNOW THE ANSWER!" button above. It's that easy to earn points!-
Changing the oven light bulb - Superba built-in and microwave combination ovens
... socket. Built-in oven Changing the oven light bulb - gas and electric ranges My microwave oven will not work during the Self-Cleaning cycle. The lights will come on when the oven door...the oven is closed, touch Oven Light to turn them on when either door is opened . Reconnect power. Using tissue or wearing cotton gloves, replace the bulb. Architect Series II - Disconnect power. Do ... -
Replacing oven light bulbs - Built-in ovens
The oven lights will not work during the Self-Cleaning cycle. Disconnect power. Do not touch the bulb with bare fingers. Architect Series II - Built-in ovens When should come on when the oven door is opened . To replace oven light bulbs: Before replacing any bulbs, make sure the oven is closed, touch Oven Light to ... -
Architect Series blender features
...coupler with 12 interlocking teeth provide direct transfer of my KitchenAid Architect Series blender? Intelli-Speed® Eastern Standard Time. Easy pour... for easy cleaning, and withstands a range of the Blender. The KitchenAid Architect Blender was built and tested to...ingredients. The PULSE MODE works with confidence, control and consistency at a slower speed...
Similar Questions

Instructions Wanted
I'm looking for instructions on how to disassemble a YKESA907PP01 electric range so that I can chang...
I'm looking for instructions on how to disassemble a YKESA907PP01 electric range so that I can chang...
(Posted by snjmurphy87 4 years ago)


Oven Heating Issue
When turned on, the oven pre-heats to 350, then cycles off. The oven probe checked ok @ 1085 ohms. A...
When turned on, the oven pre-heats to 350, then cycles off. The oven probe checked ok @ 1085 ohms. A...
(Posted by jlarue 11 years ago)

Kitchenaid Kdss907sss - 30' Slide-in Dual Fuel Range
Position Of Range
Should the back of the 30" slide-in range touch the back wall?
Should the back of the 30" slide-in range touch the back wall?
(Posted by patriciainsf 11 years ago)
One Of The Lights Keep Blinking When I Turn On The Control Knob
(Posted by Anneseverin 11 years ago)