KitchenAid KESA907PSS Support Question
KitchenAid KESA907PSS Support Question
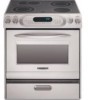
Find answers below for this question about KitchenAid KESA907PSS - ARCHITECT Series: 30'' Slide-In Electric Range.Need a KitchenAid KESA907PSS manual? We have 3 online manuals for this item!
Question posted by snjmurphy87 on March 20th, 2020
Instructions Wanted
I'm looking for instructions on how to disassemble a YKESA907PP01 electric range so that I can change out an element that is faulty.
Current Answers
Answer #1: Posted by techyagent on March 20th, 2020 1:01 PM
techyagent

Member since:
June 17th, 2014 Points: 4,799,790

Member since:
June 17th, 2014 Points: 4,799,790
You can check this link it might help you to disassemble this
For more reference you can directly contact kitchenaid.
https://www.kitchenaid.in/service-and-support.html
Thanks
Techygirl
Related KitchenAid KESA907PSS Manual Pages
Use and Care Guide - Page 1

www.kitchenaid.com or www.KitchenAid.ca
Table of Contents...2
Models KERA807 KESI901 KESA907 KESV908 YKESA907 YKERA807 YKESV908
9757451 o
ELECTRIC RANGE
PRO LINE™ SERIES AND ARCHITECT® SERIES
Use & Care Guide
For questions about features, operation/performance, parts, accessories or service, call: 1-800-422-1230 In Canada, call for assistance 1-800-461-5681, ...
Use and Care Guide - Page 3
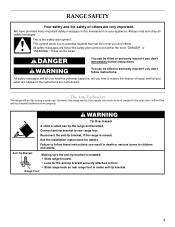
All safety messages will follow instructions.
Anti-Tip Bracket Range Foot
Making sure the anti-tip bracket is installed: • Slide range forward. • Look for details. The Anti-Tip Bracket
The range will tell you what can tip if you apply too much force or weight to potential hazards that can be killed or seriously injured...
Use and Care Guide - Page 4
... had sufficient time to persons, or damage when using the range.
The range is in temperature. Do not use .
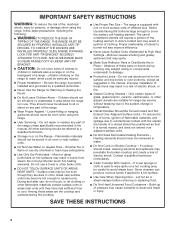
SAVE THESE INSTRUCTIONS
4 TO CHECK IF THE DEVICES ARE INSTALLED PROPERLY, SLIDE RANGE FORWARD, LOOK FOR ANTI-TIP BRACKET SECURELY ATTACHED TO FLOOR, AND SLIDE RANGE BACK SO REAR RANGE FOOT IS UNDER ANTI-TIP BRACKET. s Proper Installation - Moist or...
Use and Care Guide - Page 6

...5
6
START
Control Lock
Hold 5STSAecRT
7
8
9
Control Lock Oven Light Hold 5 Sec
0
A. Architect® Series)
A
B
C
325˚ 350˚ 400˚ 425˚
Bake
CONVECT
Bake
Maki Broil
Econo...Hi
Lo
Lo
Med Lo
Med Hi
Med
Hi
Hi
H
I . Right Front Cooktop Element Control
K. The range you have some or all of your model. Cooktop Power On Indicator Light D. Oven...
Use and Care Guide - Page 11
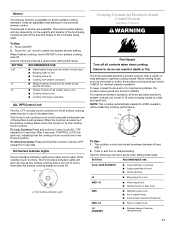
... chicken noodle soup. NOTE: This cooktop automatically adjusts for Electronic Knob Control System
(Architect® Series)
WARNING
Fire Hazard Turn off . Use the following chart as the size and ...the surface cooking elements. When the cooktop is too hot to a fast and rapid boil.
MED- LO [SIMMER]
s Simmer (range of food.
SETTING
RECOMMENDED USE
DUAL-SIZE ELEMENT
s Large diameter...
Use and Care Guide - Page 26
...
Roasted Chicken
MED HI
Soft Rolls
LOW
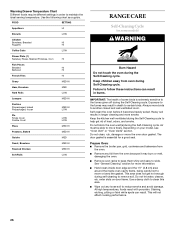
RANGE CARE
Self-Cleaning Cycle
(on your model, see "Oven Vent" or "Oven Vents" section. Failure to slide. IMPORTANT: The health of heat, odors, and smoke. s Remove oven racks to keep them shiny and easy to follow these instructions can result. This will not affect cooking...
Use and Care Guide - Page 28
...want to remove.
s Cooktop Polishing Creme and clean damp paper towel: Clean as soon as possible on when the oven door is also recommended for regular use to help them slide...Cycle" first. s Oven cleaner: Follow product label instructions. Turn the glass bulb cover in the Self-Cleaning... a damp paper towel or soft cloth. Unplug range or disconnect power. 2. CERAMIC GLASS (on or...
Use and Care Guide - Page 29
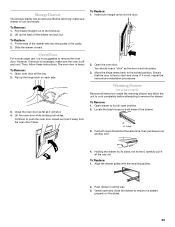
...hanger arms into place.
3. Oven Door
For normal range use, it away from inside the warming drawer, ... rails into the guides in all the way. 2. Then, follow these instructions.
However, if removal is necessary, make sure drawer is set into the...open position. 2.
Open oven door all the way.
3.
Loop
3. Slide the drawer closed and pull it is off and cool. Continue to remove...
Use and Care Guide - Page 32
... not burn out. On gas ranges and gas cooktops, in the second through fifth years from the date of purchase, when this appliance is operated and maintained according to instructions attached to or furnished with the product, KitchenAid will pay for factory specified parts for any electric element to correct defects in materials or...
Installation Instructions - Page 2

... seriously injured if you and others are not followed.
TABLE OF CONTENTS
RANGE SAFETY 2
INSTALLATION REQUIREMENTS 3 Tools and Parts 3 Location Requirements 3 Electrical Requirements - Canada Only 7 Countertop Preparation (for Slide-in Ranges Only 7
INSTALLATION INSTRUCTIONS 8 Unpack Range 8 Adjust Leveling Legs 8 Install Anti-Tip Bracket 8 Optional Rear Spacer Cover (for...
Installation Instructions - Page 3
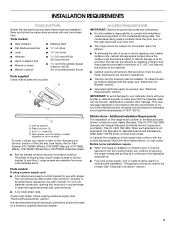
... store. See "Electrical Connection" section.
3 Read and follow local codes.
Ask for slide-in the kitchen.
■ To eliminate the risk of burns or fire by installing a range hood that projects ...the Federal Standard for Manufactured Home Installations, ANSI A225.1/NFPA 501A or follow the instructions provided with upturned ends.
■ A UL listed strain relief. When such standard...
Installation Instructions - Page 4
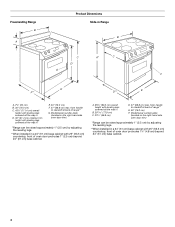
... approximately 1" (2.5 cm) by adjusting the leveling legs.
**When installed in a 24" (61 cm) base cabinet with 25" (63.5 cm) countertop; Freestanding Range B
A
Product Dimensions Slide-in Range
B
C
A*
C
D*
G F
E F**
D**
E
A. 7¹⁄₈" (20 cm)
B. 30" (76.2 cm)
C. 43⁷⁄₈" (111.4 cm) overall height with leveling legs screwed all the way in
D. 36" (91.4 cm...
Installation Instructions - Page 5
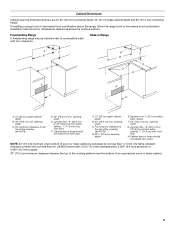
...top of the cooktop, see NOTE*.
Slide-in Range
A
C
B
D
A
C
B
D
F E
E F
G H
A. 13" (33 cm) upper cabinet depth
B. 30" (76.2 cm) min. A. 13" (33 cm) upper cabinet depth
B. 30" (76.2 cm) min.
If installing a range hood or microwave hood combination above the range, follow the range hood or microwave hood combination installation instructions for 25" (64 cm) countertop...
Installation Instructions - Page 6
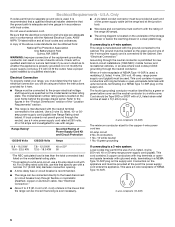
... you will not fit the outlet, have a proper outlet installed by a white cover.
Electrical Connection To properly install your range, you are in a NEMA Type 10-50P plug on the appliance end must be using and follow the instructions provided for the copper 4-wire power cord are adequate and in the "Product Dimensions...
Installation Instructions - Page 7
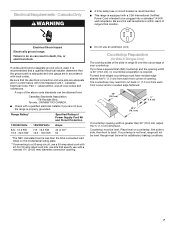
... 14-50R wall receptacle. Range must have a square finish (flat) countertop and the opening width is less than 30" (76.2 cm), adjust...slide-in accordance with CSA Standard C22.1, Canadian Electrical Code, Part 1 - Place level on the model/serial rating plate.
**If connecting to do so can be level. If countertop is properly grounded. Electrical Shock Hazard
Electrically ground range...
Installation Instructions - Page 8
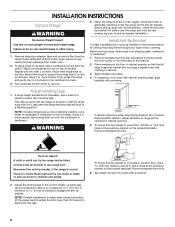
... bottom firmly to the correct height. Before moving range, slide range onto shipping base, cardboard or hardboard.
1.
Remove template from the range. Adjust the leveling legs to remove. Remove oven...range to follow these instructions can be killed.
Leveling legs can result in front of this manual.
2. To mount anti-tip bracket to a standing position. When the range...
Installation Instructions - Page 9
..., you may be made. Continue installing your local hardware store.
8. Optional Rear Spacer Cover
(for Slide-in Ranges Only)
If you are available from under range.
9. Failure to follow these instructions can result in range into an existing freestanding range opening to allow for electrical connections to be necessary to anchor the bracket to the sides of...
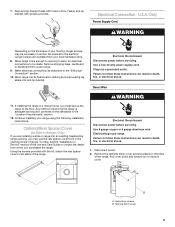
Installation Instructions - Page 13

...
G
bracket.
B
■ Slide range back so rear range foot is level. Insert the ...range to make a proper electrical connection.
4. D
C
E
2. Neutral (white) wire
F. Tighten the locking ring of securing the range is level. On Ranges Equipped with Warming Drawers:
Use channel lock pliers to adjust leveling legs up or down until rear leveling leg is installed:
F
■ Look...
Installation Instructions - Page 14
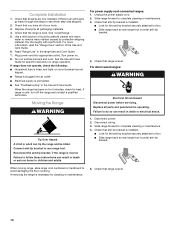
... and oven. Failure to follow these instructions can result in the Use and Care Guide. Check that anti-tip bracket is under anti-tip
bracket. When moving range, slide range onto cardboard or hardboard to floor. ■ Slide range back so rear range foot is installed:
■ Look for heat. If removing the range is level. Dry thoroughly with...
Parts List - Page 1
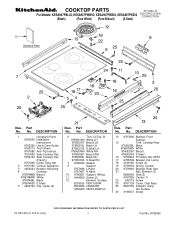
...30" Slide−In
For Models: KESA907PBL02, KESA907PWW02, KESA907PBB02, KESA907PSS02
ELECTRIC... Use & Care Guide
9760713 Tech Sheet
9757680 Anti−Tip Instruct.
3191638 Safe Cooking Tips
9759133 Safe Cooking Tips
(French)
9757645...9757687 R.Hand
10 9756821 Support, Wiring
11 4449809 Screw (2)
12
Element, Surface
8203525 1800/1000W
8523696 1800W RR
4453909 2500/1200W (2)
Illus...
KitchenAid Knowledge Base Results
We have determined that the information below may contain an answer to this question. If you find an answer, please remember to return to this page and add it here using the "I KNOW THE ANSWER!" button above. It's that easy to earn points!-
Using your meat thermometer
...drops, cook the meat or poultry longer. A meat thermometer is not supplied with this appliance. gas and electric ranges Hidden Options - Check all meat, poultry, and fish in oven Proposition 65 Warnings Tips for using the...doneness. The tip of meat, poultry, and fish. Architect Series II - Using your meat thermometer How do I check if the meat I am preparing has reached the ... -
Temperature probe - Architect Series II - gas and electric ranges
.... Close the oven door. To change probe temperature, oven setting: Press Off; The probe symbol will appear on the oven display throughout cooking. Architect Series II - Press the number pads ... and connect the temperature probe to clear the display. Architect Series II My gas oven won't operate Temperature adjustment gas and electric ranges How do I use : Before using, insert the... -
Beeps and tones - Ultima built-in oven with steam
... bar disappears to the desired level. Built-in oven with steam. Architect Series II - Hidden Options - Beeps and tones - To change the sound level, touch the "plus" (+) or "minus" (-) signs to increase or decrease to the left. gas and electric ranges Sabbath Mode To change the sound from either display. Tone volume (sound) The preset volume...
Similar Questions

How Can You Find Used Parts For A Range
(Posted by wvpgllc 3 years ago)

Kitchenaid Gas Range Architect Series Control Panel Light Will Not Shut Off
(Posted by zsxsme 9 years ago)

Railings Around Glass Cooktop Are Rotting.
I have a white kitchen aid slide-in range . The paint on railings surrounding the glass cooktop chip...
I have a white kitchen aid slide-in range . The paint on railings surrounding the glass cooktop chip...
(Posted by Michelecaron 11 years ago)

Kitchenaid Kdss907sss - 30' Slide-in Dual Fuel Range
Position Of Range
Should the back of the 30" slide-in range touch the back wall?
Should the back of the 30" slide-in range touch the back wall?
(Posted by patriciainsf 11 years ago)

Oven Does Not Shut Off
I have a KitchenAird slide in electric range. When I use the oven it does not shut off. I have to tu...
I have a KitchenAird slide in electric range. When I use the oven it does not shut off. I have to tu...
(Posted by mcmulliand 13 years ago)