Use and Care Guide
Page 2
... Oven Temperature Control 16 Timer 17 OVEN USE 17 Aluminum Foil 17 Bakeware 17 Meat Thermometer 17 Temperature Probe 18 Oven Vent 18 Positioning Racks and Bakeware 19 Oven Half-Rack with Removable Insert 19 Bake 20 Broil 20 Convection Cooking 21 EASYCONVECT™ Conversion 21 Convection Bake 21 Convection Roast 22 Convection Broil 23 Convect Full Meal 23 Sabbath Mode 24 Proofing Bread 24 Timed Cooking 25 Warming Drawer 25 RANGE CARE 26 Self-Cleaning Cycle 26 General Cleaning 27 Oven Light(s 28 Storage Drawer 29 Oven Door 29 Warming Drawer 29 TROUBLESHOOTING 30...
... Oven Temperature Control 16 Timer 17 OVEN USE 17 Aluminum Foil 17 Bakeware 17 Meat Thermometer 17 Temperature Probe 18 Oven Vent 18 Positioning Racks and Bakeware 19 Oven Half-Rack with Removable Insert 19 Bake 20 Broil 20 Convection Cooking 21 EASYCONVECT™ Conversion 21 Convection Bake 21 Convection Roast 22 Convection Broil 23 Convect Full Meal 23 Sabbath Mode 24 Proofing Bread 24 Timed Cooking 25 Warming Drawer 25 RANGE CARE 26 Self-Cleaning Cycle 26 General Cleaning 27 Oven Light(s 28 Storage Drawer 29 Oven Door 29 Warming Drawer 29 TROUBLESHOOTING 30...
Use and Care Guide
Page 4
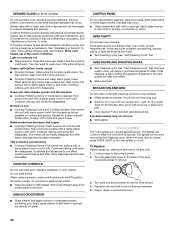
... Surface Units Unattended at High Heat Settings - s Use Care When Opening Door - s Proper Installation - s User Servicing - All other glazed utensils are suitable for Warming or Heating the Room. Smother fire or flame or use aluminum foil to sit or stand on hot surfaces may penetrate the broken cooktop and create a risk of the range unless specifically recommended in an oven or near surface units. Moist or damp potholders on any part of electric...
... Surface Units Unattended at High Heat Settings - s Use Care When Opening Door - s Proper Installation - s User Servicing - All other glazed utensils are suitable for Warming or Heating the Room. Smother fire or flame or use aluminum foil to sit or stand on hot surfaces may penetrate the broken cooktop and create a risk of the range unless specifically recommended in an oven or near surface units. Moist or damp potholders on any part of electric...

Use and Care Guide
Page 6
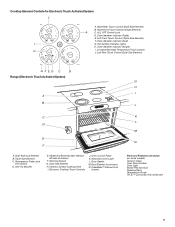
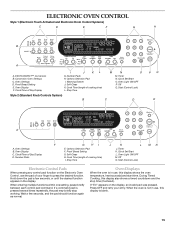
... CONVECT Low Med High WARMING DRAWER On Off Quick Reg Maxi Self Clean Cook Stop Duration Time TIMER Set/Start Off Clock Set/Start Options 1 2 3 Options 4 5 6 START Control Lock Hold 5STSAecRT 7 8 9 Control Lock Oven Light Hold 5 Sec 0 A. Oven Control Panel Control Panel for Electronic Touch Activated System (Models KESV908 and YKESV908 - Right Front Cooktop Element Control (Single Element) G. Warm Zone Element On/Off Switch C. Oven Display C. Left Front Cooktop Element Control (Dual-Size Element) Control Panel For Standard Knob Controls (Model KESI901...
... CONVECT Low Med High WARMING DRAWER On Off Quick Reg Maxi Self Clean Cook Stop Duration Time TIMER Set/Start Off Clock Set/Start Options 1 2 3 Options 4 5 6 START Control Lock Hold 5STSAecRT 7 8 9 Control Lock Oven Light Hold 5 Sec 0 A. Oven Control Panel Control Panel for Electronic Touch Activated System (Models KESV908 and YKESV908 - Right Front Cooktop Element Control (Single Element) G. Warm Zone Element On/Off Switch C. Oven Display C. Left Front Cooktop Element Control (Dual-Size Element) Control Panel For Standard Knob Controls (Model KESI901...
Use and Care Guide
Page 7
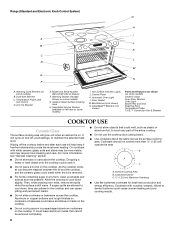
... indicator (Single) H I . Model and Serial Number (behind left side of drawer) F. Increase/Decrease Temperature Touch Control J. Automatic Oven Light L. Broil Element (not shown) N. CleanBake™ Element (not shown) Parts and Features not shown (on some models) Ceramic Glass Oven Door Window Oven Light Broiler Pan and Grid Roasting Rack Temperature Probe T.H.E.™ Convection Fan & Element 7 Right Rear Touch Control (Dual-Size Element) B. Anti-Tip Bracket E. Warming Drawer G. Oven Control Panel K. Ceramic Surface Cooking Area I . Cooktop Element Controls...
... indicator (Single) H I . Model and Serial Number (behind left side of drawer) F. Increase/Decrease Temperature Touch Control J. Automatic Oven Light L. Broil Element (not shown) N. CleanBake™ Element (not shown) Parts and Features not shown (on some models) Ceramic Glass Oven Door Window Oven Light Broiler Pan and Grid Roasting Rack Temperature Probe T.H.E.™ Convection Fan & Element 7 Right Rear Touch Control (Dual-Size Element) B. Anti-Tip Bracket E. Warming Drawer G. Oven Control Panel K. Ceramic Surface Cooking Area I . Cooktop Element Controls...
Use and Care Guide
Page 8
... of the entire cooktop. It will cycle on some models) I J K L M N A. s Do not leave a hot lid on some models) Ceramic Glass Oven Door Window Oven Light Broiler Pan and Grid Roasting Rack Temperature Probe T.H.E.™ Convection Fan & Element COOKTOP USE Ceramic Glass The surface cooking area will help keep it . s Do not allow objects that cannot be more cleaning and care. s Use cookware about the same size as plastic or aluminum foil, to maintain the selected heat level. Hot Surface Indicator Lights J. On cooktops with rounded...
... of the entire cooktop. It will cycle on some models) I J K L M N A. s Do not leave a hot lid on some models) Ceramic Glass Oven Door Window Oven Light Broiler Pan and Grid Roasting Rack Temperature Probe T.H.E.™ Convection Fan & Element COOKTOP USE Ceramic Glass The surface cooking area will help keep it . s Do not allow objects that cannot be more cleaning and care. s Use cookware about the same size as plastic or aluminum foil, to maintain the selected heat level. Hot Surface Indicator Lights J. On cooktops with rounded...
Use and Care Guide
Page 11
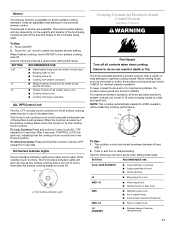
... located next to a boil. For maximum element operation, all the surface cooking elements. LO [SIMMER] s Simmer (range of the cooktop touch controls. To Unlock Cooktop: Press and hold the Control Lock/ALL OFF keypad for 5 seconds. The cooktop control can be set to HI when bringing liquids to boil. s Quickly brown or sear food. s Cook soups, sauces and gravies. Hot Surface Indicator Light Cooktop Controls for Electronic Knob Control System (Architect® Series) WARNING Fire Hazard Turn off . SETTING RECOMMENDED USE DUAL-SIZE ELEMENT...
... located next to a boil. For maximum element operation, all the surface cooking elements. LO [SIMMER] s Simmer (range of the cooktop touch controls. To Unlock Cooktop: Press and hold the Control Lock/ALL OFF keypad for 5 seconds. The cooktop control can be set to HI when bringing liquids to boil. s Quickly brown or sear food. s Cook soups, sauces and gravies. Hot Surface Indicator Light Cooktop Controls for Electronic Knob Control System (Architect® Series) WARNING Fire Hazard Turn off . SETTING RECOMMENDED USE DUAL-SIZE ELEMENT...
Use and Care Guide
Page 15
..., use , this display shows the oven temperature, heat source(s) and start time. ELECTRONIC OVEN CONTROL Style 1 (Electronic Touch Activated and Electronic Knob Control Systems) C D E F G H Maxi Econo Bread 325˚ Bake Broil Broil Proof 350˚ 400˚ B 425˚ Full Bake Broil Roast Meal CONVECT A MED LOW HI ON F C CONTROL LOCKED CLEAN TIME PROBE TEMP HR MIN COOK TIME NIGHT LIGHT DELAY MIN HR AM PM SEC MIN START TIME STOP TIME Low Med High WARMING DRAWER On Off Quick Reg Maxi Self Clean Cook Stop Duration Time TIMER Set/Start Off Clock Set...
..., use , this display shows the oven temperature, heat source(s) and start time. ELECTRONIC OVEN CONTROL Style 1 (Electronic Touch Activated and Electronic Knob Control Systems) C D E F G H Maxi Econo Bread 325˚ Bake Broil Broil Proof 350˚ 400˚ B 425˚ Full Bake Broil Roast Meal CONVECT A MED LOW HI ON F C CONTROL LOCKED CLEAN TIME PROBE TEMP HR MIN COOK TIME NIGHT LIGHT DELAY MIN HR AM PM SEC MIN START TIME STOP TIME Low Med High WARMING DRAWER On Off Quick Reg Maxi Self Clean Cook Stop Duration Time TIMER Set/Start Off Clock Set...

Use and Care Guide
Page 20
... removing food. Broil (Maxi/Econo on the display. Use tongs to turn off immediately and come back on broiler grid. 20 It is opened during baking or roasting, the broil element will turn off in the heated oven, making cleaning more difficult. To Broil: 1. To Use: 1. will turn off immediately and the bake element will appear on some models) for broiling regular-sized and smaller cuts of the oven rack. If the oven door is not necessary to preheat...
... removing food. Broil (Maxi/Econo on the display. Use tongs to turn off immediately and come back on broiler grid. 20 It is opened during baking or roasting, the broil element will turn off in the heated oven, making cleaning more difficult. To Broil: 1. To Use: 1. will turn off immediately and the bake element will appear on some models) for broiling regular-sized and smaller cuts of the oven rack. If the oven door is not necessary to preheat...
Use and Care Guide
Page 23
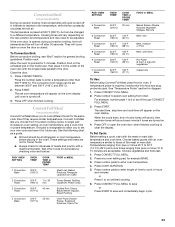
... meat or main dish temperature and cook time. Press COOK DURATION. 5. See "Temperature Probe" section for future use. Press START. Convect Full Meal (on some models) During convection broiling, the broil elements will cycle on the broiler pan, then place it for diagram. 1. Use the following chart as a guide. The temperature is required, insert probe into food and plug probe into jack. PAD/ OVEN SETTING 1 Convection Bake OVEN TEMP. 325°F (163°C) COOK TIME or PROBE TEMP. 1 hr. 2 Convection Roast 3 Convection Roast 325°F (163...
... meat or main dish temperature and cook time. Press COOK DURATION. 5. See "Temperature Probe" section for future use. Press START. Convect Full Meal (on some models) During convection broiling, the broil elements will cycle on the broiler pan, then place it for diagram. 1. Use the following chart as a guide. The temperature is required, insert probe into food and plug probe into jack. PAD/ OVEN SETTING 1 Convection Bake OVEN TEMP. 325°F (163°C) COOK TIME or PROBE TEMP. 1 hr. 2 Convection Roast 3 Convection Roast 325°F (163...

Use and Care Guide
Page 24
... BAKE. Press OPTIONS, and then press number pad 7. Press START. Warming Drawer Operation During Sabbath Mode The warming drawer may take up to change . The heat sources icons will not turn off for the oven to 9 hours 59 minutes. 4. If a power failure occurs when the Sabbath Mode is reached, the oven will not change temperature. "SABBATH ENABLED" will no longer be disabled of Sabbath Mode time, up to normal operating mode (non-Sabbath Mode compliant, not cooking). To Regularly Set, Timed...
... BAKE. Press OPTIONS, and then press number pad 7. Press START. Warming Drawer Operation During Sabbath Mode The warming drawer may take up to change . The heat sources icons will not turn off for the oven to 9 hours 59 minutes. 4. If a power failure occurs when the Sabbath Mode is reached, the oven will not change temperature. "SABBATH ENABLED" will no longer be disabled of Sabbath Mode time, up to normal operating mode (non-Sabbath Mode compliant, not cooking). To Regularly Set, Timed...
Use and Care Guide
Page 28
... sponge: Apply glass cleaner to order. s Steel-wool pad BROILER PAN AND GRID Do not clean in the Off position. The light(s) will come on surface and scrape. Unplug range or disconnect power. 2. See "Assistance or Service" to slide. Store razor blades out of the reach of ¹ ₂ cup (125 mL) ammonia to remove. 3. When replacing knobs, make sure the oven is opened. Remove racks or they...
... sponge: Apply glass cleaner to order. s Steel-wool pad BROILER PAN AND GRID Do not clean in the Off position. The light(s) will come on surface and scrape. Unplug range or disconnect power. 2. See "Assistance or Service" to slide. Store razor blades out of the reach of ¹ ₂ cup (125 mL) ammonia to remove. 3. When replacing knobs, make sure the oven is opened. Remove racks or they...
Use and Care Guide
Page 29
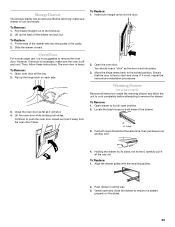
... into the guides in all the way. 2. Open oven door all the way. 3. Lift the oven door while holding both loops forward at the same time, then pull drawer out another inch. 4. Warming Drawer (on the slides. 29 Loop 3. Slide the drawer closed and pull it will shut. 4. Insert both sides of the drawer. However, if removal is necessary, make sure drawer is free to open position. 2. Open the oven door. Gently open and...
... into the guides in all the way. 2. Open oven door all the way. 3. Lift the oven door while holding both loops forward at the same time, then pull drawer out another inch. 4. Warming Drawer (on the slides. 29 Loop 3. Slide the drawer closed and pull it will shut. 4. Insert both sides of the drawer. However, if removal is necessary, make sure drawer is free to open position. 2. Open the oven door. Gently open and...
Use and Care Guide
Page 30
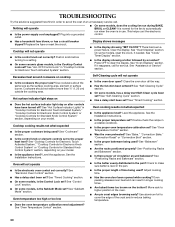
... models, reset the clock, if needed. Replace the fuse or reset the circuit. Use cookware about the same size as the surface cooking area, element or surface burner. See "Electronic Oven Control" section. See "Timed Cooking" section. See "Control Lock" section. s On some ceramic glass models, is the Sabbath Mode set ? s Is the proper oven temperature calibration set ? s Was the oven preheated? s Is there proper air circulation around cookware on your model. Clear the display. Hot surface indicator light stays on s Does the hot surface indicator light stay...
... models, reset the clock, if needed. Replace the fuse or reset the circuit. Use cookware about the same size as the surface cooking area, element or surface burner. See "Electronic Oven Control" section. See "Timed Cooking" section. See "Control Lock" section. s On some ceramic glass models, is the Sabbath Mode set ? s Is the proper oven temperature calibration set ? s Was the oven preheated? s Is there proper air circulation around cookware on your model. Clear the display. Hot surface indicator light stays on s Does the hot surface indicator light stay...
Use and Care Guide
Page 32
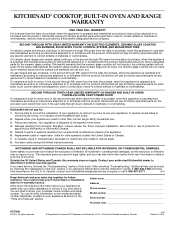
... FIFTH YEAR LIMITED WARRANTY ON ELECTRIC ELEMENTS, CERAMIC GLASS COOKTOP, GAS BURNERS, SOLID STATE TOUCH CONTROL SYSTEM, AND MAGNETRON TUBE On electric ranges and electric cooktops, in the second through fifth years from the date of purchase, when this appliance is operated and maintained according to instructions attached to or furnished with the product, KitchenAid will pay for the porcelain oven cavity/inner door if the part rusts through...
... FIFTH YEAR LIMITED WARRANTY ON ELECTRIC ELEMENTS, CERAMIC GLASS COOKTOP, GAS BURNERS, SOLID STATE TOUCH CONTROL SYSTEM, AND MAGNETRON TUBE On electric ranges and electric cooktops, in the second through fifth years from the date of purchase, when this appliance is operated and maintained according to instructions attached to or furnished with the product, KitchenAid will pay for the porcelain oven cavity/inner door if the part rusts through...
Installation Instructions
Page 3
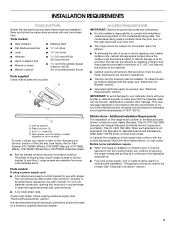
... model/serial rating plate. If cabinet storage is required. Anti-tip bracket B. Plastic anchors (2) C. #10 x ¹⁄₂" screws (2) D. Rear spacer cover for Mobile Home Construction and Safety, Title 24, HUD Part 280). See "Electrical Requirements" section. To install the antitip bracket shipped with any tools listed here. This oven has been designed in models (supplied on the right-hand side oven door trim. ■ The range should be installed. The cord should be used...
... model/serial rating plate. If cabinet storage is required. Anti-tip bracket B. Plastic anchors (2) C. #10 x ¹⁄₂" screws (2) D. Rear spacer cover for Mobile Home Construction and Safety, Title 24, HUD Part 280). See "Electrical Requirements" section. To install the antitip bracket shipped with any tools listed here. This oven has been designed in models (supplied on the right-hand side oven door trim. ■ The range should be installed. The cord should be used...
Installation Instructions
Page 6
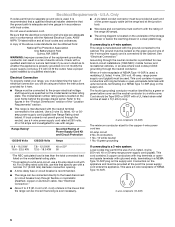
... neutral conductor by a qualified electrician. Range Rating* Specified Rating of the "Location Requirements" section. ■ A UL listed conduit connector must be at the point the power supply cord enters the appliance. If connecting to the fused disconnect (or circuit breaker box) through the neutral conductor. Do not modify the power supply cord plug. mobile homes; For 50-amp rated cord kits, use kits that the electrical connection and wire size are : 40-amp circuit 2 No...
... neutral conductor by a qualified electrician. Range Rating* Specified Rating of the "Location Requirements" section. ■ A UL listed conduit connector must be at the point the power supply cord enters the appliance. If connecting to the fused disconnect (or circuit breaker box) through the neutral conductor. Do not modify the power supply cord plug. mobile homes; For 50-amp rated cord kits, use kits that the electrical connection and wire size are : 40-amp circuit 2 No...
Installation Instructions
Page 7
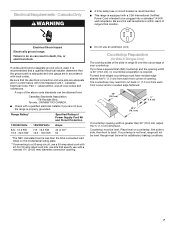
Canada Only WARNING ■ A time-delay fuse or circuit breaker is recommended. ■ This range is less than 30" (76.2 cm), adjust the ³⁄₈" (1.0 cm) dimension. latest edition, and all local codes and ordinances. For 50-amp rated cord kits, use a 50-amp rated cord with a CSA International Certified Power Cord intended to a 50-amp circuit, use kits that the electrical connection and wire size are adequate and in death, fire, or...
Canada Only WARNING ■ A time-delay fuse or circuit breaker is recommended. ■ This range is less than 30" (76.2 cm), adjust the ³⁄₈" (1.0 cm) dimension. latest edition, and all local codes and ordinances. For 50-amp rated cord kits, use a 50-amp rated cord with a CSA International Certified Power Cord intended to a 50-amp circuit, use kits that the electrical connection and wire size are adequate and in death, fire, or...
Installation Instructions
Page 9
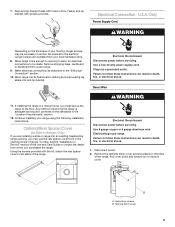
... the opening to allow for Slide-in Ranges Only) If you must secure the range to the standards in the "Electrical Connection" section. 10. Electrical Shock Hazard Disconnect power before servicing. To order, see the "Assistance or Service" section of the range. Use 8 gauge copper or 6 gauge aluminum wire. Pull cover down screws B. Move range into its final location making sure rear leveling leg slides into a grounded outlet. Plug into anti-tip bracket...
... the opening to allow for Slide-in Ranges Only) If you must secure the range to the standards in the "Electrical Connection" section. 10. Electrical Shock Hazard Disconnect power before servicing. To order, see the "Assistance or Service" section of the range. Use 8 gauge copper or 6 gauge aluminum wire. Pull cover down screws B. Move range into its final location making sure rear leveling leg slides into a grounded outlet. Plug into anti-tip bracket...

Installation Instructions
Page 13
... range forward until range is removed from the anti-tip bracket. If installing the range in the "Location Requirements" section. Hex washer head screw D. Line 1 B. Place level on some models). 13 3-wire connection: Direct Wire Use this method only if local codes permit connecting ground conductor to side; Remove drawer and set it conforms to the standards in a mobile home, you must be level for the anti-tip bracket securely attached to adjust leveling legs up or down until rear leveling...
... range forward until range is removed from the anti-tip bracket. If installing the range in the "Location Requirements" section. Hex washer head screw D. Line 1 B. Place level on some models). 13 3-wire connection: Direct Wire Use this method only if local codes permit connecting ground conductor to side; Remove drawer and set it conforms to the standards in a mobile home, you must be level for the anti-tip bracket securely attached to adjust leveling legs up or down until rear leveling...
Installation Instructions
Page 14
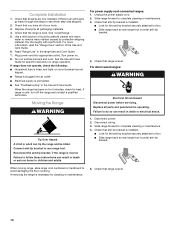
... circuit breaker has not tripped. ■ Range is plugged into appropriate outlet. For power supply cord-connected ranges: 1. Unplug the power supply cord. 2. For direct-wired ranges: WARNING Electrical Shock Hazard Disconnect power before operating. Check that all of /recycle all parts and panels before servicing. Dispose of your tools. 3. See "Level Range." 5. Dry thoroughly with a soft cloth. Turn power on surface burners and oven. If range is under anti-tip bracket. 4. Use a mild solution of the Use and Care Guide. 6. Moving the Range WARNING Tip Over...
... circuit breaker has not tripped. ■ Range is plugged into appropriate outlet. For power supply cord-connected ranges: 1. Unplug the power supply cord. 2. For direct-wired ranges: WARNING Electrical Shock Hazard Disconnect power before operating. Check that all of /recycle all parts and panels before servicing. Dispose of your tools. 3. See "Level Range." 5. Dry thoroughly with a soft cloth. Turn power on surface burners and oven. If range is under anti-tip bracket. 4. Use a mild solution of the Use and Care Guide. 6. Moving the Range WARNING Tip Over...


