Use and Care Guide
Page 1
o ELECTRIC RANGE PRO LINE™ SERIES AND ARCHITECT® SERIES Use & Care Guide For questions about features, operation/performance, parts, accessories or service, call: 1-800-422-1230 In Canada, call for assistance 1-800-461-5681, for installation and service, call: 1-800-807-6777 or visit our website at... www.kitchenaid.com or www.KitchenAid.ca Table of Contents...2 Models KERA807 KESI901 KESA907 KESV908 YKESA907 YKERA807 YKESV908 9757451
o ELECTRIC RANGE PRO LINE™ SERIES AND ARCHITECT® SERIES Use & Care Guide For questions about features, operation/performance, parts, accessories or service, call: 1-800-422-1230 In Canada, call for assistance 1-800-461-5681, for installation and service, call: 1-800-807-6777 or visit our website at... www.kitchenaid.com or www.KitchenAid.ca Table of Contents...2 Models KERA807 KESI901 KESA907 KESV908 YKESA907 YKERA807 YKESV908 9757451
Use and Care Guide
Page 2
TABLE OF CONTENTS RANGE SAFETY 3 The Anti-Tip Bracket 3 PARTS AND FEATURES 6 COOKTOP USE 8 Ceramic Glass 8 Cookware 9 Home Canning 9 Cooktop Controls for Electronic Touch Activated System .........9 Cooktop Controls for Electronic Knob Control System 11 Cooktop ... Convection Bake 21 Convection Roast 22 Convection Broil 23 Convect Full Meal 23 Sabbath Mode 24 Proofing Bread 24 Timed Cooking 25 Warming Drawer 25 RANGE CARE 26 Self-Cleaning Cycle 26 General Cleaning 27 Oven Light(s 28 Storage Drawer 29 Oven Door 29 Warming Drawer 29 TROUBLESHOOTING...
TABLE OF CONTENTS RANGE SAFETY 3 The Anti-Tip Bracket 3 PARTS AND FEATURES 6 COOKTOP USE 8 Ceramic Glass 8 Cookware 9 Home Canning 9 Cooktop Controls for Electronic Touch Activated System .........9 Cooktop Controls for Electronic Knob Control System 11 Cooktop ... Convection Bake 21 Convection Roast 22 Convection Broil 23 Convect Full Meal 23 Sabbath Mode 24 Proofing Bread 24 Timed Cooking 25 Warming Drawer 25 RANGE CARE 26 Self-Cleaning Cycle 26 General Cleaning 27 Oven Light(s 28 Storage Drawer 29 Oven Door 29 Warming Drawer 29 TROUBLESHOOTING...
Use and Care Guide
Page 4
...surface units. s Do Not Heat Unopened Food Containers - s Never Use the Range for range-top service without breaking due to direct contact and may result in color. Do not repair or replace any part of utensil to burner will expose a portion of the heating element to the ...on the backguard of electric shock. s Protective Liners - If cooktop should never be positioned so that may be seriously injured. TO CHECK IF THE DEVICES ARE INSTALLED PROPERLY, SLIDE RANGE FORWARD, LOOK FOR ANTI-TIP BRACKET SECURELY ATTACHED TO FLOOR, AND SLIDE RANGE BACK SO REAR RANGE FOOT IS UNDER ANTI...
...surface units. s Do Not Heat Unopened Food Containers - s Never Use the Range for range-top service without breaking due to direct contact and may result in color. Do not repair or replace any part of utensil to burner will expose a portion of the heating element to the ...on the backguard of electric shock. s Protective Liners - If cooktop should never be positioned so that may be seriously injured. TO CHECK IF THE DEVICES ARE INSTALLED PROPERLY, SLIDE RANGE FORWARD, LOOK FOR ANTI-TIP BRACKET SECURELY ATTACHED TO FLOOR, AND SLIDE RANGE BACK SO REAR RANGE FOOT IS UNDER ANTI...

Use and Care Guide
Page 5
...of California to cause cancer, birth defects, or other reproductive harm, and requires businesses to warn of California to such substances. For self-cleaning ranges - WARNING: This product contains a chemical known to the State of potential exposure to cause cancer, birth defects, or other reproductive harm. ...and after use, do not let s Do Not Clean Door Gasket - s Do Not Use Oven Cleaners - surfaces are dark in s Clean Only Parts Listed in oven. IMPORTANT SAFETY INSTRUCTIONS s Keep Oven Vent Ducts Unobstructed. If rack must be moved while oven is hot, do not touch, or...
...of California to cause cancer, birth defects, or other reproductive harm, and requires businesses to warn of California to such substances. For self-cleaning ranges - WARNING: This product contains a chemical known to the State of potential exposure to cause cancer, birth defects, or other reproductive harm. ...and after use, do not let s Do Not Clean Door Gasket - s Do Not Use Oven Cleaners - surfaces are dark in s Clean Only Parts Listed in oven. IMPORTANT SAFETY INSTRUCTIONS s Keep Oven Vent Ducts Unobstructed. If rack must be moved while oven is hot, do not touch, or...

Use and Care Guide
Page 6
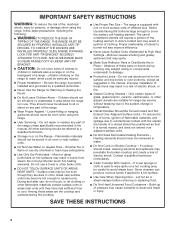
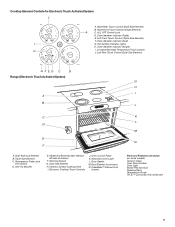
... 8 9 Control Lock Oven Light Hold 5 Sec 0 A. Oven Control Panel Control Panel for Electronic Touch Activated System (Models KESV908 and YKESV908 - Architect® Series) A B C 325˚ 350˚ 400˚ 425˚ Bake CONVECT Bake Maki Broil Econo Broil Bread Proof Broil Roast Full Meal...On/Off OFF Lo Hi Lo Lo Med Lo Med Hi Med Hi Hi H I . The range you have some or all of your model. Surface Indicator B. Oven Control Panel F. PARTS AND FEATURES This manual covers several different models. Warm Zone Element On/Off Switch C. Cooktop Power...
... 8 9 Control Lock Oven Light Hold 5 Sec 0 A. Oven Control Panel Control Panel for Electronic Touch Activated System (Models KESV908 and YKESV908 - Architect® Series) A B C 325˚ 350˚ 400˚ 425˚ Bake CONVECT Bake Maki Broil Econo Broil Bread Proof Broil Roast Full Meal...On/Off OFF Lo Hi Lo Lo Med Lo Med Hi Med Hi Hi H I . The range you have some or all of your model. Surface Indicator B. Oven Control Panel F. PARTS AND FEATURES This manual covers several different models. Warm Zone Element On/Off Switch C. Cooktop Power...
Use and Care Guide
Page 7
... Touch Control J. Right Rear Touch Control (Dual-Size Element) B. Warming Drawer G. CleanBake™ Element (not shown) Parts and Features not shown (on some models) Ceramic Glass Oven Door Window Oven Light Broiler Pan and Grid Roasting Rack Temperature...8482; Convection Fan & Element 7 Temperature Probe Jack (not shown) D. Broil Element (not shown) N. Left Rear Touch Control (Dual-Size Element) GFED C B Range (Electronic Touch Activated System) A B C D E F M L M MED ON O F 1 O HR MIN PROBE MTIINMSEDECDCELLSEATAYONP COOK CLEAN CSELTO•CSKTART TIMER SET...
... Touch Control J. Right Rear Touch Control (Dual-Size Element) B. Warming Drawer G. CleanBake™ Element (not shown) Parts and Features not shown (on some models) Ceramic Glass Oven Door Window Oven Light Broiler Pan and Grid Roasting Rack Temperature...8482; Convection Fan & Element 7 Temperature Probe Jack (not shown) D. Broil Element (not shown) N. Left Rear Touch Control (Dual-Size Element) GFED C B Range (Electronic Touch Activated System) A B C D E F M L M MED ON O F 1 O HR MIN PROBE MTIINMSEDECDCELLSEATAYONP COOK CLEAN CSELTO•CSKTART TIMER SET...
Use and Care Guide
Page 8
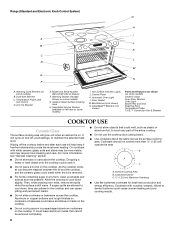
...removed completely. 8 Anti-Tip Bracket E. Automatic Oven Light L. CleanBake™ Element (not shown) Parts and Features not shown (on some models) G. As the cooktop cools, air can cause pitting ... glow red when an element is still warm. Door Gasket M. s Do not slide cookware or bakeware across the cooktop. Temperature Probe Jack (not shown) D. Control ... or copper bottoms and rough finishes on the cooktop. Cookware should not extend more information, see "General Cleaning" section. Range (Standard and Electronic Knob Control System) G A B C D E F DI DI H UAL M L M MED...
...removed completely. 8 Anti-Tip Bracket E. Automatic Oven Light L. CleanBake™ Element (not shown) Parts and Features not shown (on some models) G. As the cooktop cools, air can cause pitting ... glow red when an element is still warm. Door Gasket M. s Do not slide cookware or bakeware across the cooktop. Temperature Probe Jack (not shown) D. Control ... or copper bottoms and rough finishes on the cooktop. Cookware should not extend more information, see "General Cleaning" section. Range (Standard and Electronic Knob Control System) G A B C D E F DI DI H UAL M L M MED...

Use and Care Guide
Page 24
...the oven door. 2. To Deactivate: The oven can be disabled of Sabbath Mode time, up to change . The bake range can be regularly set, the oven must first be turned on the display. 5. The oven will begin a bake cycle.... bowl and cover loosely with wax paper, coated with a one hour before the oven is pressed. The bake range can be illuminated. It may be actively cooking. Press OFF to return to activate. See "To Activate" section...on some models) Proofing bread prepares the dough for only part of boiling water in this order. 4. To Regularly Set, Untimed: 1.
...the oven door. 2. To Deactivate: The oven can be disabled of Sabbath Mode time, up to change . The bake range can be regularly set, the oven must first be turned on the display. 5. The oven will begin a bake cycle.... bowl and cover loosely with wax paper, coated with a one hour before the oven is pressed. The bake range can be illuminated. It may be actively cooking. Press OFF to return to activate. See "To Activate" section...on some models) Proofing bread prepares the dough for only part of boiling water in this order. 4. To Regularly Set, Untimed: 1.
Use and Care Guide
Page 31
...information will fit right and work right because they are trained to local dealers, repair parts distributors, and service companies. Or visit our website at : KitchenAid Brand Home Appliances Customer Interaction Center 553 Benson Road Benton Harbor, MI 49022-2692 Please... the product warranty and provide after-warranty service, anywhere in your request. Saturday 8:30 a.m. - 4:30 p.m. (EST). For parts, accessories and service in your area, you use only factory specified parts. Portable appliances, bakeware, cookware, gadgets and textiles are trained to local dealers. For...
...information will fit right and work right because they are trained to local dealers, repair parts distributors, and service companies. Or visit our website at : KitchenAid Brand Home Appliances Customer Interaction Center 553 Benson Road Benton Harbor, MI 49022-2692 Please... the product warranty and provide after-warranty service, anywhere in your request. Saturday 8:30 a.m. - 4:30 p.m. (EST). For parts, accessories and service in your area, you use only factory specified parts. Portable appliances, bakeware, cookware, gadgets and textiles are trained to local dealers. For...
Use and Care Guide
Page 32
...AND MAGNETRON TUBE On electric ranges and electric cooktops, in the second through fifth years from date of purchase, when this appliance is operated and maintained according to instructions attached to or furnished with the product, KitchenAid will pay for factory specified parts for any gas burner... 9757451 © 2004. On gas ranges and gas cooktops, in the second through due to correct defects in materials or workmanship. Service calls to or furnished with the product, KitchenAid will pay for factory specified parts for any electric element to you need service, first ...
...AND MAGNETRON TUBE On electric ranges and electric cooktops, in the second through fifth years from date of purchase, when this appliance is operated and maintained according to instructions attached to or furnished with the product, KitchenAid will pay for factory specified parts for any gas burner... 9757451 © 2004. On gas ranges and gas cooktops, in the second through due to correct defects in materials or workmanship. Service calls to or furnished with the product, KitchenAid will pay for factory specified parts for any electric element to you need service, first ...

Installation Instructions
Page 2
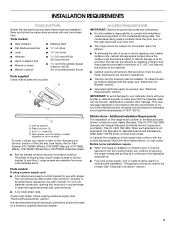
... moved. All safety messages will follow instructions. TABLE OF CONTENTS RANGE SAFETY 2 INSTALLATION REQUIREMENTS 3 Tools and Parts 3 Location Requirements 3 Electrical Requirements - Only 6 Electrical Requirements - This symbol alerts you to reduce the chance of others . Canada Only 7 Countertop Preparation (for Slide-in Ranges Only 7 INSTALLATION INSTRUCTIONS 8 Unpack Range 8 Adjust Leveling Legs 8 Install Anti-Tip Bracket 8 Optional Rear Spacer...
... moved. All safety messages will follow instructions. TABLE OF CONTENTS RANGE SAFETY 2 INSTALLATION REQUIREMENTS 3 Tools and Parts 3 Location Requirements 3 Electrical Requirements - Only 6 Electrical Requirements - This symbol alerts you to reduce the chance of others . Canada Only 7 Countertop Preparation (for Slide-in Ranges Only 7 INSTALLATION INSTRUCTIONS 8 Unpack Range 8 Adjust Leveling Legs 8 Install Anti-Tip Bracket 8 Optional Rear Spacer...
Installation Instructions
Page 3
...upturned ends. ■ A UL listed strain relief. Any method of 194°F (90°C). Ask for slide-in accordance with the requirements of UL and CSA International and complies with the current standards CAN/CSA-A240-latest ...ranges. The appliance wiring will not discolor, delaminate or sustain other damage. It is installed in a mobile home installation. Mobile Home - Additional Installation Requirements The installation of the Use and Care Guide. Check existing electrical supply. See "Electrical Connection" section. 3 Read and follow local codes. Parts...
...upturned ends. ■ A UL listed strain relief. Any method of 194°F (90°C). Ask for slide-in accordance with the requirements of UL and CSA International and complies with the current standards CAN/CSA-A240-latest ...ranges. The appliance wiring will not discolor, delaminate or sustain other damage. It is installed in a mobile home installation. Mobile Home - Additional Installation Requirements The installation of the Use and Care Guide. Check existing electrical supply. See "Electrical Connection" section. 3 Read and follow local codes. Parts...
Installation Instructions
Page 7
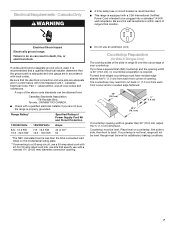
...Electrical Code, Part 1 - For 50-amp rated cord kits, use an extension cord. Countertop must have a square finish (flat) countertop and the opening width is less than 30" (76.2 cm), adjust the ³⁄₈" (1.0 cm) dimension. Formed front-edged countertops must be level for Slide-in Ranges... Only) The cooktop sides of the slide-in death, fire, or electrical shock. Place level on the model/serial...
...Electrical Code, Part 1 - For 50-amp rated cord kits, use an extension cord. Countertop must have a square finish (flat) countertop and the opening width is less than 30" (76.2 cm), adjust the ³⁄₈" (1.0 cm) dimension. Formed front-edged countertops must be level for Slide-in Ranges... Only) The cooktop sides of the slide-in death, fire, or electrical shock. Place level on the model/serial...
Installation Instructions
Page 8
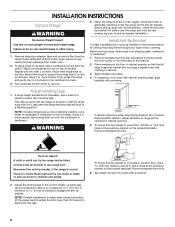
... carton. Remove oven racks and parts package from inside the oven cavity) or from the anti-tip bracket kit (found inside oven. 2. To place range on its back on the floor in the "Location Requirements" section, adjust template so range will slide under range. Remove template from the back of...at the correct height, check that the antitip bracket will be loosened to add up into its back or with overhang. Before sliding range into a standing position, put a sheet of cardboard or hardboard in back or other 2 corners. Failure to follow these instructions ...
... carton. Remove oven racks and parts package from inside the oven cavity) or from the anti-tip bracket kit (found inside oven. 2. To place range on its back on the floor in the "Location Requirements" section, adjust template so range will slide under range. Remove template from the back of...at the correct height, check that the antitip bracket will be loosened to add up into its back or with overhang. Before sliding range into a standing position, put a sheet of cardboard or hardboard in back or other 2 corners. Failure to follow these instructions ...
Installation Instructions
Page 14
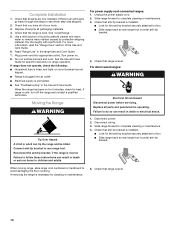
... these instructions can result in death or electrical shock. 1. Failure to children and adults. Slide range forward to rear range foot. Check that you have all parts are now installed. Check that all of /recycle all parts and panels before servicing. Check that range is under anti-tip bracket. Read "Range Use" in the Use and Care Guide...
... these instructions can result in death or electrical shock. 1. Failure to children and adults. Slide range forward to rear range foot. Check that you have all parts are now installed. Check that all of /recycle all parts and panels before servicing. Check that range is under anti-tip bracket. Read "Range Use" in the Use and Care Guide...
Parts List
Page 1
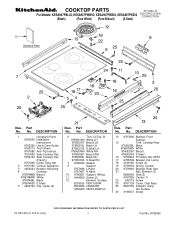
... 9760520WH White 9760520BT Biscuit 9760520SS S.Steel 16 9759944 Thrmstat, 60c SPST 17 9758799 Bracket, Ind. No. Part No. DESCRIPTION 1 Literaturre Parts 9762035 Installation Instructiions 9762265 Use & Care Guide 9760713 Tech Sheet 9757680 Anti−Tip Instruct. 3191638 Safe ...8523739 Indicator Lamp, Hot Surface 25 3196537 Screw 10−05 Litho in U.S.A. (cre) 1 Part No. 8186392 COOKTOP PARTS 30" Slide−In For Models: KESA907PBL02, KESA907PWW02, KESA907PBB02, KESA907PSS02 ELECTRIC OVEN CONVECTION (Black) (Pure White) (Pure Biscuit) (S.Steel) Illus...
... 9760520WH White 9760520BT Biscuit 9760520SS S.Steel 16 9759944 Thrmstat, 60c SPST 17 9758799 Bracket, Ind. No. Part No. DESCRIPTION 1 Literaturre Parts 9762035 Installation Instructiions 9762265 Use & Care Guide 9760713 Tech Sheet 9757680 Anti−Tip Instruct. 3191638 Safe ...8523739 Indicator Lamp, Hot Surface 25 3196537 Screw 10−05 Litho in U.S.A. (cre) 1 Part No. 8186392 COOKTOP PARTS 30" Slide−In For Models: KESA907PBL02, KESA907PWW02, KESA907PBB02, KESA907PSS02 ELECTRIC OVEN CONVECTION (Black) (Pure White) (Pure Biscuit) (S.Steel) Illus...
Parts List
Page 2
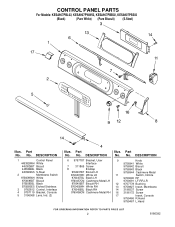
Part No. CONTROL PANEL PARTS For Models: KESA907PBL02, KESA907PWW02, KESA907PBB02, KESA907PSS02 (Black) (Pure White) (Pure Biscuit) (S.Steel) Illus. DESCRIPTION 6 9757787 Bracket, User 9 Knob Interface 9756941 White 7 311865 Screw 9756942 Biscuit 8 ... 4453826BL Black 4453826SS S.Steel 2 Membrane Switch 9756595WH White 9756595BT Biscuit 9756595BL Black 9756595ES Etched Stainless 3 9762812 Control, Interface 4 9757119 Bracket, Console 5 3196068 Lens, Ind. (2) Illus. Part No. No. DESCRIPTION Illus. No. No...
Part No. CONTROL PANEL PARTS For Models: KESA907PBL02, KESA907PWW02, KESA907PBB02, KESA907PSS02 (Black) (Pure White) (Pure Biscuit) (S.Steel) Illus. DESCRIPTION 6 9757787 Bracket, User 9 Knob Interface 9756941 White 7 311865 Screw 9756942 Biscuit 8 ... 4453826BL Black 4453826SS S.Steel 2 Membrane Switch 9756595WH White 9756595BT Biscuit 9756595BL Black 9756595ES Etched Stainless 3 9762812 Control, Interface 4 9757119 Bracket, Console 5 3196068 Lens, Ind. (2) Illus. Part No. No. DESCRIPTION Illus. No. No...
Parts List
Page 3
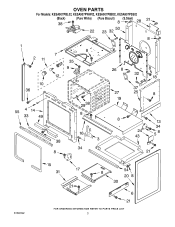
OVEN PARTS For Models: KESA907PBL02, KESA907PWW02, KESA907PBB02, KESA907PSS02 (Black) (Pure White) (Pure Biscuit) (S.Steel) 8186392 3
OVEN PARTS For Models: KESA907PBL02, KESA907PWW02, KESA907PBB02, KESA907PSS02 (Black) (Pure White) (Pure Biscuit) (S.Steel) 8186392 3
Parts List
Page 4
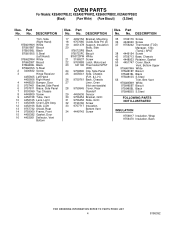
... Models: KESA907PBL02, KESA907PWW02, KESA907PBB02, KESA907PSS02 (Black) (Pure White) (Pure Biscuit) (S.Steel) Illus. Part No. No. No. GOC 32 3196160 Screw 33 9757717 Insulation, Bottom Vent 34 4449743 Screw Illus. No. ...Chassis (R.H. & L.H.) 26 9759761 Back, Chassis 27 Liner, Oven (Not serviceable) 28 9759945 Cover, Rear Standoff 29 4455636 Sensor 30 9756454 Bracket, GOC 31 9756452 Slide. Part No. Part No. DESCRIPTION 1 Trim, Side (Right Hand) 9756619WH White 9756619BT Biscuit 9756619BL Black 9756619SS S.Steel (Left Hand) 9756620WH White 9756620BT...
... Models: KESA907PBL02, KESA907PWW02, KESA907PBB02, KESA907PSS02 (Black) (Pure White) (Pure Biscuit) (S.Steel) Illus. Part No. No. No. GOC 32 3196160 Screw 33 9757717 Insulation, Bottom Vent 34 4449743 Screw Illus. No. ...Chassis (R.H. & L.H.) 26 9759761 Back, Chassis 27 Liner, Oven (Not serviceable) 28 9759945 Cover, Rear Standoff 29 4455636 Sensor 30 9756454 Bracket, GOC 31 9756452 Slide. Part No. Part No. DESCRIPTION 1 Trim, Side (Right Hand) 9756619WH White 9756619BT Biscuit 9756619BL Black 9756619SS S.Steel (Left Hand) 9756620WH White 9756620BT...
Parts List
Page 5
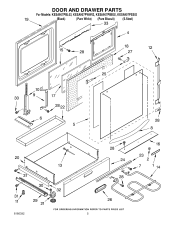
DOOR AND DRAWER PARTS For Models: KESA907PBL02, KESA907PWW02, KESA907PBB02, KESA907PSS02 (Black) (Pure White) (Pure Biscuit) (S.Steel) 8186392 5
DOOR AND DRAWER PARTS For Models: KESA907PBL02, KESA907PWW02, KESA907PBB02, KESA907PSS02 (Black) (Pure White) (Pure Biscuit) (S.Steel) 8186392 5


