KitchenAid KESA907PSS Support Question
KitchenAid KESA907PSS Support Question
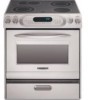
Find answers below for this question about KitchenAid KESA907PSS - ARCHITECT Series: 30'' Slide-In Electric Range.Need a KitchenAid KESA907PSS manual? We have 3 online manuals for this item!
Question posted by Anneseverin on November 18th, 2012
One Of The Lights Keep Blinking When I Turn On The Control Knob
The person who posted this question about this KitchenAid product did not include a detailed explanation. Please use the "Request More Information" button to the right if more details would help you to answer this question.
Current Answers
Related KitchenAid KESA907PSS Manual Pages
Use and Care Guide - Page 1
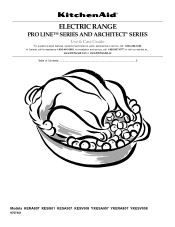
www.kitchenaid.com or www.KitchenAid.ca
Table of Contents...2
Models KERA807 KESI901 KESA907 KESV908 YKESA907 YKERA807 YKESV908
9757451 o
ELECTRIC RANGE
PRO LINE™ SERIES AND ARCHITECT® SERIES
Use & Care Guide
For questions about features, operation/performance, parts, accessories or service, call: 1-800-422-1230 In Canada, call for assistance 1-800-461-5681, ...
Use and Care Guide - Page 2
TABLE OF CONTENTS
RANGE SAFETY 3 The Anti-Tip Bracket 3
PARTS AND FEATURES 6
COOKTOP USE 8 Ceramic Glass 8 Cookware 9 Home Canning 9 Cooktop Controls for Electronic Touch Activated System .........9 Cooktop Controls for Electronic Knob Control System 11 Cooktop Controls for Standard Knob Control System 13
ELECTRONIC OVEN CONTROL 15 Electronic Control Pads 15 Oven Displays 15 Start 16...
Use and Care Guide - Page 6

... Set/Start Off
Clock Set/Start
Options
1
2
3
Options
4
5
6
START
Control Lock
Hold 5STSAecRT
7
8
9
Control Lock Oven Light Hold 5 Sec
0
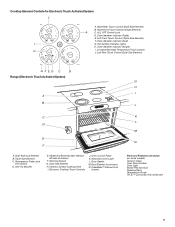
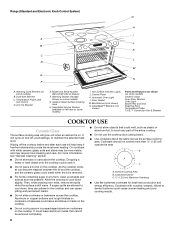
A. Left Front Cooktop Element Control (Dual-Size Element)
Control Panel For Standard Knob Controls (Model KESI901)
A
B
C
D
E
F
G
F. Right Front Cooktop Element Control
K. The range you have purchased may not match those of the...
Use and Care Guide - Page 7
... Element)
GFED C
B
Range (Electronic Touch Activated System)
A B
C D
E F
M L M
MED
ON O F
1 O
HR
MIN PROBE
MTIINMSEDECDCELLSEATAYONP
COOK
CLEAN
CSELTO•CSKTART
TIMER SET•START
CANCEL
4
7 7
PROBE TIMED CLEAN
CLEAN
•START
CANCEL
DI HI UAL
G H I
G. Dual-Size Element H. Electronic Cooktop Touch Controls
J. Automatic Oven Light L. CleanBake™ Element...
Use and Care Guide - Page 8
... . Surface Cooking Area B. Hot Surface Indicator Lights J. If sugary spills are allowed to cool ... surface is on the cooktop. s Do not slide cookware or bakeware across the cooktop. s Do not...25 cm) Maximum Overhang
s Use flat-bottomed cookware for best heat conduction and energy efficiency.
Range (Standard and Electronic Knob Control System)
G
A B C D
E F
DI DI H UAL
M L M
MED...
Use and Care Guide - Page 9
... no space or light should be set to HI when bringing liquids to a fast and rapid boil. Rough finishes may be set to MELT & HOLD for all controls when done cooking... instructions. This allows time for optimal cooking results. Cooktop Controls for Electronic Touch Activated System
(Pro Line™ Series)
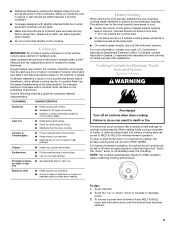
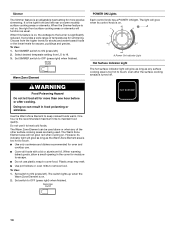
WARNING
Fire Hazard Turn off all types of heat settings for the most cooking ...
Use and Care Guide - Page 11
... Surface Indicator Light
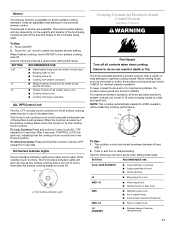
Cooktop Controls for Electronic Knob Control System
(Architect® Series)
WARNING
Fire Hazard Turn off all the surface cooking elements. For maximum element operation, all controls when done cooking. The cooktop control can be set to HI when bringing liquids to WARM. HI
s Bring liquid to boil. HI
s Hold a rapid boil.
LO [SIMMER]
s Simmer (range of the...
Use and Care Guide - Page 12
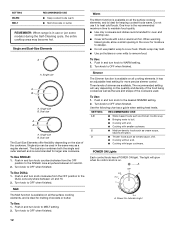
... ON Lights
Each control knob has a POWER ON light.
To Use: 1. s Cover all cooking elements. s Do not use . To Use: 1. Turn knob to OFF when finished. The recommended setting will glow when its control knob is...range is ideal for moisture to heat cold foods. Push in the cover for keeping cooked foods warm.
When warming baked goods, allow a small opening in and turn knob...
Use and Care Guide - Page 13

... SURFACE
REMEMBER: When range is in death or fire.
The cooktop controls can be used in and turn knob counterclockwise from the OFF...turn knob clockwise from the OFF
position to do so can be set anywhere between HI and LO.
HI
s Hold a rapid boil. LO
s Keep food warm. s Melt chocolate or butter.
To Use SINGLE: 1. Hot Surface Indicator Light
The hot surface indicator light...
Use and Care Guide - Page 14
...wide range of the other surface cooking areas are being used alone or when any surface cooking area is too hot to HI. 3. Simmer On/Off
Warm Zone Element
POWER ON Lights
Each control knob has a POWER ON light. ... feature is on, the wattage to escape. The light will glow when its indicator light will glow as long as the Warm Zone Element area is turned off. It is on . OFF
A
Lo
Hi...
Use and Care Guide - Page 15
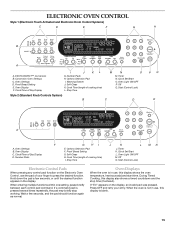
... and the stop working. Convection Oven Settings C. Proof Bread Setting E. Timer N. EASYCONVECT™ Conversion B. Oven Settings D. Oven Light ON/OFF P. Self-Clean H.
ELECTRONIC OVEN CONTROL
Style 1 (Electronic Touch Activated and Electronic Knob Control Systems)
C
D
E
F
G
H
Maxi
Econo Bread
325˚
Bake
Broil
Broil
Proof
350˚
400˚
B
425˚...
Use and Care Guide - Page 20

...models)
s Use only the broiler pan and grid provided with the range.
s Trim excess fat to maintain oven temperature.
Use MAXI/ECONO (...the heated oven, making cleaning more precise control when cooking. Use tongs to turn off immediately and the bake element will... and fish. Press START. 3. When roasting, it in 30 seconds to enter a temperature.
Each subsequent press of meat,...
Use and Care Guide - Page 27

... display.
Also, make sure all controls are off and the oven and ...turn on the display until the oven cools. s Stainless Steel Cleaner & Polish (sample included): See
"Assistance or Service" section to the correct time of gloss, hairline cracks and popping sounds. s Remove all -purpose cleaner: Rinse with clean water and dry with a damp cloth.
There are 2 hours 30 minutes for light...
Use and Care Guide - Page 28
..., candy, syrup) s Cooktop Scraper: Clean while the cooktop is closed, press OVEN LIGHT to help them slide.
s Steel-wool pad
BROILER PAN AND GRID
Do not clean in the back of.... On some models). To Replace: Before replacing, make sure knobs are in range or reconnect power.
28 Turn bulb counterclockwise to remove from
control panel to 1 gal. (3.75 L) water:
Soak for stubborn...
Use and Care Guide - Page 30
... controls have been turned off?
Push in longer cooking times.
See "ALL OFF/Control Lock" in "Cooktop Controls for Electronic Touch Activated System," "Cooktop Controls for Electronic Knob Control System" or "Cooktop Controls for Standard Knob Control System" section, depending on your model. See "Clock/ Timer Display" section. See "Hot Surface Indicator Lights" in "Cooktop Controls...
Use and Care Guide - Page 32
... appliance, to replace house fuses or
correct house wiring, or to replace owner-accessible light bulbs. 2. Outside the 50 United States and Canada, this exclusion or limitation may ...THROUGH FIFTH YEAR LIMITED WARRANTY ON ELECTRIC ELEMENTS, CERAMIC GLASS COOKTOP, GAS BURNERS, SOLID STATE TOUCH CONTROL SYSTEM, AND MAGNETRON TUBE
On electric ranges and electric cooktops, in -warranty service.
...
Installation Instructions - Page 4
...;₈" (4.8 cm) beyond 24" (61 cm) base cabinet.
front of oven door protrudes 1" (2.5 cm) beyond 24" (61 cm) base cabinet.
4 Freestanding Range B
A
Product Dimensions Slide-in Range
B
C
A*
C
D*
G F
E F**
D**
E
A. 7¹⁄₈" (20 cm)
B. 30" (76.2 cm)
C. 43⁷⁄₈" (111.4 cm) overall height with leveling legs screwed all the way in
D. 36" (91.4 cm...
Installation Instructions - Page 5
...) minimum clearance between the top of the cooking platform and the bottom of the cooktop, see NOTE*.
D. 30" (76.2 cm) min. Cabinet door or hinge should not extend into the cutout. Slide-in Range
A
C
B
D
A
C
B
D
F E
E F
G H
A. 13" (33 cm) upper cabinet depth
B. 30" (76.2 cm) min.
Cabinet door or hinge should not extend into cutout. Freestanding...
Installation Instructions - Page 7
...Blvd. Electrical Shock Hazard
Electrically ground range.
Countertop Preparation
(for satisfactory baking conditions.
7 Countertop must be level for Slide-in Ranges Only)
The cooktop sides of the slide-in range fit over... C22.1, Canadian Electrical Code, Part 1 -
Be sure that the ground path is required. Range must be obtained from each front corner of opening width is 30" (76.2 ...
Parts List - Page 1
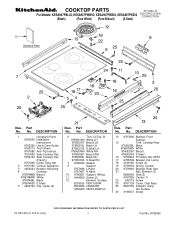
COOKTOP PARTS
30" Slide−In
For Models: KESA907PBL02, KESA907PWW02, KESA907PBB02, KESA907PSS02
ELECTRIC OVEN CONVECTION
(Black)
(Pure White) (Pure Biscuit) (S.Steel)
Illus. DESCRIPTION
1
Literaturre Parts
9762035 Installation
Instructiions
9762265 Use & Care Guide
9760713 Tech Sheet
9757680 Anti−...
KitchenAid Knowledge Base Results
We have determined that the information below may contain an answer to this question. If you find an answer, please remember to return to this page and add it here using the "I KNOW THE ANSWER!" button above. It's that easy to earn points!-
Using the dual- or triple-size elements - Architect Series 2 electric cooktop with downdraft
...electric downdraft cooktop . The dual and triple size combine single, dual and outer element and are recommended for larger size cookware, large quantities of the cookware. Turn knob to Search Results For additional information, see or triple-size control knob? Using knob controls...How old is your appliance? Architect Series 2 electric cooktop with downdraft How do I use the dual- -
Temperature and moisture control of warming drawer
... foods for Hi. Control knob Push in operation. The blue power indicator light will open or close the vents. When the warming drawer is normal. The temperature setting ranges from room temperature on the warming drawer control to keep foods crisp, slide control to the Dry setting, which will begin to turn on and remain on the... -
Lighting the beverage center
... and pressing the exterior switch located beside the temperature control knob on the base grille. The beverage center has an interior light that comes on for an extended period of time will slightly increase the temperature of the beverage center. You may also turn on the light at any time the door is not operating...
Similar Questions


Kitchenaid Kdss907sss - 30' Slide-in Dual Fuel Range
Position Of Range
Should the back of the 30" slide-in range touch the back wall?
Should the back of the 30" slide-in range touch the back wall?
(Posted by patriciainsf 11 years ago)

Kesa907pss00, Top Heating Elements
My two top electric heating elements won't work anymore, I can hear clicking after I turn the knob, ...
My two top electric heating elements won't work anymore, I can hear clicking after I turn the knob, ...
(Posted by crubis 11 years ago)

Right Front Element Not Working And His Light Is Blinking
whats the problem !
whats the problem !
(Posted by yefousti 11 years ago)

Oven Does Not Shut Off
I have a KitchenAird slide in electric range. When I use the oven it does not shut off. I have to tu...
I have a KitchenAird slide in electric range. When I use the oven it does not shut off. I have to tu...
(Posted by mcmulliand 13 years ago)