Get support for Genie Excelerator

Genie Excelerator Support Question

Genie Excelerator Support Question

Find answers below for this question about Genie Excelerator.
Need a Genie Excelerator manual? We have 1 online manual for this item!
Question posted by jiperez1961 on April 26th, 2015

Where Can I Buy A 4062 Traveler

The person who posted this question about this Genie product did not include a detailed explanation. Please use the "Request More Information" button to the right if more details would help you to answer this question.

Current Answers

Answer #1: Posted by sabrie on April 26th, 2015 8:38 PM
sabrie

Member since:
May 23rd, 2013

Points: 3,306,778
100
points
buy one on the link below.


http://www.ebay.com/bhp/genie-excelerator


www.techboss.co.za

Related Genie Excelerator Manual Pages

Owner's Manual - Page 1

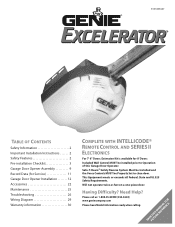
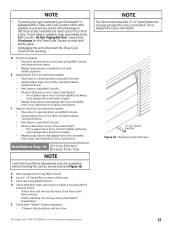
.... SAVEFTUHTIUSRMEARNEUFEARLEFNOCRE Safe-T-Beam® Safety Reverse System Must be Installed and the Force Controls MUST be installed prior to close door. Extension Kit is available for Service 11 Garage Door Opener Installation 12 Accessories 22 Maintenance 25 Troubleshooting 26 Wiring Diagram 29 Warranty information 30 COMPLETE WITH INTELLICODE® REMOTE CONTROL AND SERIES...
Owner's Manual - Page 2

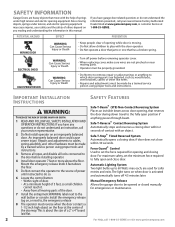
...Not allow children to play with an object. each, are used for opening , that reverses the door during down travel to 60 Watts max. If you reading and understanding the information in this...or Death • Turn off 4.5 minutes later. Manual Emergency Release Allows the garage door to be opened or closed manually for emergencies or maintenance. 2 For Help, call your nearest Genie...
Owner's Manual - Page 3

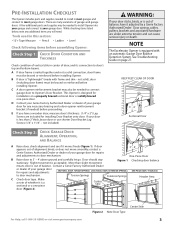
..." (made with an automatic Garage Door Balance Detection System. While checking items listed below, note any necessary bracing and a door opener reinforcement bracket (if needed) before proceeding. One-Piece Door B Raise door to 3' - 4' above ground and carefully let go. Make a note of whether it moves freely (Figure 1). NOTE The Excelerator Opener is equipped with frame and...
Owner's Manual - Page 4

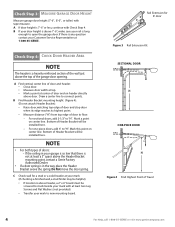
... distance ("H") from top edge of Travel 4 For Help, call 1-800-35-GENIE or visit www.geniecompany.com Mark a point on center line. Bottom of the wall just above 7'-6", make sure your mark to open the garage door. Draw a center line to floor. - Do Not move the door spring. A If door height is a heavily reinforced section of...
Owner's Manual - Page 5

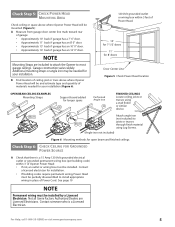
Check Step 5: CHECK POWER HEAD MOUNTING AREA Check ceiling or space above where Opener Power Head will be mounted (Figure 5): A Measure from garage door center line mark toward rear of Opener Power Head: • If not, an outlet or wiring box must be installed. NOTE Mounting Straps are Licensed Electricians. See page 19 NOTE Permanent...
Owner's Manual - Page 6

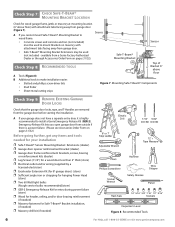
... Extensions (dealer) ❐ Garage door opener reinforcement bracket (dealer) ❐ Garage door frame reinforcement brackets, screws, bracing or reinforcement kits (dealer) ❐ Lag Screws (11/4") for a wood door less than 2" thick (store) ❐ Electrical outlet and/or wiring (supplied by a licensed electrician) ❐ Excelerator Extension Kit (for 8' garage doors) (store) ❐...
Owner's Manual - Page 9

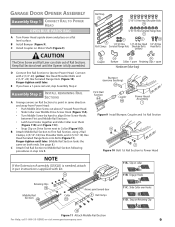
... Power Head. • Slide Collar over Middle Drive Screw Hook (Figure 11A). • Turn Middle Screw by hand to Collar (Figure11D). GARAGE DOOR OPENER ASSEMBLY Assembly Step C1H: CONNECT RAIL TO POWER HEAD OPEN BLUE PARTS BAG A Turn Power Head upside down and place on collar 11B. B Install Bumper (Figure 9). D Connect first Rail Section...
Owner's Manual - Page 12

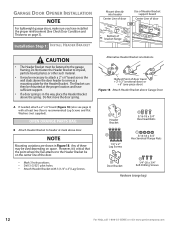
... and Thickness on page 3). Do Not move the door spring. Any of door travel + 2-1/2" (sectional door) or + 6" (one-piece door) Figure 18 Attach Header Bracket above the door header to the garage framing. NOTE Mounting variations are shown in the way, place the Header Bracket above door. OPEN ORANGE PARTS BAG B Attach Header Bracket to the Header Bracket be...
Owner's Manual - Page 13

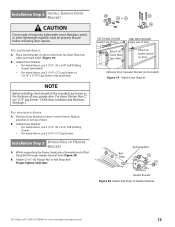
... later. 28 30 56 or 30 28 SECTIONAL DOORS Center Line of door ONE-PIECE DOORS Center Line of door. Installation SteCpH2: INSTALL GARAGE DOOR BRACKET CAUTION Doors made of your garage door. the thickness of masonite, lightweight wood, fiberglass, metal, or other lightweight materials must be properly braced before mounting door Opener. Installation SteCpH3: ATTACH RAIL TO HEADER BRACKET...
Owner's Manual - Page 15

... Lever until Knob is 6' from floor. • Tie a new overhand knot in Cord at Magnetic Carriage Assembly Lever. C Attach both Arms together with garage door fully or partially open, garage door may leave Emergency Release Knob within reach of children. Securely tighten fasteners. D Adjust height of Emergency Release Cord Knob to 6' above ! Securely tighten fasteners...
Owner's Manual - Page 16

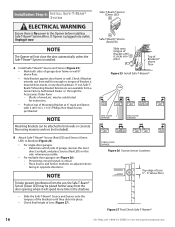
... spend more time in opposite directions. Place Source and Sensor modules on this side whenever possible. • For multiple-door garages see (Figure 26). - Check if Bracket extends out from the door opening, where it now. NOTE Mounting Brackets can be substituted for extensions. • Position top of Lens (Figure 27). Preventing crossed signals...
Owner's Manual - Page 18

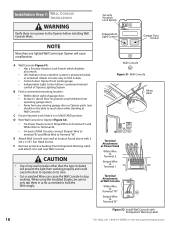
... wall consoles other than one lighted Wall Control per Opener will prevent the light from inside garage. • Independent Light Control allows convenient manual control of any moving garage door or Opener parts (you should not be sure to only tap them in dark. • Controls door Opener from working . B Find a convenient mounting location: • Within direct...
Owner's Manual - Page 20

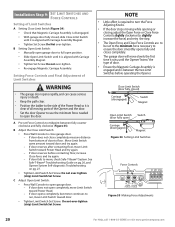
... Adjustment of Limit Switches WARNING • The garage door opens rapidly, and can cause serious injury or death. • Keep the path clear. • Position the ladder to floor. B Adjust the Close Limit Switch: • Press Wall Console to close completely, measure distance from bottom of door to the side of the Power Head...
Owner's Manual - Page 21

...Unplug the Unit - If not, adjust Open Force Control slightly clockwise, close garage door, and open garage door, and close it again. • Repeat steps above until garage door runs smoothly from resetting. simply wait 10 minutes for the Timer/Cycle Counter to Open Limit Switch. A Open garage door using Wall Console. If your Excelerator® is blocked, door will prevent the Timer/Cycle...
Owner's Manual - Page 22

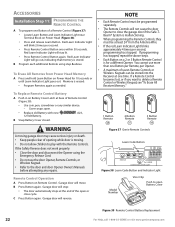
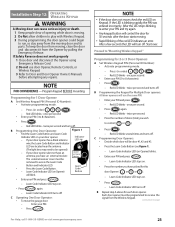
...-35-GENIE or visit www.geniecompany.com Remote Control Operation A Press Button on Power Head (Figure 38). • Press and release Learn Button. Garage door will not cause the door Opener to delete a Remote Control or Wireless Keypad, see "To Erase All Receiver Memory." NOTE • Each Remote Control must be programmed separately. •...
Owner's Manual - Page 23

... second and turns off . C Programming Door Openers: • Decide which door will control the door for this door Opener ( or or ). - once per second. • Press the number of doors (total) you have an external receiver. Press . NOTE • If the door does not move the garage door: - B Programming the Keypad for each door opener. Press (in order) . - twice...
Owner's Manual - Page 26

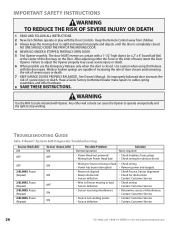
... with a 1-1/2" high object (or a 2" x 4" board laid flat) at the center of severe injury or death. 7 KEEP GARAGE DOORS PROPERLY BALANCED. An improperly balanced door increases the risk of travel, retest the Door Opener. Any other hardware. 8 SAVE THESE INSTRUCTIONS. The door MUST reverse on the floor. Weak or broken springs are capable of increasing the rate of...
Owner's Manual - Page 27

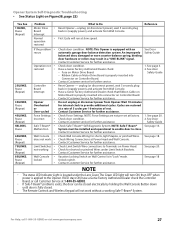
... • The status LED Indicator Light is equipped with an automatic garage door balance detection system. For Help, call Customer Service at 1-800-35-GENIE. • If Safe-T-Beam® problems exists, the door can be installed and operational to enable door to the Opener. Reference 2 BLINKS, Pause (Repeat) 3 BLINKS, Pause (Repeat) 4 BLINKS, Pause (Repeat...
Owner's Manual - Page 28

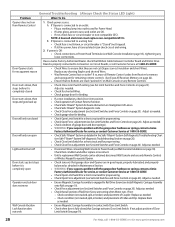
... is not blown, or circuit breaker is connected to operate Opener. Door starts up Door will only run open Operator runs, but stops before it is fully closed Door starts down, then stops and goes back up , but door does not move • Check (ensure) that garage door and Opener are in good repair, properly lubricated, and properly balanced...
Owner's Manual - Page 29

... of Lenses. • Check Safe-T-Beam® System for any diagnostic codes. Noisy operation • Ensure all fasteners are tightened. • Check that the garage door and Opener are in UNLOCKED position for service, or contact Customer Service at 1-800-35-GENIE. It must be in good repair, properly lubricated, and properly balanced...

Similar Questions

Garage Door Opener Not Working
Green light and red light are on the safety"eye" When pushing wall, remote or key pad the screw driv...
(Posted by scanty5 9 years ago)
Garage Door Opener.
The unit will not work from the wall remote. The wall remote lights up but does not operat the unit....
(Posted by ckniffen 10 years ago)
Where Is The Learn Code Button Situated On The 3060l-07 Genie Garage Door Opener
Where is the learn code button situated on the 3060L-07 Genie garage door opener. Trying to intregat...
(Posted by katiaella 10 years ago)
Ask a New Question
Use the box below to post a new question about this Genie product .
Points & Prizes
  • You can earn points for nearly everything you do on HelpOwl.com
  • You can trade in those points for gift cards at leading retailers such as Amazon.com and Walmart
  • It's that simple!
See How it Works
Create a Free Account

Genie Manuals

Find free Genie Excelerator manuals and user guides available at ManualOwl.com. Try out our unique manual viewer allowing you to interact with manuals from directly within your browser!

Genie Reviews

View thousands of Genie user reviews and customer ratings available at ReviewOwl.com.

Contact Information

Complete Genie customer service contact information including steps to reach representatives, hours of operation, customer support links and more from ContactHelp.com.

Scoreboard Ratings

See detailed Genie customer service rankings, employee comments and much more from our sister site.