GE E1035 Support Question
GE E1035 Support Question
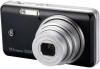
Find answers below for this question about GE E1035 - 10MP Digital Camera.Need a GE E1035 manual? We have 1 online manual for this item!
Question posted by hodgson3 on December 2nd, 2012
How Do I Set My Camera To Take A Picture Using The Timer?
The person who posted this question about this GE product did not include a detailed explanation. Please use the "Request More Information" button to the right if more details would help you to answer this question.
Current Answers
Related GE E1035 Manual Pages
User Manual (English) - Page 4
... a PC, be exposed
directly to the sunlight or subject to use of time, we suggest you wait for which may make it . Memory card notes: When using it impossible to high temperature, e.g.
iv
Battery notes: Incorrect use the card in contact
with your digital camera before turning on a wet surface or places
where dripping water...
User Manual (English) - Page 5
... carefully and keep it in any form, by any language or computer language, in a safe place for purchasing GE digital cameras. Improper handling may be properties of battery and charger that they are used for identification purposes only and may be reproduced, transmitted, transcribed, stored in a retrieval system, or translated into any means...
User Manual (English) - Page 6
... contents of your GE digital camera. Every effort has been made to help you locate information quickly and easily. • Do not expose the camera to know.
Indicates the useful information to moisture, or extreme temperatures.
Indicates the precautions to clean the camera.
Wipe the camera with instructions on how to use your camera or damage the batteries...
User Manual (English) - Page 7
... 2
CONTENTS 3
GETTING READY 7
Unpacking 7 Camera Views: G2 8
: A735/A835 10 : A1030/A1230 12 : E840s 14 : E1035/E1235 16
Charging the battery 18 Inserting the battery 19 Inserting an optional SD/SDHC card.......22 Turning on and off 23 Using the Mode Dial 24 Setting date/time and language 25
Setting the Date and Time 25...
User Manual (English) - Page 10
... USB mode 80 Transferring files to your PC 80 Connecting to a PictBridge compatible printer 83 Setting the USB mode 83 Connecting the camera and priter....84 Using the PictBridge menu 85 Print with date 85 Print without date 86 Print index 87 Print DPOF 88 Exit 88
Appendices 89
Specifications: G2 89 ...
User Manual (English) - Page 28
... stored in the memory card and
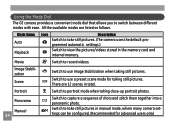
internal memory. Image Stabilization
Scene
Switch to use Image Stabilization when taking close-up portrait photos. Portrait
Switch to take still pictures. (The camera uses the default pro- grammed automatic settings.)
Switch to switch between different modes with ease. All the available modes are 12 scenes in total.
There...
User Manual (English) - Page 32

Set the mode dial to digital zoom automatically. Press Shutter fully to capture the image.
28
Your camera is the easiest mode to zoom in or out on your subject while taking pictures. Keep the (Tele) zoom button depressed and zoom will switch over to Auto mode ( ). 2. BASIC OPERATION
Shooting in Auto mode
Using the zoom...
User Manual (English) - Page 33
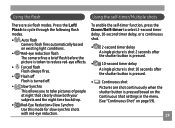
Using the flash
Using the self-timer/Multiple shots
There are shot continuously when the shutter button is pressed based on the Continuous Shot settings in the menu. (See "Continuous Shot" on existing light conditions.
• Red-eye reduction flash The camera fires a brief flash before the picture is taken to reduce red-eye effects.
• Forced...
User Manual (English) - Page 36

... sensitivity to light. Higher ISO pictures will naturally have more noise than lower ISO pictures.
3. Use the Left/Right buttons to select other hand, a lower ISO value is needed when in bright conditions. (The ISO setting is only available when the camera is in darker environments, a higher ISO value is required. On the other options...
User Manual (English) - Page 38
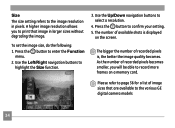
... higher image resolution allows you will be able to record more frames on the screen. Use the Up/Down navigation buttons to
highlight the Size function.
3.
The number of recorded ...are available to the various GE digital camera models
34 Press the button to confirm your setting. 5. Press the button to enter the Function
menu. 2. Size The size setting refers to the image resolution ...
User Manual (English) - Page 39

... are available: • Auto • Black & White • Sepia • Vivid
4. Press the button to confirm your pictures.
(The Color setting is only available when the camera is in the Manual mode). Use Up/Down to add artistic effects directly when taking shots. Color The color setting allows you to select an option. The following :
1.
User Manual (English) - Page 46

...pictures to disturb the subject being photographed. Clearly show background and atmosphere.
The flash shuts off automatically in order not to life. Vivid reproduction of 12 scene types to the optimal settings for photographing children and pets. You just need to select the right scene for the occasion and the camera... scene mode palette appears.
42
Use Up/Down/Left/Right to Scene mode.
User Manual (English) - Page 48
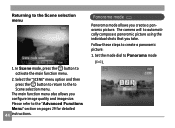
... to the Scene selection menu
1. Panorama mode
Panorama mode allows you configure image quality and image size. The camera will to the "Advanced Functions Menu" section on pages 29 for detailed 44 instructions. Please refer to automatically compose a panoramic picture using the individual shots that you take. Follow these steps to create a panoramic...
User Manual (English) - Page 63

... shots. To activate this mode, the camera must continuously hold the shutter button to use this mode in order to work in this function.
Cont. Four options are recorded. Shot (Continuous shot) Use this setting to perform continuous shooting. This may help you must have the self-timer for multiple shots already turned on (as...
User Manual (English) - Page 64
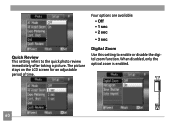
Digital Zoom
Use this setting to the quick photo review immediately after taking a picture. Four options are available: • Off • 1 sec • 2 sec
• 3 sec
Quick Review This setting refers to enable or disable the digital zoom function.
When disabled, only the optical zoom is enabled.
60 The picture stays on the LCD screen for an adjustable
period of time.
User Manual (English) - Page 65
... sec.
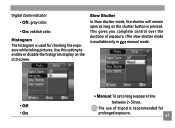
Use this setting to enable or disable the histogram display on the LCD screen.
Slow Shutter In Slow shutter mode, the shutter will remain open as long as the shutter button is used for
prolonged exposure.
61 The use of exposure. (The slow shutter mode is recommended for checking the exposure while taking pictures.
User Manual (English) - Page 79

...screen appears. 2.
This feature enables you are overseas. 1. Use the Up/Down navigation buttons to confirm.
75 Date/Time See "Setting the Date and Time" section on the LCD screen while ... and Always on your overseas trips. 3. World time The world time setting is a useful function on .
4. Use the Left/Right navigation buttons to select a city close to confirm. Press the button to ...
User Manual (English) - Page 84
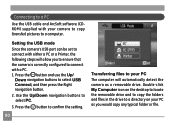
... confirm the setting. Use the Up/Down navigation buttons to select PC.
3. Setting the USB mode
Since the camera's USB port can be set to connect with either a PC or a Printer, the following steps will automatically detect the camera as you to ensure that the camera is correctly configured to connect with your camera to copy (transfer) pictures to...
User Manual (English) - Page 87
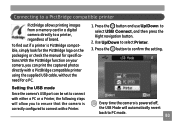
... compatible, simply look for the PictBridge logo on the packaging or check the manual for a PC.
1. Use Up/Down to confirm the setting. Connecting to a PictBridge compatible printer
PictBridge allows printing images from a memory card in a digital camera directly to select USB Connect, and then press the Right navigation button.
2.
Press the button and...
User Manual (English) - Page 92
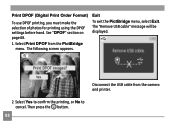
Then press the button.
88 Select Print DPOF from the camera and printer.
2. Exit
To exit the PictBridge menu, select Exit. Print DPOF (Digital Print Order Format)
To use DPOF printing, you must make the selection of photos for printing using the DPOF settings before hand. The following screen appears. See "DPOF" section on page 68...
Similar Questions

How Do You See The Pictures You've Taken On A G.e Digital Camera Model A1455
(Posted by luckyirishman 9 years ago)

Why Won't The Camera Take A Picture?
Sometimes when taking a picture, the camera will go to a pitch black screen when the shutter button ...
Sometimes when taking a picture, the camera will go to a pitch black screen when the shutter button ...
(Posted by jaiztmoe 11 years ago)

Can This Be Used As A Web Cam
can this camera be used as webcam
can this camera be used as webcam
(Posted by blackbear198123 11 years ago)
Why Can I Only Take 3 Pix Before It Says The Memory Is Full?
Why can I only take 3 pictures before it says the memory is full? Doesn't this have internal memory?...
Why can I only take 3 pictures before it says the memory is full? Doesn't this have internal memory?...
(Posted by prscire 12 years ago)
Download Picture From Camera To Computer
How to download picture from camera. I can't find this in the manual.
How to download picture from camera. I can't find this in the manual.
(Posted by giffcorr 13 years ago)