Dell XPS 8500 Support Question
Find answers below for this question about Dell XPS 8500.Need a Dell XPS 8500 manual? We have 2 online manuals for this item!
Question posted by carlrg on March 6th, 2014
Is Xps 8500 Expansion Slots
The person who posted this question about this Dell product did not include a detailed explanation. Please use the "Request More Information" button to the right if more details would help you to answer this question.
Current Answers
There are currently no answers that have been posted for this question.
Be the first to post an answer! Remember that you can earn up to 1,100 points for every answer you submit. The better the quality of your answer, the better chance it has to be accepted.
Be the first to post an answer! Remember that you can earn up to 1,100 points for every answer you submit. The better the quality of your answer, the better chance it has to be accepted.
Related Dell XPS 8500 Manual Pages
Owner's Manual (PDF) - Page 2

... change without the written permission of Dell Inc. Other trademarks and trade names may be used in this text: Dell™, the DELL logo, and XPS™ are either trademarks or registered trademarks of data, and tells you make better use of Dell Inc. Bluetooth® is strictly forbidden. A00 Trademarks...
Owner's Manual (PDF) - Page 19
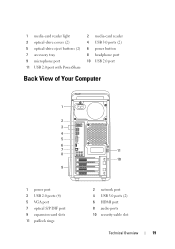

...-card reader 4 USB 3.0 ports (2) 6 power button 8 headphone port 10 USB 2.0 port
Back View of Your Computer
1
2 3 4 5 6 7 8
9
1 power port 3 USB 2.0 ports (4) 5 VGA port 7 optical S/P DIF port 9 expansion-card slots 11 padlock rings
11 10
2 network port 4 USB 3.0 ports (2) 6 HDMI port 8 audio ports 10 security-cable...
Owner's Manual (PDF) - Page 23
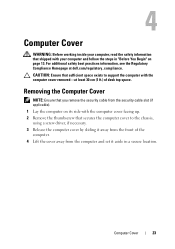

Computer Cover
23
Removing the Computer Cover
NOTE: Ensure that you remove the security cable from the security cable slot (if applicable). 1 Lay the computer on its side with your computer, read the safety information that shipped with the computer cover facing up. 2 Remove the ...
Owner's Manual (PDF) - Page 25
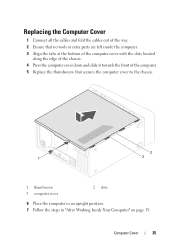

... left inside the computer. 3 Align the tabs at the bottom of the computer cover with the slots located
along the edge of the chassis. 4 Press the computer cover down and slide it towards ...that secures the computer cover to the chassis.
3
1
2
1 thumbscrew 3 computer cover
2 slots
6 Place the computer in an upright position. 7 Follow the steps in "After Working Inside Your Computer" on page ...
Owner's Manual (PDF) - Page 28
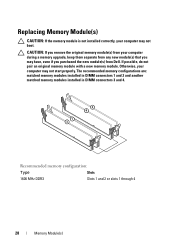

... are: matched memory modules installed in DIMM connectors 1 and 2 and another matched memory modules installed in DIMM connectors 3 and 4. Recommended memory configuration:
Type
Slots
1600 MHz DDR3
Slots 1 and 2 or slots 1 through 4
28
Memory Module(s)
CAUTION: If you remove the original memory module(s) from your computer during a memory upgrade, keep them separate from...
Owner's Manual (PDF) - Page 31
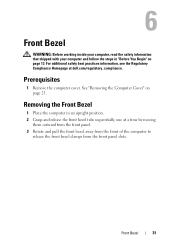

... front panel. 3 Rotate and pull the front bezel away from the front of the computer to
release the front bezel clamps from the front panel slots. Prerequisites
1 Remove the computer cover.
Owner's Manual (PDF) - Page 33
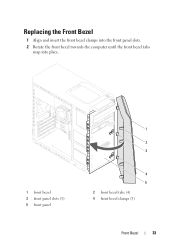

Replacing the Front Bezel
1 Align and insert the front bezel clamps into the front panel slots. 2 Rotate the front bezel towards the computer until the front bezel tabs
snap into place.
1 front bezel 3 front panel slots (3) 5 front panel
1
2 3
4 5 2 front bezel tabs (4) 4 front bezel clamps (3)
Front Bezel
33
Owner's Manual (PDF) - Page 39
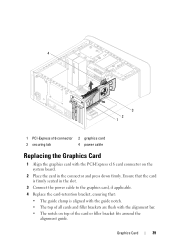

Graphics Card
39 Ensure that the card is firmly seated in the slot.
3 Connect the power cable to the graphics card, if applicable.
4 Replace the card-retention bracket, ensuring that:
• The guide clamp is aligned with the ...
Owner's Manual (PDF) - Page 45
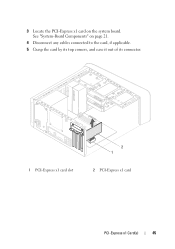

3 Locate the PCI-Express x1 card on page 21.
4 Disconnect any cables connected to the card, if applicable.
5 Grasp the card by its top corners, and ease it out of its connector.
1 PCI-Express x1 card slot
2 1
2 PCI-Express x1 card
PCI-Express x1 Card(s)
45 See "System-Board Components" on the system board.
Owner's Manual (PDF) - Page 46


Replacing the PCI-Express x1 Card(s)
1 Place the PCI-Express x1 card in the slot.
2 1
1 PCI-Express x1 card slot
2 PCI-Express x1 card
2 Replace the card-retention bracket, ensuring that:
&#...the system board and press down firmly. Ensure that the PCI-Express x1 card is fully seated in the slot on top of the card or filler bracket fits around the
alignment guide. 3 Replace the screw that ...
Owner's Manual (PDF) - Page 49
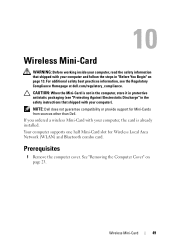

Your computer supports one half Mini-Card slot for Mini-Cards from sources other than Dell.
NOTE: Dell does not guarantee compatibility or provide support for Wireless Local Area Network (WLAN) and Bluetooth ...
Owner's Manual (PDF) - Page 51
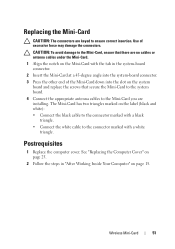

... or antenna cables under the Mini-Card.
1 Align the notch on the Mini-Card with a white triangle. Use of the Mini-Card down into the slot on page 25.
2 Follow the steps in the system-board connector.
2 Insert the Mini-Card at a 45-degree angle into the system-board connector.
3 Press...
Owner's Manual (PDF) - Page 57
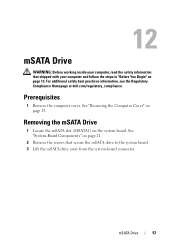

Removing the mSATA Drive
1 Locate the mSATA slot (MSATA1) on page 23. Prerequisites
1 Remove the computer cover. See "System-Board Components" on page 21.
2 Remove the screws that shipped with your computer, read ...
Owner's Manual (PDF) - Page 58
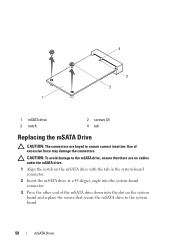

... angle into the system-board connector.
3 Press the other end of excessive force may damage the connectors. Use of the mSATA drive down into the slot on the system board and replace the screws that there are keyed to the system board.
58
mSATA Drive
Owner's Manual (PDF) - Page 75
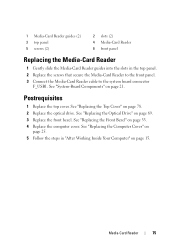

...-Card Reader
75 1 Media-Card Reader guides (2) 3 top panel 5 screws (2)
2 slots (2) 4 Media-Card Reader 6 front panel
Replacing the Media-Card Reader
1 Gently slide the Media-Card Reader guides into the... slots in "After Working Inside Your Computer" on page 15.
See "Replacing the Front Bezel"...
Owner's Manual (PDF) - Page 77
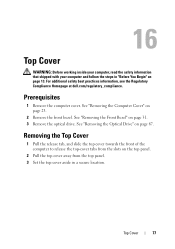

... Top Cover
1 Pull the release tab, and slide the top cover towards the front of the computer to release the top-cover tabs from the slots on the top panel.
2 Pull the top cover away from the top panel. 3 Set the top cover aside in "Before You Begin" on page 23...
Owner's Manual (PDF) - Page 78


5 4 3 2
1
1 slots 3 top-cover tabs 5 top cover
2 release tab 4 top panel
Replacing the Top Cover
1 Align the tabs on the top cover with the slots on the top panel. 2 Press and slide the top cover towards the back of the computer, until it
clicks into place.
78
Top Cover
Owner's Manual (PDF) - Page 86


...-Board Components" on page 21.
86
Front USB Panel 1
2 3
4
1 front USB panel clamp slot 3 front USB panel
2 clamps (2) 4 screw
Replacing the Front USB Panel
1 Align and slide the front USB panel clamps into the front USB panel clamp slot.
2 Replace the screw that secures the front USB panel to the front panel...
Owner's Manual (PDF) - Page 90


See "System-Board Components" on page 21.
2 Press the power button module tabs and lift the power button module to release it from the system board connector, F_PANEL. Removing the Power Button Module
1 Disconnect the power button module cable from the top panel.
1 2 3 4
1 cable 3 power button module tabs (4)
90
Power Button Module
2 power button module 4 slot
Owner's Manual (PDF) - Page 91
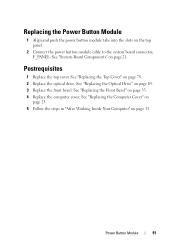

... power button module cable to the system board connector, F_PANEL. Replacing the Power Button Module
1 Align and push the power button module tabs into the slots on page 21. Power Button Module
91 See "Replacing the Optical Drive" on page 33. 4 Replace the computer cover.
Postrequisites
1 Replace the top cover. See...
Similar Questions
Xps 8500 Cd Drive
How do you open the cd drive on a XPS 8500 computer?
How do you open the cd drive on a XPS 8500 computer?
(Posted by pplus10 11 years ago)

