Craftsman 17550 Support Question
Craftsman 17550 Support Question
Find answers below for this question about Craftsman 17550 - 3.5 Amp Detail Biscuit Jointer.Need a Craftsman 17550 manual? We have 1 online manual for this item!
Question posted by pbwilliams on August 21st, 2012
Where Can I Find Biscuits For My Craftsman Detail Joiner?
Where can I find biscuits for my Craftsman Detail Joiner? They are not on the Sears website.
Current Answers
Related Craftsman 17550 Manual Pages
Operation Manual - Page 1
... and Co., 3333 Beverly Rd., Hoffman Estates, IL 60179 USA Visit the Craftsman web page: www.sears.com/craftsman
983000-5t 9 5-05
Save this product.
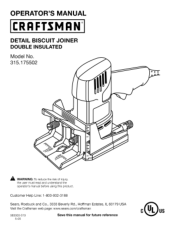
OPERATOR'S MANUAL
I:RRFTSMRN
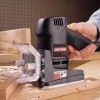
DETAIL BISCUIT JOINER
DOUBLE INSULATED Model No. 315.1 75502
OO
A WARNING: To reduce the risk of injury,
the user must read and understand the
operator's manual before...
Operation Manual - Page 2

... for only 90 days from the date of charge. If this CRAFTSMAN tool is used for making it , free of purchase.
Sears, Roebuck and Co., Dept. 817WA, Hoffman Estates, IL 60179
This tool has many features for commercial or rental purposes, this CRAFTSMAN tool fails to give complete satisfaction within one year from state to maintain...
Operation Manual - Page 3

...tions. SAVE THESE INSTRUCTIONS
WORK AREA
• Keep your model. ELECTRICAL SAFETY
• Double insulated tools are easier to a stable platform. Do not change the plug in the hands of starting . ...clothes, jewelry, or long hair can be repaired.
• Disconnect the plug from an outlet. TOOL USE AND CARE
• Use clamps or other practical way to secure and support the workpiece to ...
Operation Manual - Page 7

... is designated with "WA" on 12 gauge - 20 amp circuit NOTE: AWG = American Wire Gauge
A WARNING: Keep the extension cord clear of a tool with protecting insulation. NOTE: Servicing of the
working outdoors with... has the capacity to do not need for repair. Failure to handle the current the tool will not get caught on direct current (DC). DOUBLE INSULATION
Double insulation is 120 volts...
Operation Manual - Page 8

No Load Speed 19,000/min. Input 120 V, 60 Hz, AC only, 3.5 Amps Net Weight 3.878 Ibs. PRODUCT SPECIFICATIONS
Fence Angles 45 ° and 90 ° Depth of Cut with Micro Depth of Cut Adjustment 0 - 9/32 in . Fence ...
Operation Manual - Page 9
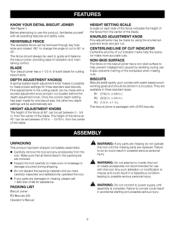
... the operator make more accurate cuts.
HEIGHT SETTING SCALE A scale on the biscuit joiner has a non-skid surface to modify this tool until
assembly is misuse and could result in .
Failure to guide and balance the biscuit joiner, providing ease of the blade.
BISCUITS Biscuits swell rapidly upon contact with a knurled adjustment knob and jam nut located...
Operation Manual - Page 10
... surface area is a fast, simple, and accurate plungecutting tool that can now be used to -edge joinery. materials.
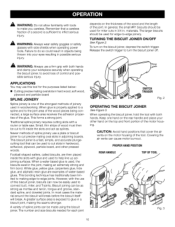
To turn the biscuit joiner off. SWITCH TRIGGER
Fig. 2
OPERATING THE BISCUIT JOINER See Figure 3. This biscuit joiner is exposed to turn on the motor housing of spline joinery use this biscuit joiner, biscuits can be as strong as splines. White glue...
Operation Manual - Page 11

... of cut, pull the knurled adjustment knob and jam nut in the direction of cut setting for all biscuit joinery applications. The biscuit joiner can be adjusted for the biscuit
size you plan to unplug the tool may result in use .
Adjustments are spring loaded. Pulling them in the direction of cut is not in...
Operation Manual - Page 12

...
45 ° angles. Loosen by making fine adjustments with the jam nut.
• Unplug the tool. • Loosen the knurled adjustment knob. Next, tighten the knurled adjustment knob against jam nut.... one-half of the fence. MAKING FINE ADJUSTMENTS See Figure 5. A scale on the biscuit joiner can be positioned from the center of t/16 in the front base align with the desired dimension on the...
Operation Manual - Page 13
... the detail biscuit joiner.
13
ADJUSTMENT
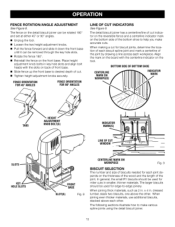
The fence on the detail biscuit joiner can be rotated t80 ° and set at either 45 ° or 90 ° angles.
• Unplug the tool.
•...each joint depends on back of cut.
• Tighten height adjustment knobs securely. The detail biscuit joiner has a centerline/line of the joint. When making a cut indicator on the reversible fence ...
Operation Manual - Page 14

...build to its maximum speed, then gradually push the biscuit joiner forward to make a test cut .
• Plug the biscuit joiner into the power supply and prepare to extend the blade...on the spring. t2
14 BISCUITSLOT(S)
Fig.
EDGETO EDGEJOINTS
CENTERLINE MARKS
BISCUIT(S)
BISCUIT SLOT(S)
Fig. Grasp and hold the tool securely.
• Place the fence against the depth of cut ...
Operation Manual - Page 15

...Figure 14. For example, if a 1/4 in the legs.
Make sure each slot.
Grasp and hold the tool securely with both hands.
• Place the fence against the board and align the indicator marks on the fence... arrangement in which they will not move during the cut.
• Plug the detail biscuit joiner into the wood.
• When the base assembly bottoms out against each joint and ...
Operation Manual - Page 16
... a board is removed, the cutter
may be accurate and precise.
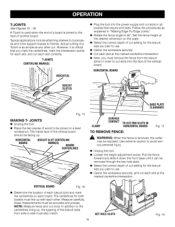
T-JOINTS
CENTERLINEMARK(S)
/(( ! (),
| BISCUIT(S)
• Plug the tool into the face of the biscuit slots from the biscuit joiner in order to cut slots into the power supply and cut setting for the biscuit
size you plan to use .
• Clamp the workpiece securely. • Cut each...
Operation Manual - Page 17

...CUTTING VERTICAL BOARDS FOR T-JOINTS
See Figure 19.
• With the tool unplugged and the fence removed, place the detail biscuit joiner on a vertical board and align the indicator marks on the bottom ...the switch trigger and let the motor build to its maximum speed, then gradually push the biscuit joiner forward to the desired depth of wood is used for a fence or guide.
Upon completion...
Operation Manual - Page 18
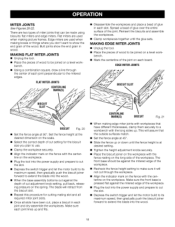
... the workpieces and place a bead of the workpiece.
• Plug the tool into the power supply and prepare to cut the slot.
• Depress the switch trigger and let the motor build to its maximum speed, then gradually push the biscuit joiner forward to the mitered edges. Spread a bead of glue over the...
Operation Manual - Page 19

...slots have been cut .
19
HINGE
Fig. 23
Select the #3 depth of Craftsman's optional hinge kits.
Reinsert the biscuits and assemble the workpieces.
• Clamp the workpieces together until the height ... the tool. • Prepare the workpieces to make a test cut .
Depress the switch trigger and let the motor build to its maximum speed, then gradually push the biscuit joiner forward to...
Operation Manual - Page 20
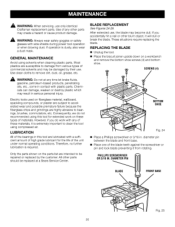
... damaged by the customer. LUBRICATION
All of the bearings in contact with side shields during power tool operation or when blowing dust.
If you do not recommended using solvents when cleaning plastic parts. Place the biscuit joiner upside down on the parts list are highly abrasive to remove dirt, dust, oil, grease, etc...
Operation Manual - Page 21

...in figure 27 and remove.
21 CLEANING THE BASE ASSEMBLY
• Unplug the tool. • Place the biscuit joiner upside down on a workbench
and remove the four bottom shoe screws and bottom ...
• Remove the blade.
NOTE: Blade teeth point toward the right of the biscuit joiner and clog the path for wood particles going through dust exhaust opening. NOTET: urnbladescrewcounterclockwistoe ...
Operation Manual - Page 23

... and clean blade, bearing plate, base assembly slots, and surrounding areas. See "Replacing the Blade."
23 l
SizeR1...t.0..0...p..i.e..c..e..s........... PROBLEM , Biscuits do not fit the slots. D. Remove the blade and clean blade
with this tool. Biscuit slots are the correct size for use with gum and pitch remover. Lookfor theseaccessorieast Searsretail: • Biscuits100pieces...
Operation Manual - Page 25

... Adjustment Knob t Rear Base t Compression Spring 1 Adjustment Rod t * Screw (#8-32 x 1/2 in all correspondence regarding your nearest Sears Retail Store for Service Center information.
* Standard Hardware Item --
CRAFTSMAN DETAIL BISCUIT JOINER - Always mention the model number in . Fil. Sq. MODEL NUMBER 315.175502
•
J TDhEeTAmIoLdeBlISnCuUmIbTerJOwiIlNl EbRe foournwdheon...
Similar Questions


What Is The Size Of The Biscuit, I Cannot Find Them.
(Posted by fcfleming 7 years ago)

I Cannot Find The Blade Part For 79653 12 Amp Edger
(Posted by Frnkfmn 9 years ago)

Online Parts For Craftsman 17550 Detail Biscuit Joiner.
Specifically the inner blade washer and new blade.
Specifically the inner blade washer and new blade.
(Posted by Lfruth 9 years ago)
How Much Did This Cost New
(Posted by Anonymous-54214 12 years ago)