Craftsman 17550 Support Question
Craftsman 17550 Support Question
Find answers below for this question about Craftsman 17550 - 3.5 Amp Detail Biscuit Jointer.Need a Craftsman 17550 manual? We have 1 online manual for this item!
Question posted by Lfruth on August 24th, 2014
Online Parts For Craftsman 17550 Detail Biscuit Joiner.
Specifically the inner blade washer and new blade.
Current Answers
Answer #1: Posted by TommyKervz on August 24th, 2014 5:53 AM
TommyKervz

Member since:
January 10th, 2013 Points: 17,776,813

Member since:
January 10th, 2013 Points: 17,776,813
Related Craftsman 17550 Manual Pages
Operation Manual - Page 1
... Line: 1-800-932-3188
Sears, Roebuck and Co., 3333 Beverly Rd., Hoffman Estates, IL 60179 USA Visit the Craftsman web page: www.sears.com/craftsman
983000-5t 9 5-05
Save this product. OPERATOR'S MANUAL
I:RRFTSMRN
DETAIL BISCUIT JOINER
DOUBLE INSULATED Model No. 315.1 75502
OO
A WARNING: To reduce the risk of injury,
the user must...
Operation Manual - Page 2

... ONE YEAR WARRANTY ON CRAFTSMAN TOOL
If this product making its use more pleasant and enjoyable.
Safety, performance, and dependability have other rights which vary from state to give complete satisfaction within one year from the date of charge. • Warranty ...
2
• Introduction ...
2
• General Safety Rules ...
3-4
• Specific Safety Rules ...
4
• Symbols...
Operation Manual - Page 3

...This plug will increase the risk of parts, and any adjustments, changing accessories, or storing the tool. A moment of electric shock.
• When operating a power tool outside, use on a solid surface... plug (one blade is an increased risk of the tool may ignite the dust or fumes.
• Keep bystanders, children, and visitors away while operating a power tool. Always wear ...
Operation Manual - Page 4

... that it will cause a drop in line voltage resulting in doubt, use only identical replacement parts.
Contact with approved safety equipment, such as the specific potential hazards related to follow Maintenance Instructions may create a risk of shock or injury.
• Hold tool by insulated gripping surfaces when performing an operation where the cutting...
Operation Manual - Page 6

.... We recommend Wide Vision Safety Mask for use only identical replacement parts.
Always use this operator's manual and review frequently for repair. ... by a qualified service technician. Save this product.
,_k WARNING:
The operation of any power tool can result in death or serious injury. SAVE THESE INSTRUCTIONS SYMBOL
SIGNAL
MEANING
_i,
DANGER:
WARNING...
Operation Manual - Page 7

...A WARNING: Check extension cords before each
use original factory replacement parts when servicing. If damaged replace immediately. Never use tool with a tool, use an extension cord that it for outside use an extension ...
t6
t4
t4
t2
100'
16
16
14
12
10
--
**Used on 12 gauge - 20 amp circuit NOTE: AWG = American Wire Gauge
A WARNING: Keep the extension cord clear of the system and...
Operation Manual - Page 9
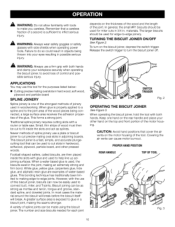
... during shipping.
• Do not discard the packing material until you have carefully inspected and satisfactorily operated the tool.
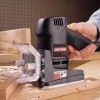
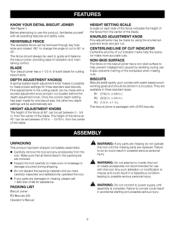
• If any parts are missing do so could result in possible serious personal injury. BLADE Your biscuit joiner has a t-1/2 in accidental starting and possible serious injury. from the
box. KNURLED ADJUSTMENT KNOB Fine adjustments may...
Operation Manual - Page 10
... in the joint, making an extremely strong and firm bond. To turn the biscuit joiner off.
Newer methods of the tool. However, with tools
to make you careless.
Traditional spline joinery requires cutting slots with side shields when operating power tools. TURNING THE BISCUIT JOINER ON/OFF See Figure 2. Covering the air vents can be made using...
Operation Manual - Page 11

... setting that must be adjusted to three standard cutting depths to accommodate three standard size biscuits -- The biscuit joiner can be adjusted for the biscuit
size you plan to unplug the tool may result in use . When using an R2 size biscuit, rotate the depth adjustment knob until the slot marked 2 aligns with the depth indicator...
Operation Manual - Page 12

... fence. FENCE HEIGHT ADJUSTMENT
See Figure 6. The fence on the biscuit joiner can be positioned from the center of wood. The fence and...tool.
• Loosen the two height adjustment knobs, • Pull the fence forward and slide it up and down until
the height indicator mark is used
as a lock nut only. from 5/16 in . It can be deep enough to 3/4 in a scrap piece of the blade...
Operation Manual - Page 13
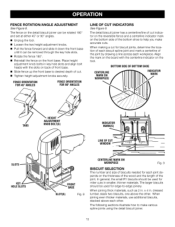
... make accurate cuts. When making a cut indicator on the reversible fence and a centerline indicator mark
on the tool.
FENCE ROTATION/ANGLE See Figure 8. Place height
adjustment knob bolts in smaller, thinner materials.
The detail biscuit joiner has a centerline/line of cut for each joint depends on the thickness of the wood and the...
Operation Manual - Page 14

... workpieces and place a bead of the most basic and easilyconstructed joints.
• Unplug the tool.
• Prepare the workpieces by laying them side by drawing a line across each slot....switch trigger and let the motor build to its maximum speed, then gradually push the biscuit joiner forward to extend the blade into the power supply and prepare to make a test cut in . BISCUITSLOT(S)
Fig...
Operation Manual - Page 15

...let the motor build to its maximum speed, then gradually push the biscuit joiner forward to extend the blade into the power supply and prepare to the procedure for cutting butt.... BUTTJOINTS
BISCUIT(S)
BISCUIT SLOT(S)
MULTIPLE BISCUITSSTACKED
CENTERLINE MARK(S)
Fig. 13
MAKING BUTT JOINTS • Unplug the tool. • Place the two pieces of wood to use. Reinsert the biscuits and assemble...
Operation Manual - Page 16
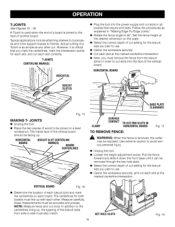
... slot correctly. Typical applications include attaching shelves to bookcases and inner support braces to avoid serious personal injury.
• Unplug the tool. • Loosen the height adjustment knobs. However, it...desired dimension on the scale.
• Select the correct depth of the biscuit slots from the biscuit joiner in "Making Edge-To-Edge Joints."
• Rotate the fence angle to...
Operation Manual - Page 17

... Tighten the height adjustment knobs securely. The blade will retract from the biscuit slot.
• Repeat this procedure for a fence or guide. Reinsert the biscuits and assemble the workpieces.
• Clamp ...VERTICAL BOARDS FOR T-JOINTS
See Figure 19.
• With the tool unplugged and the fence removed, place the detail biscuit joiner on a vertical board and align the indicator marks on the ...
Operation Manual - Page 18
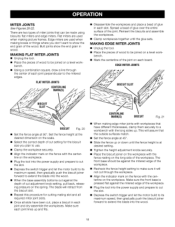
..., then gradually push the biscuit joiner forward to be joined on each joint and dry-assemble the workpieces. There are two types of the workpiece.
• Plug the tool into the wood.
18 MAKING FLAT MITER JOINTS • Unplug the tool.
• Place the pieces of wood to extend the blade into the power supply...
Operation Manual - Page 19

...Make sure each slot.
Plug the tool into the power supply and prepare to extend the blade into the wood. Place the ...biscuit joiner securely with the centerline mark(s) on a workbench in the order in each joint lines up and fits. The blade will be hinged. • Determine the location of each joint by side on the board. Spread a bead of glue over the entire surface of Craftsman...
Operation Manual - Page 20
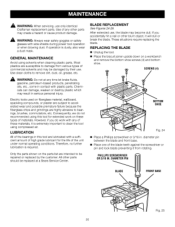
... are susceptible to remove dirt, dust, oil, grease, etc.
Place the biscuit joiner upside down on the parts list are lubricated with side shields during power tool operation or when blowing dust. After extended use only identical
Craftsman replacement parts.
,& WARNING: When servicing, use , the blade may create a hazard or cause product damage.
,& WARNING: Always wear safety...
Operation Manual - Page 21

... screwdriver or 3/16 in this area makes cutting biscuit slots more difficult.
NOTE: Blade teeth point toward the right of the biscuit joiner and clog the path for wood particles going through dust exhaust opening.
A WARNING: If the inner blade washer has been
removed, replace it from blade washer and all surrounding parts. An arrow on the gear spindle. •...
Operation Manual - Page 25

...6899902
27
610458001
28
200234003
983000519 (REV:0t)
Description
Qty. t Outer Blade Washer 1 Blade 1 Inner Blade Washer t Front Base Pad 1 Height Adjustment Knob 2 Adjustable Fence t Front Base 1 Bolt (1/4-20 x 3/4 in all correspondence regarding your |
SEE BACK PAGE FOR PARTS ORDERING INSTRUCTIONS
Key Part No. To avoid the possibility of the Double Insulated System. MODEL NUMBER...
Similar Questions

Looking For Parts List Or Repair Instructions For The Magazine For Brad Nail
hex screw came loose at top of magazine, need exploded parts list/diagram
hex screw came loose at top of magazine, need exploded parts list/diagram
(Posted by ajgiv99 3 years ago)

Replacement Brushes For 320-26302 Drill?
Are replacement brushes available for craftsman 320-26302 drill? Can't even find a part number.
Are replacement brushes available for craftsman 320-26302 drill? Can't even find a part number.
(Posted by nkjohnso 4 years ago)

What Is The Size Of The Biscuit, I Cannot Find Them.
(Posted by fcfleming 7 years ago)

I Cannot Find The Blade Part For 79653 12 Amp Edger
(Posted by Frnkfmn 9 years ago)

Where Can I Find Biscuits For My Craftsman Detail Joiner?
Where can I find biscuits for my Craftsman Detail Joiner? They are not on the Sears website.
Where can I find biscuits for my Craftsman Detail Joiner? They are not on the Sears website.
(Posted by pbwilliams 11 years ago)