Craftsman 17550 - 3.5 Amp Detail Biscuit Jointer Support and Manuals
Get Help and Manuals for this Craftsman item
View All Support Options Below
Free Craftsman 17550 manuals!
Problems with Craftsman 17550?
Ask a Question
Free Craftsman 17550 manuals!
Problems with Craftsman 17550?
Ask a Question
Most Recent Craftsman 17550 Questions

Online Parts For Craftsman 17550 Detail Biscuit Joiner.
Specifically the inner blade washer and new blade.
Specifically the inner blade washer and new blade.
(Posted by Lfruth 9 years ago)

Where Can I Find Biscuits For My Craftsman Detail Joiner?
Where can I find biscuits for my Craftsman Detail Joiner? They are not on the Sears website.
Where can I find biscuits for my Craftsman Detail Joiner? They are not on the Sears website.
(Posted by pbwilliams 11 years ago)
Popular Craftsman 17550 Manual Pages
Operation Manual - Page 1
...: 1-800-932-3188
Sears, Roebuck and Co., 3333 Beverly Rd., Hoffman Estates, IL 60179 USA Visit the Craftsman web page: www.sears.com/craftsman
983000-5t 9 5-05
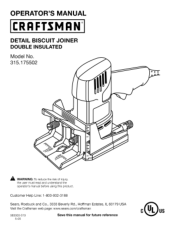
Save this product. OPERATOR'S MANUAL
I:RRFTSMRN
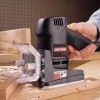
DETAIL BISCUIT JOINER
DOUBLE INSULATED Model No. 315.1 75502
OO
A WARNING: To reduce the risk of injury,
the user must read and understand...
Operation Manual - Page 6

...
attempt to use only identical replacement parts. SAVE THESE INSTRUCTIONS SERVICE
Servicing requires extreme care and knowledge and should be performed only by a qualified service technician. Before beginning power tool operation, always wear safety goggles, safety glasses with side shields. We recommend Wide Vision Safety Mask for repair.
Indicates a potentially hazardous situation, which...
Operation Manual - Page 9
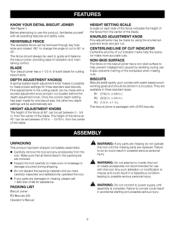
... parts are damaged or missing, please call t -800-932-3188 for assistance. KNOW YOUR DETAIL BISCUIT JOINER See Figure 1. Before attempting to use with 25 R3 biscuits.
PACKING LIST
Biscuit Joiner
R3 Biscuits (25) Operator's Manual
a, WARNING: If any accessories from the center of the blade. A WARNING: Do not connect to modify this tool.
Once the correct depth setting...
Operation Manual - Page 10
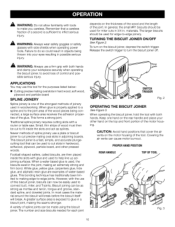
... 3/4 in woodworking. SWITCH TRIGGER
Fig. 2
OPERATING THE BISCUIT JOINER See Figure 3. •
•A
A WARNING: Do not allow familiarity with a router or table saw. A WARNING: Always use of this tool...hand on the thickness of the wood and the length of spline joinery use this biscuit joiner, biscuits can be used to -edge joinery.
CAUTION: Avoid hand positions that a careless ...
Operation Manual - Page 11

...marked 3 aligns with the depth indicator mark on the rear base. The biscuit joiner can be adjusted for the biscuit
size you plan to use .
Pulling them in the direction of cut is... Adjustments are spring loaded. A WARNING: Always unplug the tool when chang-
Rt, R2, and R3. SETTING DEPTH ADJUSTMENT KNOB See Figure 4.
• Unplug the tool. • Select the correct depth of cut...
Operation Manual - Page 12

...; angles. Loosen by making fine adjustments with a tab on the biscuit joiner can be moved up or down to adjust the position of the blade in the front base align with the jam nut.
• Unplug...the jam nut to 13/16 in increments of the workpiece.
Also periodically check the depth setting for a deeper cut.
• Once desired depth of adjustment. The fence on the backside of ...
Operation Manual - Page 14

... in the order in a scrap piece of cut adjustment knob setting, pull back, releasing pressure on the board.
• Depress the switch trigger and let the motor build to its maximum speed, then gradually push the biscuit joiner forward to extend the blade into the power supply and prepare to make your workpiece securely...
Operation Manual - Page 15

...cutting a butt joint as mentioned in the procedures for cutting butt joints, and cut setting to match the biscuit size you are planning to the desired offset and cut in each joint and dry... trigger and let the motor build to its maximum speed, then gradually push the biscuit joiner forward to extend the blade into the power supply and prepare to the procedure for cutting the slot in which...
Operation Manual - Page 16
...Determine the location of the biscuit slots from the biscuit joiner in order to 90 &#... the end of cut setting for the biscuit
size you mark the centerlines..., mark the intersection points for both
boards must also match.
16
KEYHOLESLOTS
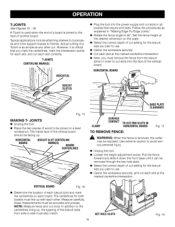
Fig. t8 T-JOINTS See Figures 15- 18. Typical applications include attaching shelves to bookcases and inner support...
Operation Manual - Page 17

...blade will retract from the biscuit slot.
• Repeat this procedure for the biscuit slot.
• Plug the tool into the wood.
17
Reinsert the biscuits and assemble the workpieces.
• Clamp the workpieces together until the glue sets... been cut adjustment knob setting, pull back, releasing ... the biscuit joiner forward to extend the blade into... place a biscuit in each joint and ...
Operation Manual - Page 18
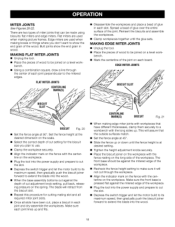
... maximum speed, then gradually push the biscuit joiner forward to extend the blade into the wood.
• When the base assembly bottoms out against the depth of cut through the center of the joint. bench.
• Mark the centerline of the workpiece.
• Recheck the fence height setting to make sure it will retract...
Operation Manual - Page 19

... against the depth of the joint. The blade will not move during the cut. Repeat this procedure for all hinge slots have been cut setting. Make sure each slot and dry-assemble ... Craftsman's optional hinge kits. Plug the tool into the wood.
Depress the switch trigger and let the motor build to its maximum speed, then gradually push the biscuit joiner forward to extend the blade ...
Operation Manual - Page 20
... shoe screws (4) and bottom shoe. All other blunt object, it from various types of the unit under normal operating conditions.
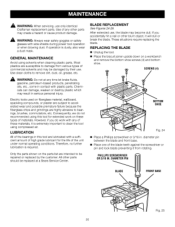
REPLACING THE BLADE
Unplug the tool.
Place the biscuit joiner upside down on the parts list are susceptible to be damaged by the customer. SCREWS(4)
i
I
i
I I
I
BOTTOM SHOE
I
Fig. 24
• Place a Phillips screwdriver or 3/16...
Operation Manual - Page 21

... figure 27 and remove.
21 A WARNING: If the inner blade washer has been
removed, replace it from blade washer and all surrounding parts.
diameter pin between the blade and front base.
• Place one of blade rotation.
• Tighten the blade screw securely. See "Replacing the Blade." • With the biscuit joiner still upside down on the gear spindle. • Secure...
Operation Manual - Page 25

...BACK PAGE FOR PARTS ORDERING INSTRUCTIONS
Key Part No. Cap) ........ May Be Purchased Locally Blade Screw (#8-32 ...Manual (not shown)
NOTE: "A"- To avoid the possibility of the Double Insulated System. MODEL NUMBER 315.175502
•
J TDhEeTAmIoLdeBlISnCuUmIbTerJOwiIlNl EbRe foournwdheon aorpdleartiengattraecphaeird ptaorttsh.e motor housing.
Fil. CRAFTSMAN DETAIL BISCUIT JOINER...
Craftsman 17550 Reviews
We have not received any reviews for Craftsman yet.